Configure the workspace
Set up identity, security, branding, and administrative access.
Manage programs
Create training programs and organise participants.
Invite members
Add candidates and examiners to your workspace.
The account that creates the institutional workspace receives administrative access. Keep its security and recovery information current.
Getting Started: Institution Account Registration and Workspace Setup
This section provides the end-to-end instructions for establishing your institution’s presence on the Clarilux platform. By following these steps, you will create your organizational account, secure your workspace, and gain administrative access to your dashboard.1. Registration
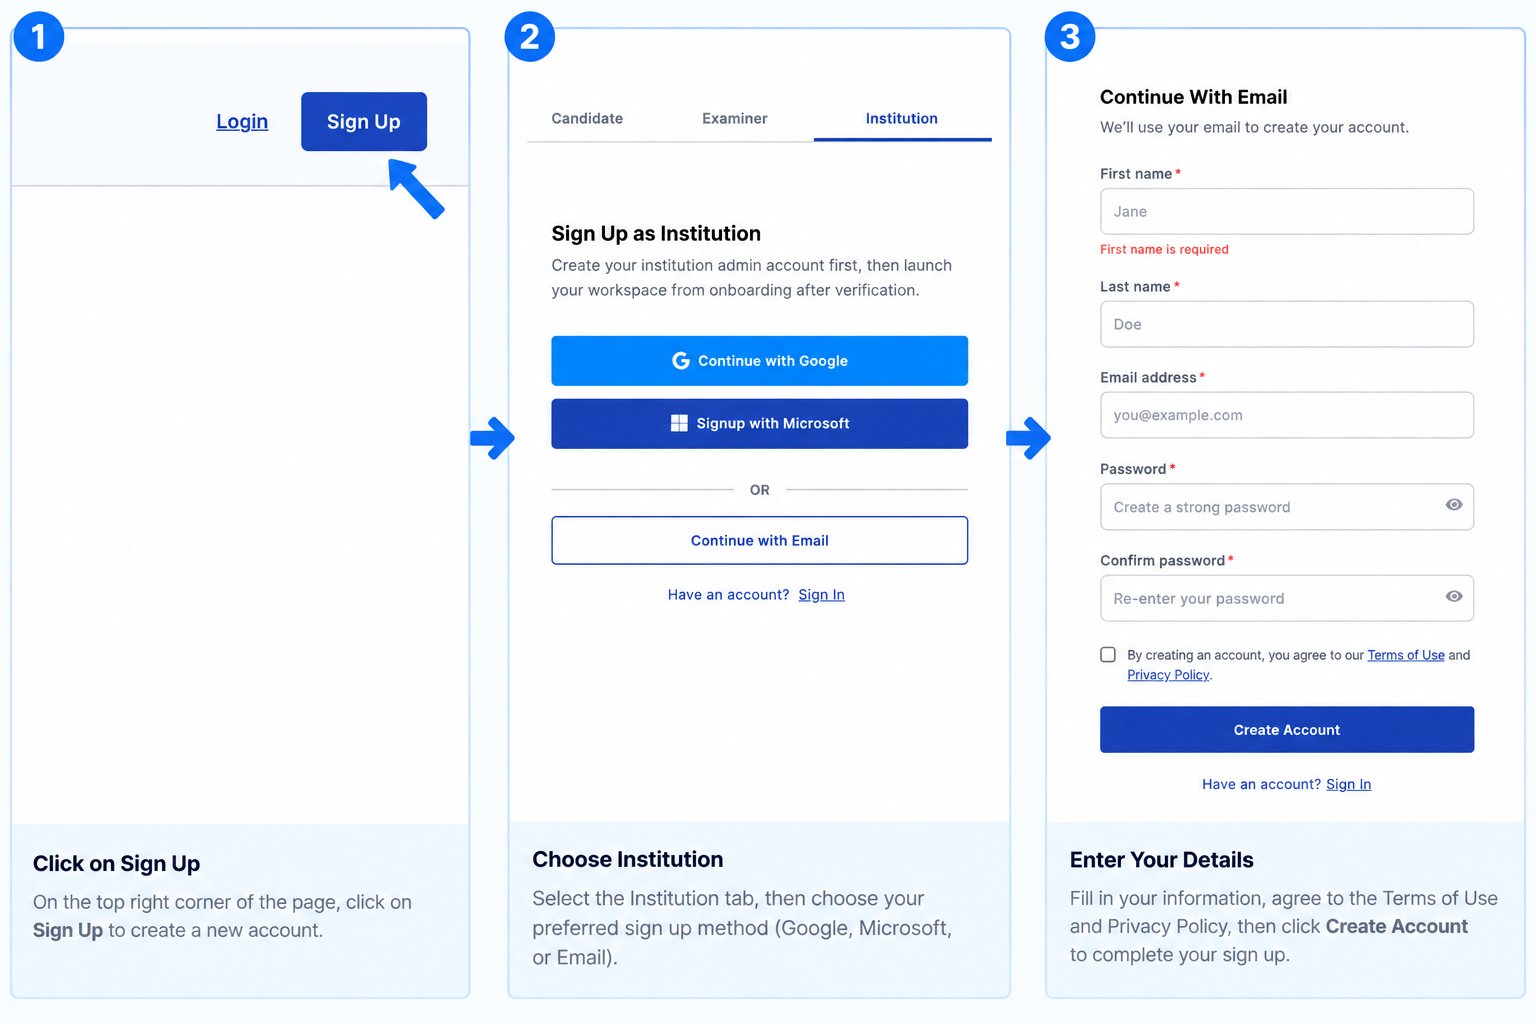
- Accessing the Platform: Navigate to the Clarilux landing page via your web browser and click Sign Up at the top right corner.
- Role Selection: Choose Institution from the registration categories to proceed with organizational setup.
- Creating Your Account:
- Sign up with Google, Microsoft or
- Sign up with E-mail.
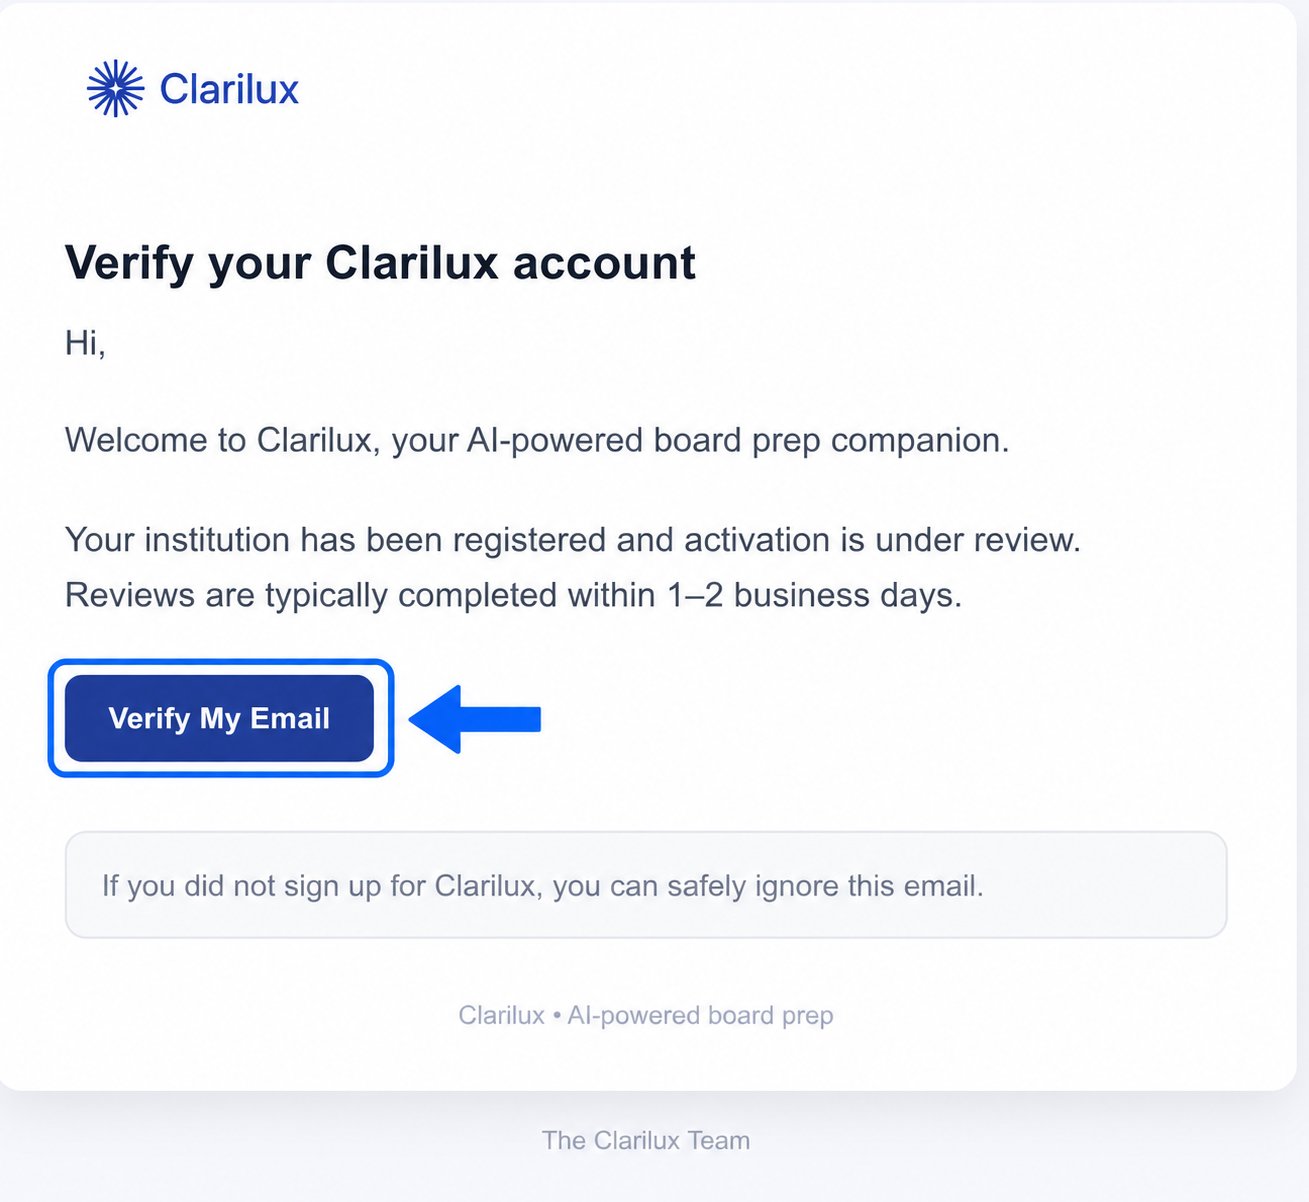
- Click the Go to sign in button on the confirmation page, or
- Return to your inbox and open the welcome email from Clarilux, then click the Start Learning button.
2. Sign-In and Initial Security
- Login: On the sign-in page, select continue with Google, Microsoft or Email, depending on which was used in signing up, enter your registered credentials, and Sign In.
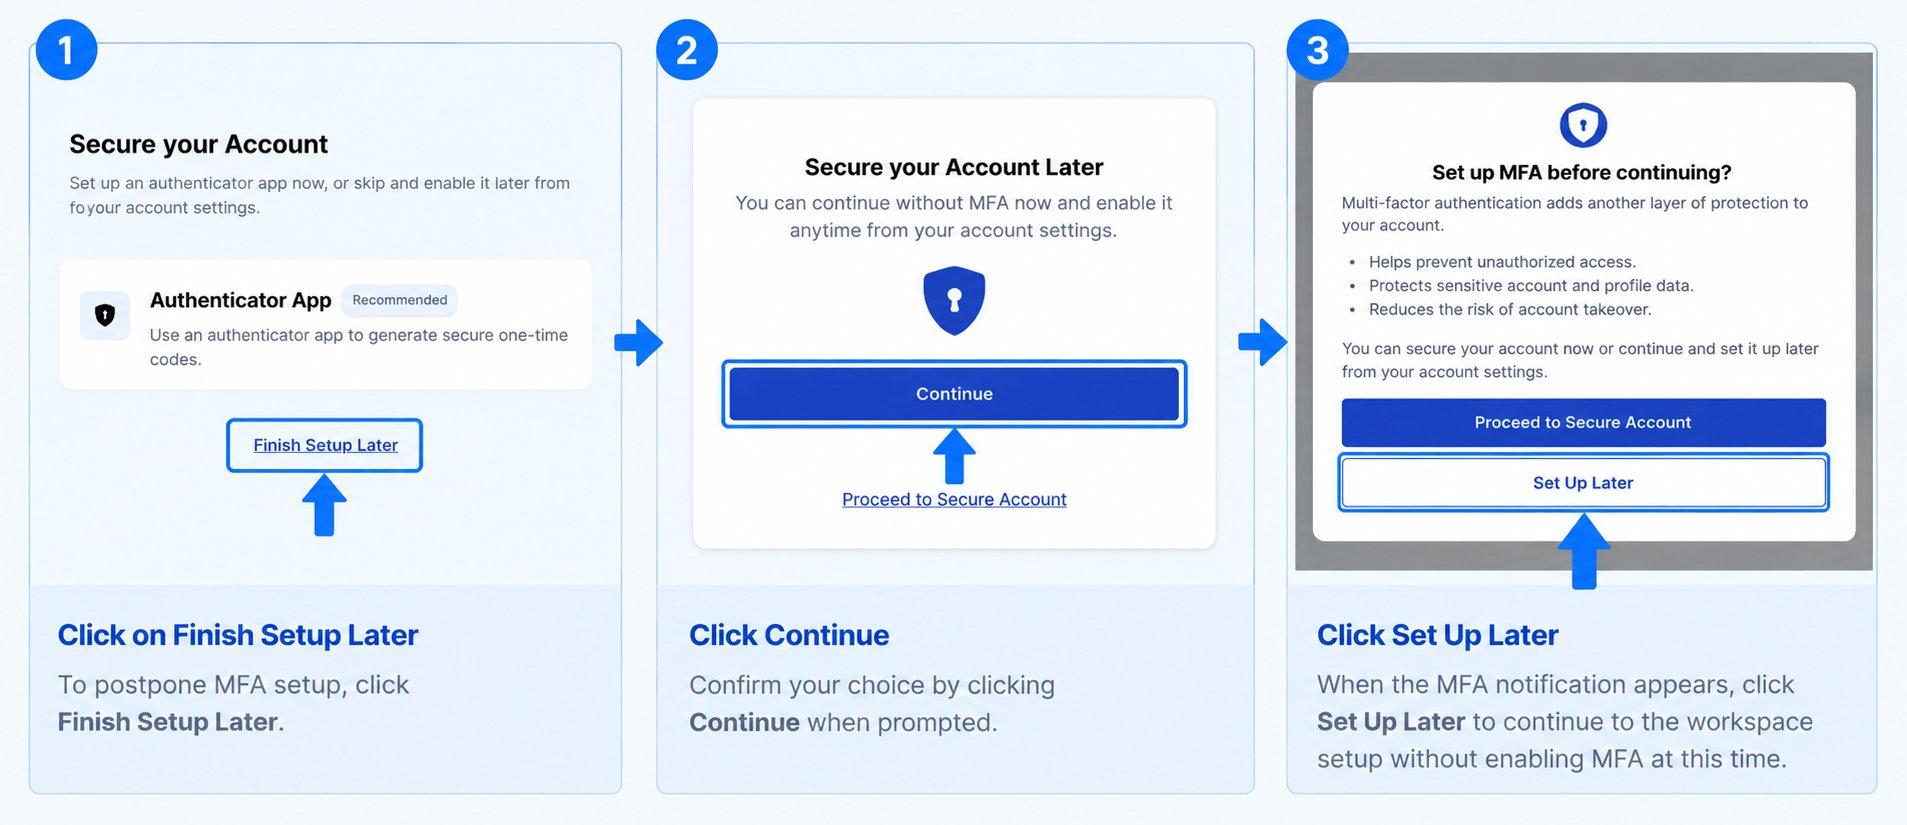
- MFA Configuration: You will be prompted to set up an authenticator app for enhanced security.
- To postpone this, click Finish Later.
- Confirm your choice by clicking Continue when prompted.
- When the secondary notification detailing the benefits of MFA appears, select Set up later to proceed to the workspace setup.
3. Workspace Configuration
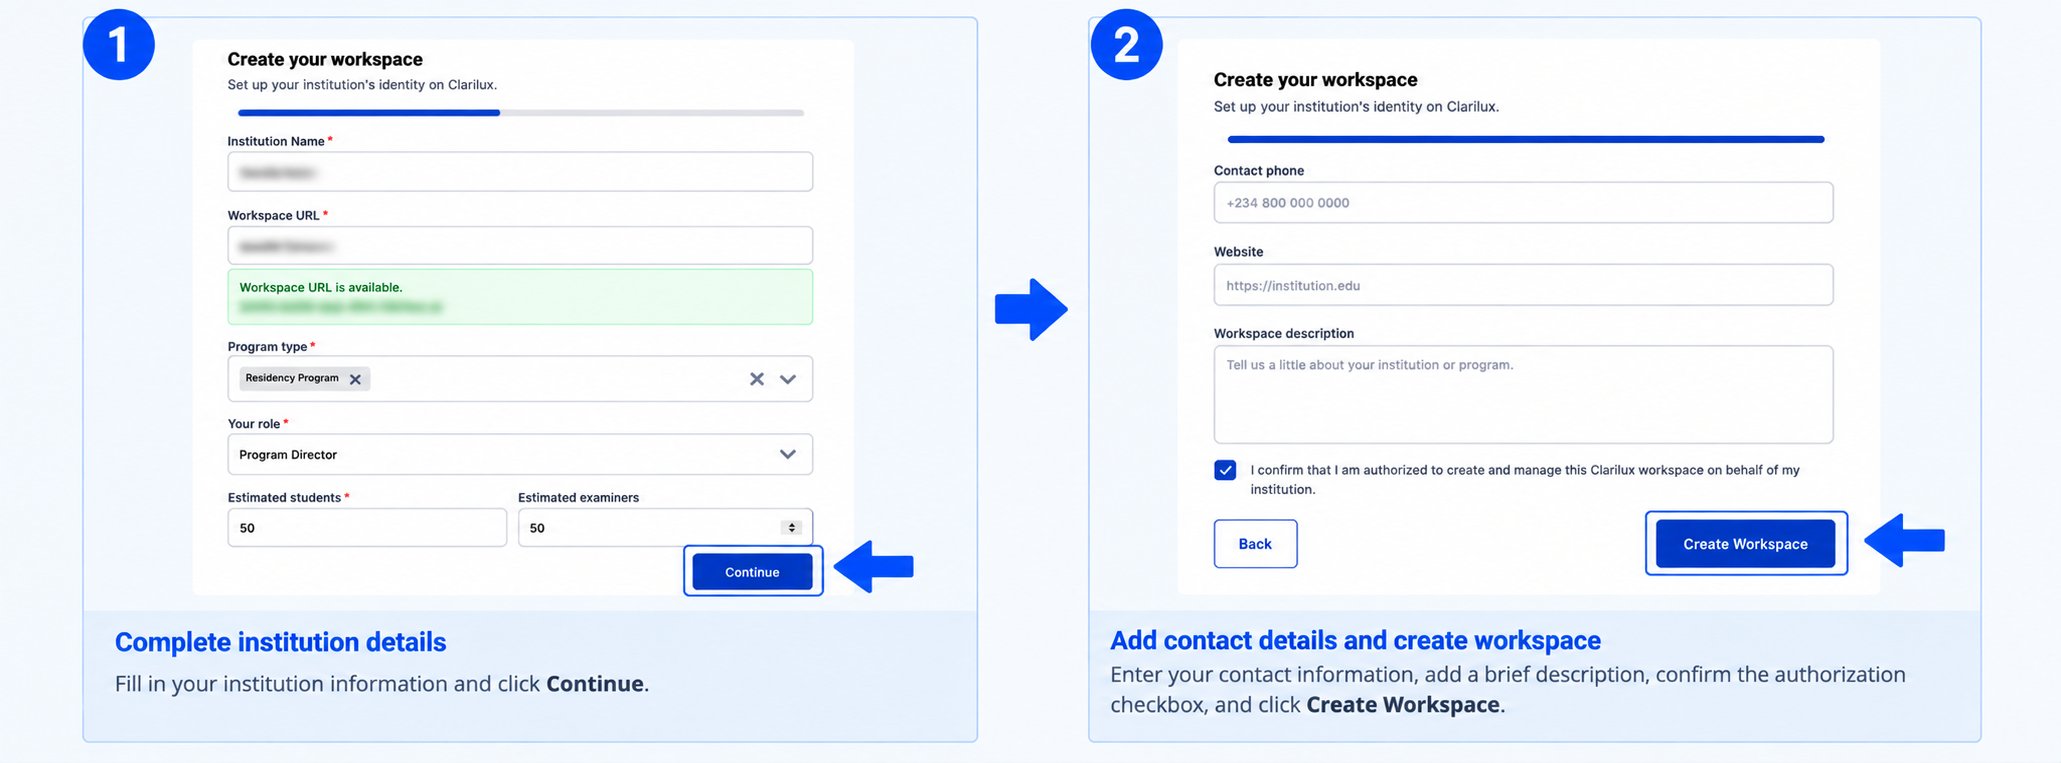
You will be directed to the workspace initialization form:- Institution Details: Enter your official Institution Name. A unique Workspace URL will be automatically generated and verified for availability.
- Program Scope: Select all applicable program types (e.g., Residency Program, Fellowship Program, or Academic Center).
- User Role: Select your specific designation (e.g., Program Director, Associate Program Director, Department Chair, Education Coordinator, or Other).
- Capacity Estimates: Input the approximate number of students and examiners that will be associated with your institution.
- Click Continue to move to the final verification step.
4. Finalizing Profile and Authorization
- Contact & Institution Details: Enter your Phone Number and the official Institution Website URL.
- Description: Add a brief description of your institution.
- Authorization: Check the box to confirm that you are authorized to create and manage the Clarilux workspace on behalf of your institution.
- Finalization: Click Create Account to complete the configuration.
5. Accessing Your Dashboard
- Upon finalization, you will be automatically redirected to your Clarilux Institution Dashboard.
- As the creator of the workspace, you are automatically assigned the Admin role, granting you full management privileges for your institution.
Dashboard
The Clarilux Institution Dashboard is your centralized operations hub. Upon your initial login, you will notice a notification indicating that your institution is pending verification, which typically takes up to 48 hours. Please note that session functionality will automatically unlock once your workspace has been verified. First-time login: Guided tour When you land on the dashboard for the first time, a guided tour appears to walk you through the key areas of your dashboard. Click Next to move through each step, or click Skip at any time to exit the tour and explore on your own.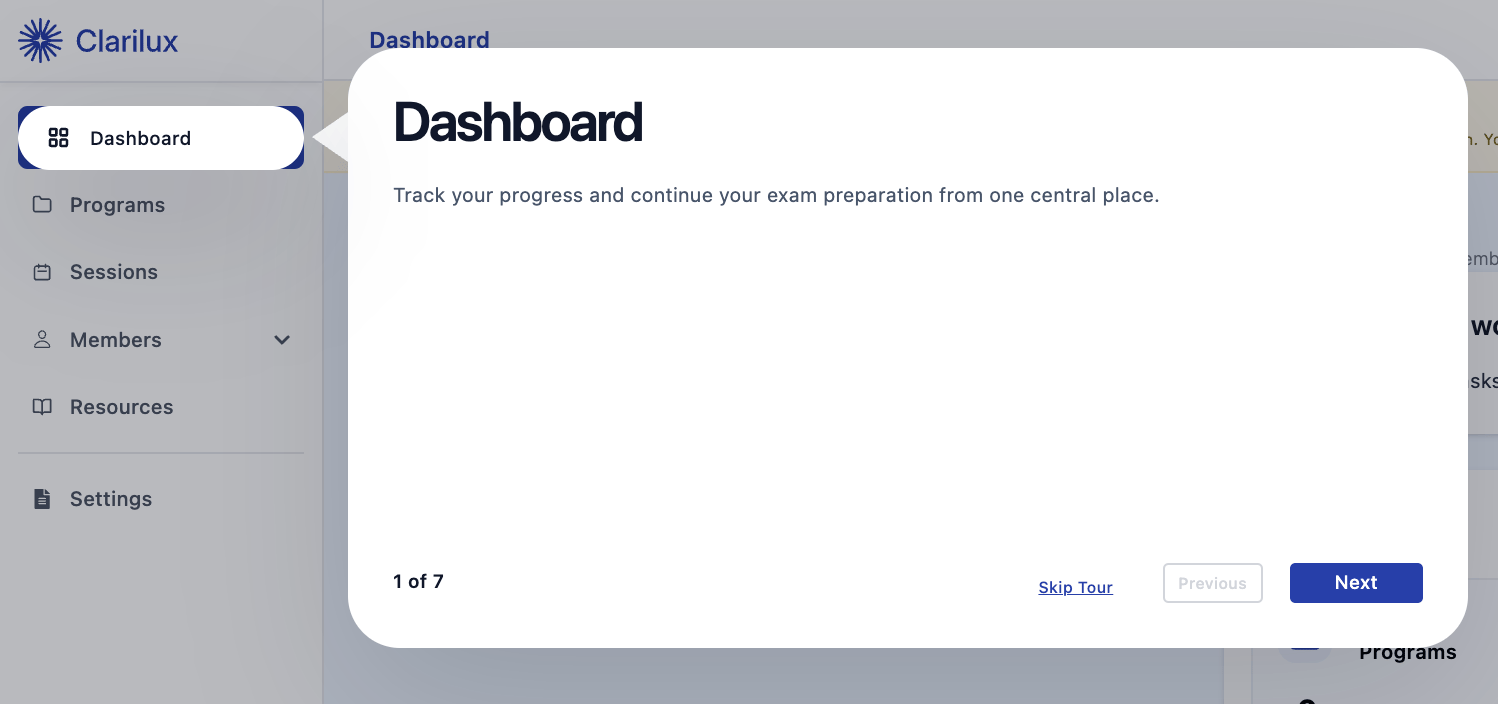
Setup Checklist
To streamline your onboarding, the dashboard provides a Setup Checklist of tasks required to fully configure your workspace. As you complete each action, it will be automatically checked off:- Personalize your Workspace: Shortcut to branding.
- Set up Institution Identity: Finalize your profile details.
- Create Your First Program: Initialize your first academic or training program.
- Invite Members: Begin onboarding your examiners and candidates.
- Set up Billing: Configure your subscription and payment preferences.
Institutional Overview & Performance
The dashboard provides high-level metrics to help you monitor your institution’s health at a glance:- Overview Stats: View your current number of Active Programs, Total Candidates, Total Examiners, and Completed Sessions.
- Performance Summary: Analyze key educational outcomes, including the Average Candidate Score, Total Evaluations Completed, and a list of Lowest Performing Programs for targeted intervention.
- Attention Needed: A dedicated section highlighting any critical issues or pending actions requiring immediate focus.
- Recent Activity: A feed displaying the latest actions and updates occurring within your workspace.
Quick Actions
For maximum efficiency, utilize the Quick Actions menu to perform essential tasks directly from the dashboard:- Create a New Program
- Invite a Candidate
- Invite an Examiner
- View Sessions
Programs
The Programs tab, accessible via the main sidebar, allows you to organize and manage your institution’s various training initiatives, such as residencies, fellowships, or academic courses.1. Creating a New Program
- Navigate to Programs in the left-hand sidebar.
- Click the Create Program button located on the screen.
- Fill in the required details to initialize your program:
- Program Name: The official title of the program.
- Specialty: The clinical or academic focus area.
- Training Level: The stage or tier (e.g., PGY-1, Senior Fellow).
- Start Date & End Date: The duration of the program.
- Description: A brief summary of the program’s objectives.
- Click Create Program to finalize and save.
2. Managing Your Programs
Once created, your programs are managed within the Programs page:- Active Programs: All currently running programs are displayed here for easy access and management.
- Archived Programs: You can view programs that are no longer active by navigating to the archived section. This allows you to retain historical data and records for programs that have concluded
Sessions
The Sessions tab is your comprehensive portal for overseeing all educational interactions within your institution. This area is divided into two primary views: Upcoming Sessions and Session History.1. Upcoming Sessions
This view allows you to manage and monitor all activities to ensure your institution’s training calendar is on track.- Search and Filter Capabilities: To help you quickly locate specific sessions, you can use the following tools:
- Search: Find sessions by Name, or Email Address.
- Session Type: Filter sessions based on format, including but not limited to:
- Rapid Fire Question & Answer
- Focused Topic Review
- Case-Based Discussion
- Custom Session
- Formal Oral Exam
- Status: Refine your view by current session status: Scheduled, Live, Pending Confirmation, or Rescheduled.
- Program: Filter by the specific programs active within your institution.
2. Session History
The Session History tab provides an archive of all past sessions that have concluded within your institution.- Reviewing Past Activity: This section allows you to maintain institutional records and review outcomes for completed training.
- Search and Filter: You have access to the same robust filtering options available in the “Upcoming Sessions” view, allowing you to search by Name, Email, Session Type, Status, and Program.
Members: Examiners and Candidates
The Members tab allows you to manage all personnel associated with your institution. From here, you can invite new users, track invitation statuses, and manage access for both Examiners and Candidates.1. Navigating Member Lists
- In the left-hand navigation sidebar, click on Members.
- Select the relevant category from the dropdown menu: Examiners or Candidates.
2. Inviting New Members
- You have two primary methods to add members to your institution:
- Single Invitation: Click the Invite button located at the top right corner of the page.
- For Examiners: Enter the email address and select the specific Program you wish to invite them into. The role is set automatically. Click Send Invite.
- For Candidates: Enter the email address, select the assigned Program, and choose the appropriate Training Level. The role is set automatically. Click Send Invite.
- Bulk Invitation: To onboard multiple users at once, click the Bulk Invite option:
- Input Data: Paste a list of email addresses or upload a CSV/Excel file.
- Custom Message (Optional): Include a personalized invitation message.
- Send: Click Send Invites to dispatch the invitations to your list.
3. Members Overview and Status Tracking
Each member category page provides a dashboard view of your user base. You can filter and view users by their current status:- Active: Users who have accepted their invitations and are currently active in the workspace.
- Invited: Users who have been sent an invitation but have not yet accepted (pending status).
- Disabled: Users whose access to your institution’s workspace has been revoked.
Resources
The Resources tab is your central repository for creating, storing, and managing examination cases. This library allows you to build a comprehensive bank of clinical scenarios to use during assessment sessions.1. Adding a New Case
To add a new case to your library, click the Add Case button located at the top right corner of the page. You have two options for creating content:- Manual Creation:
- Enter the core details, including Specialty, Topic, and Case Type.
- Provide the full Case Scenario and Follow-up Questions.
- Upload any necessary supporting Attachments.
- Click Save Resource to add the case to your institution library.
- AI-Generated Creation:
- Utilize the integrated AI tools to generate cases.
- Select your preference for Long-form or Short-form content.
- Once generated and reviewed, click Save Resource to store the case.
2. Managing the Resource Library
All saved materials are accessible in the Resource Library, where you can efficiently organize and locate your content:- Filtering: Use the filter options to narrow down your library by:
- Topic: Find resources based on specific clinical topic.
- Source: Filter by how the resource was created, either AI-Generated or Manually Created.
- Library View: The library provides a consolidated list of all resources uploaded by the administrator, ensuring you have immediate access to your entire repository.
Settings
The Settings tab is the control center for your institution’s identity, branding, and administrative policies. Use this area to customize the platform to align with your organization’s standards.1. Institution Identity
Manage the foundational details of your organization. You can view or update:- Core Information: Institution Name, assigned Role, and Program Types.
- Contact Details: Contact Email, Phone Number, and official Institution Website.
- Workspace Specs: Domain URL, estimated number of students and examiners, and your institution’s description.
2. Institution Branding
Customize the visual experience of your workspace to reflect your organization’s identity:- Logo Management: Upload or update your institution’s logo.
- Theme Customization: Adjust the Primary and Secondary colors of the application interface to match your institution’s branding.
3. Training Levels
Use this feature to organize your candidates by classifying programs according to specific levels or academic stages.4. Billing and Subscription
Maintain oversight of your financial account:- Subscription Details: View your current subscription plan and status.
- Billing History: Access a comprehensive record of your past invoices and billing transactions.
5. Administration
Policy Configuration: Manage operational rules, such as enabling or disabling the setting that allows candidates to be enrolled in multiple programs simultaneously. Audit Logs: The Audit Logs feature serves as the central security and monitoring hub for your workspace. It provides a comprehensive, real-time record of all actions, configurations, and user activities, ensuring transparency and accountability across your institution. 1. Activity Monitoring Use this section to review the history of your workspace:- Events Tracked: View a chronological list of all events, modifications, and administrative actions performed within the system.
- Role-Based Insights: Get a high-level view of how different roles are interacting with the workspace, allowing you to monitor how each user type utilizes the platform.
- Performance Metrics: Access data on the most frequently used features and identify top actions performed by your team.
- Search by Category: Narrow your view by Programs, Sessions, or Service Summary.
- User Activity: Audit specific activities by user, allowing you to see exactly what actions were initiated by particular team members.
- Security & Accountability: Identifying who performed specific actions and when, which is critical for maintaining data integrity and investigating unauthorized changes.
- Troubleshooting: Reconstructing the timeline of events to diagnose system issues or operational errors.
-
Compliance: Providing the necessary documentation and evidence of system activity for institutional or regulatory audits.
6.Security Settings
- Multi-Factor Authentication (MFA): Enable or disable MFA for your account.
- Password Management: Update or change your account password as needed to maintain security.
Profile and Security Management
The Profile section allows you to manage your institution’s core details and maintain your account’s security settings.1. Accessing Your Profile
- From the top right corner of your dashboard, click on your Initials.
- Select Profile from the dropdown menu
2. Managing Institution Information
In the Profile tab, you can view and update the information provided during the setup process. You may edit the following fields to keep your institution’s details current:- Institution Name: Your official organization name.
- Role: Your assigned designation within the institution.
- Program Types: Your active programs (e.g., Residency, Fellowship, or Academic Center).
- Contact Information: Your primary contact email and phone number.
- Institution Website: The public-facing website for your organization.
- Domain URL: Your dedicated platform workspace URL.
- Capacity Estimates: The estimated number of students and examiners associated with your institution.
- Institution Description: A summary of your institution.
3. Security Settings
The Security tab allows you to manage authentication methods to protect your institutional workspace:- Multi-Factor Authentication (MFA): Toggle this setting to Enable or Disable your MFA. Enabling MFA is highly recommended for added account protection.
- Password Management: Use the provided fields on the security page to update or change your account password.
Billing and Subscription
The Billing section, which is accessible via Settings, allows you to manage your subscription, and view payment history.1.Selecting a Subscription Plan
If your institution is new to the platform or does not have an active subscription, navigate to the billing section and click View Plans. You can compare different commitment durations to find the best fit for your institution:- Commitment Options: Choose between a Six-Month, One-Year, or Two-Year commitment plan.
- Plan Tiers and Seat Capacity: The maximum number of candidate seats available depends on your selected tier:
- Basic Plan: Standard features for smaller needs. Up to 30 candidate seats.
- Professional Plan: Up to 65 candidate seats.
- Premium Plan: Advanced tools for growing programs. Up to 100 candidate seats.
- Enterprise Plan: Tailored solutions for large-scale organizations; require clicking Contact Sales to discuss custom requirements.
2. Configuring Your Plan
Once you have selected a plan:- Capacity Adjustment: Adjust the number of candidates associated with your institution. The system supports up to a maximum of 100 seats.
- Price Calculation: The total price is automatically calculated based on your selected plan and the number of candidate seats.
- Trial Period: Depending on the selected plan, you may be eligible for a Free Trial period.
3. Finalizing Your Subscription
- Review and check the box to agree to the Terms and Conditions.
- Click Continue to Free Trial to activate your subscription and begin your trial period.
4. Account Overview
Once subscribed, you can return to the Billing page at any time to:- Review your Current Subscription status and plan details.
- Access your Billing History for a comprehensive record of all invoices and payments.
Help & Support
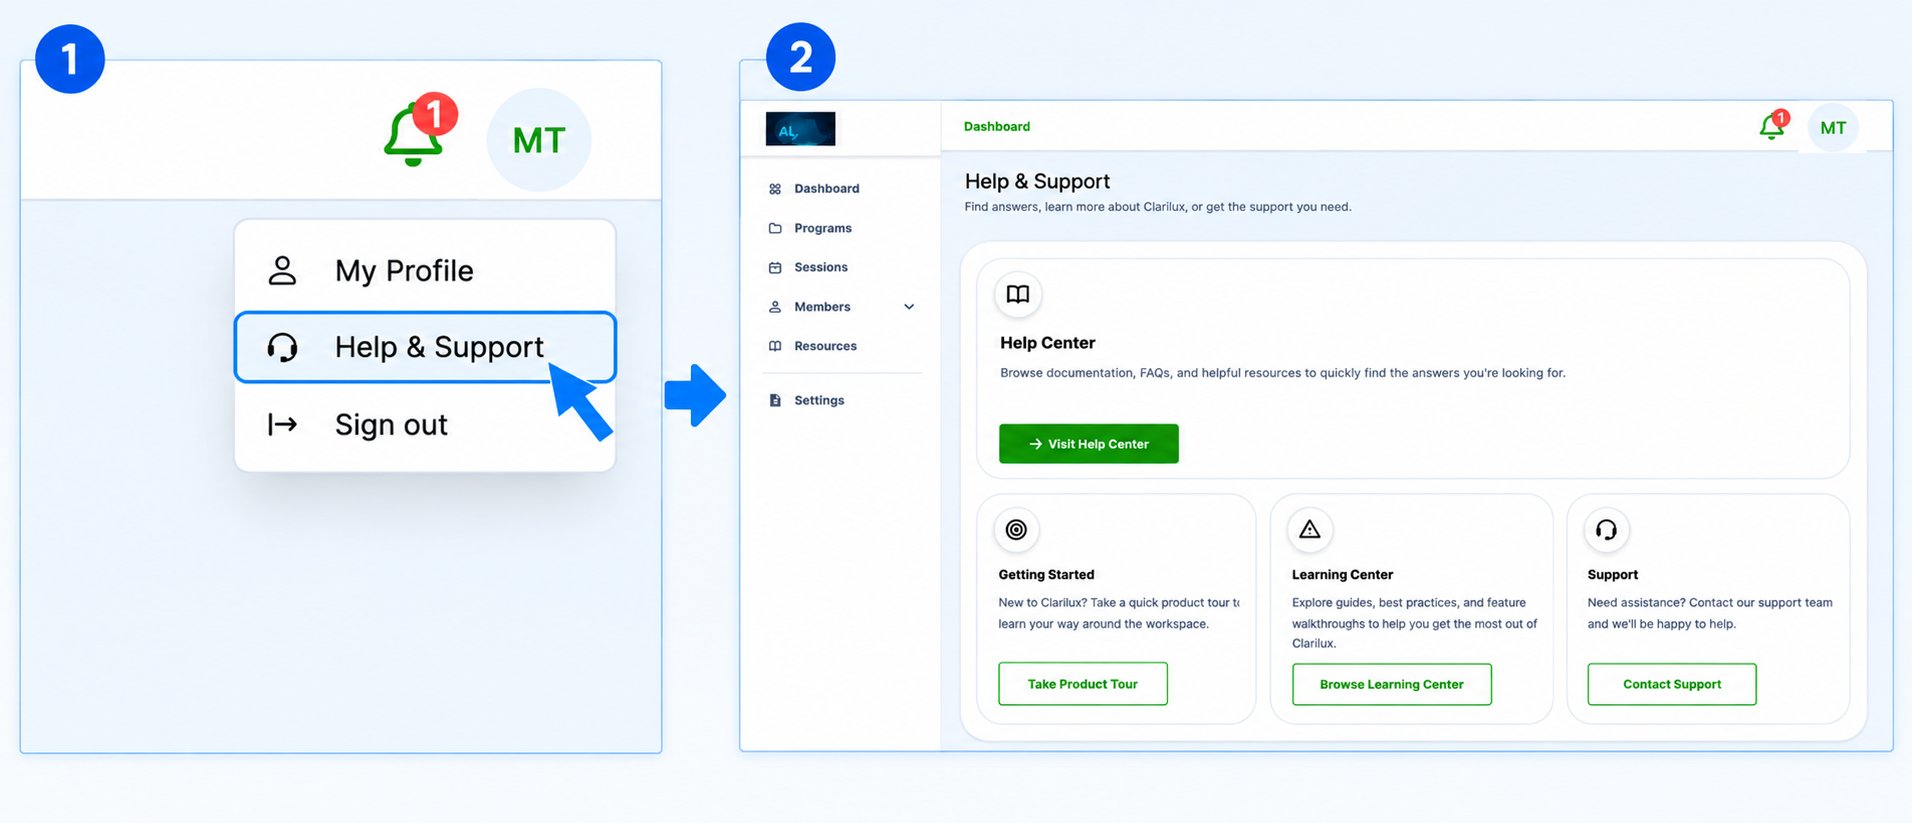
The Help and Support page is your dedicated channel for submitting feedback, reporting technical issues, or requesting assistance with the platform. Whenever you need assistance or want to explore Clarilux more deeply, everything is a click away from the Help & Support page.Accessing Help & Support
- Click your Initials in the top right corner of the dashboard
- Select Help & Support from the dropdown menu
What you’ll find on the Help & Support page
- Help Center: Browse documentation, FAQs, and helpful resources to quickly find the answers you’re looking for. Click Visit Help Center to open the full library.
- Getting Started: Click Take Product Tour to retake the guided walkthrough of your workspace. Useful whether you’re new to Clarilux or want a refresher on where things are.
- Learning Center: Click Browse Learning Center to explore guides, best practices, and feature walkthroughs to help you get the most out of Clarilux.
- Support: Click Contact Support to open a Contact Us form with your Name and Email pre-filled. Enter a Subject and Message describing your issue, and optionally attach a screenshot (JPEG or PNG, up to 2MB). Click Send Message to submit your request to the Clarilux support team.