Start practising
Run realistic oral board simulations.
Book an examiner
Find and manage marketplace sessions.
Review progress
Use performance insights to focus your preparation.
Getting Started: Account Registration
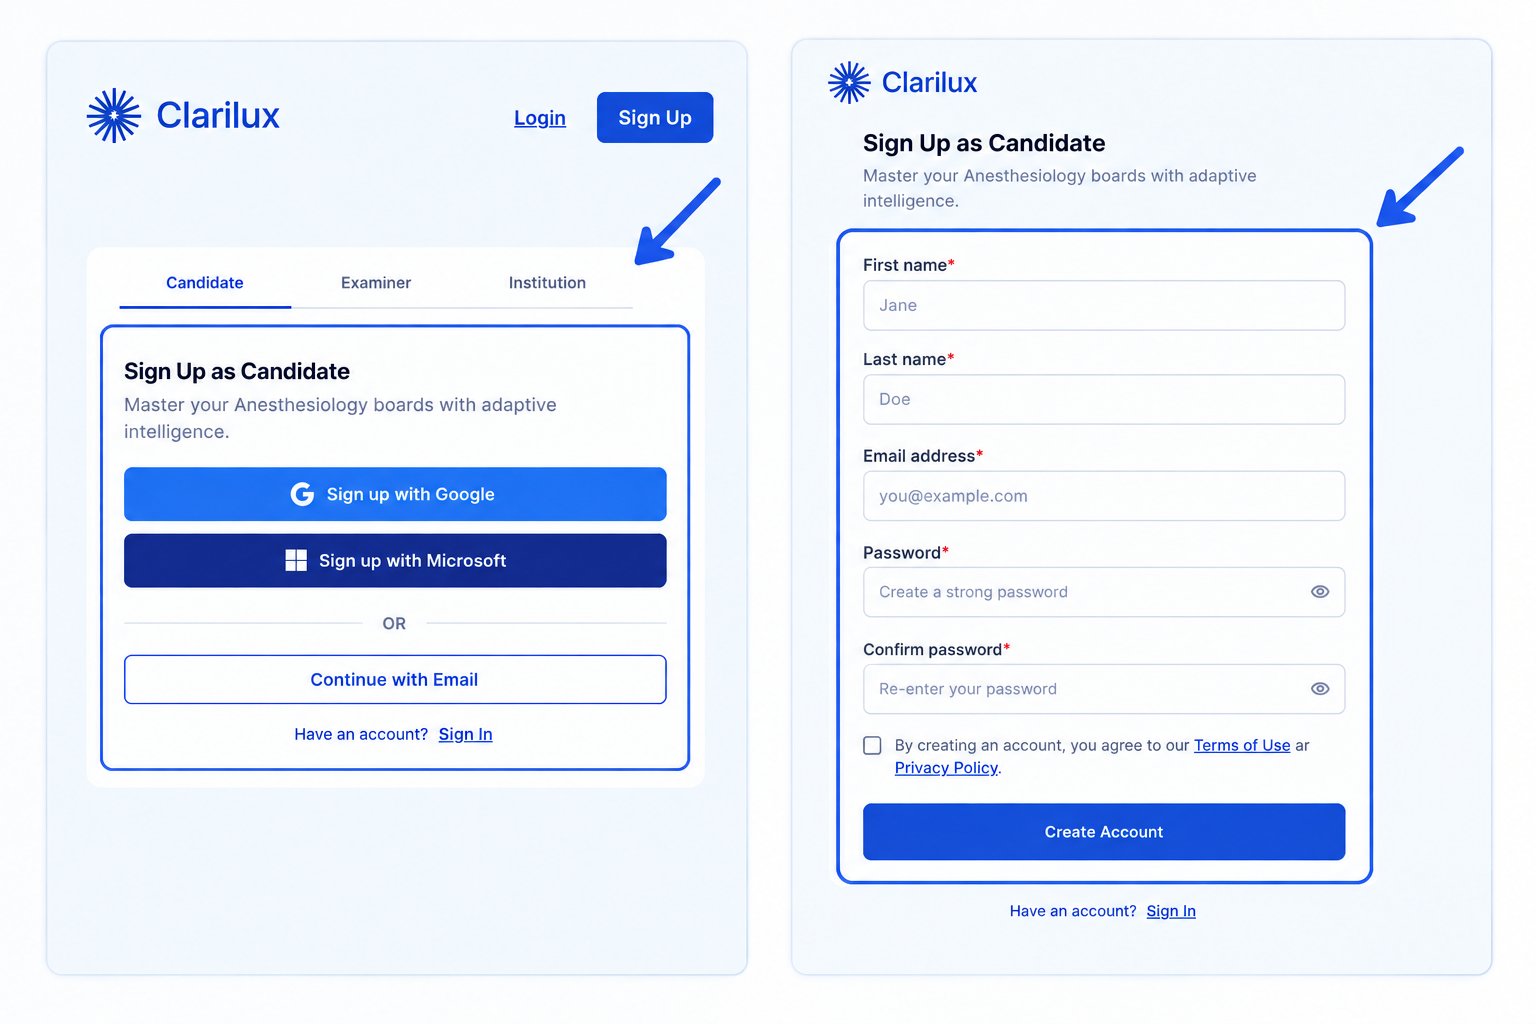
1. Navigate to the Platform Open your preferred web browser and enter the application URL: clarilux.ai. This will take you directly to the platform’s landing page. 2. Initiate Sign-Up Locate and click the Sign-Up button in the top right corner of the landing page. You will be automatically redirected to the Candidate Sign-Up page.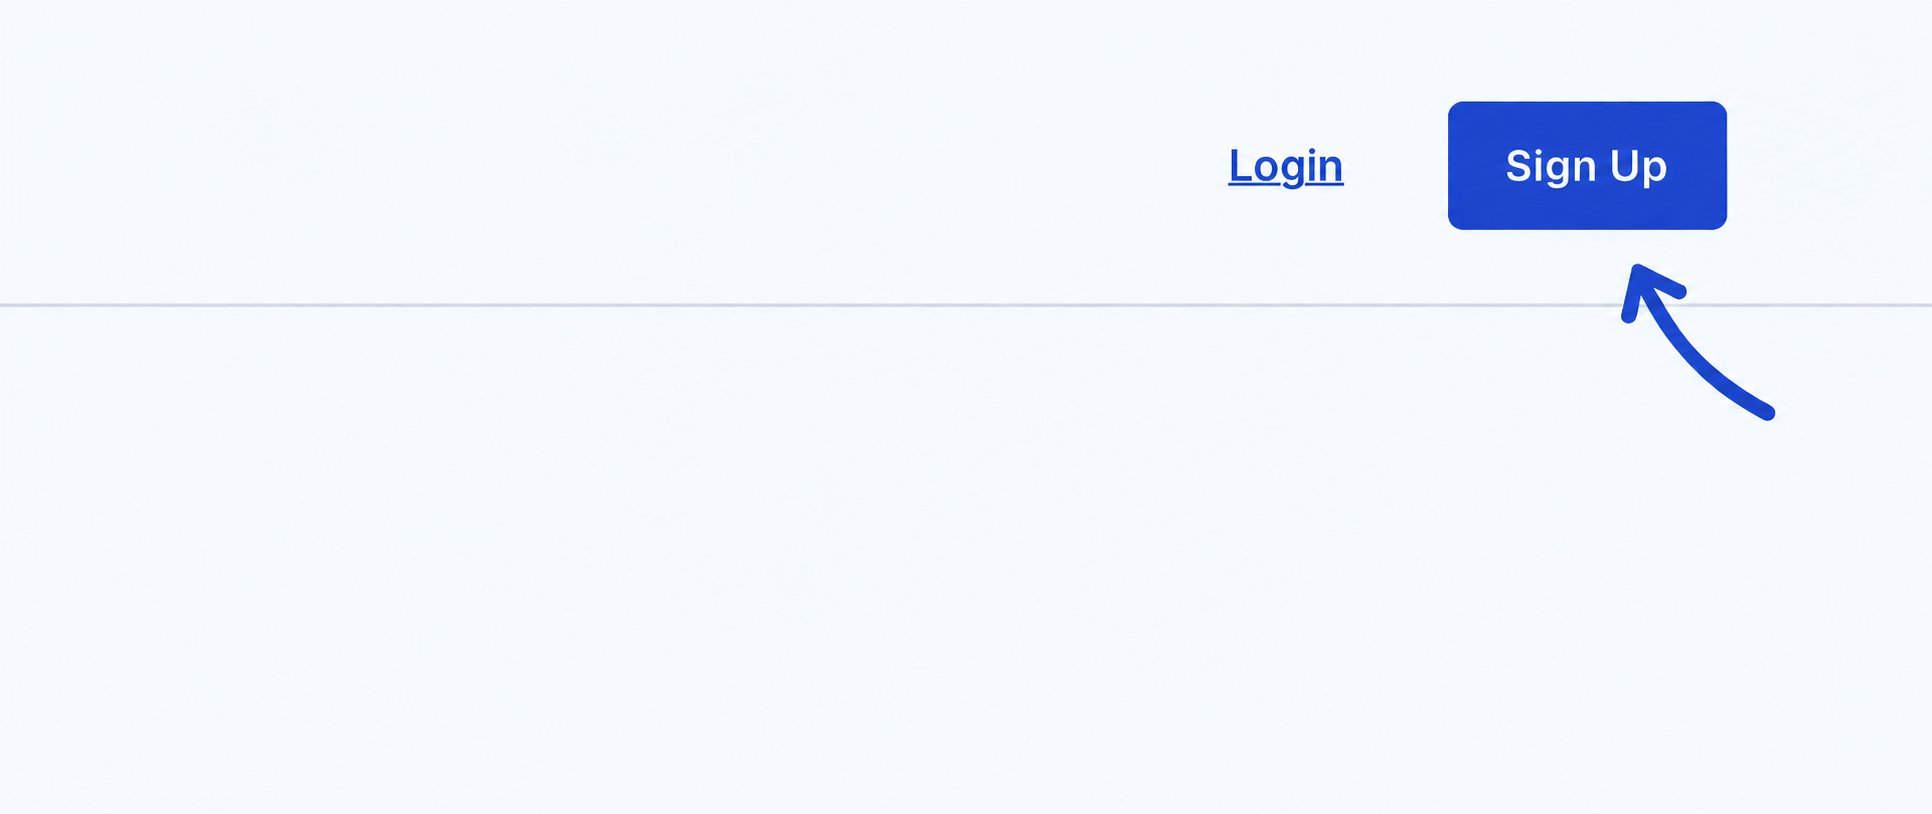
- Sign up with Google
- Sign up with Microsoft
- Continue with Email
- Fill in your First Name, Last Name, Email Address, Password, and Confirm Password.
- Check the required box to agree to the Terms of Use and Privacy Policy. Once checked, click the Create Account button to proceed with account creation.
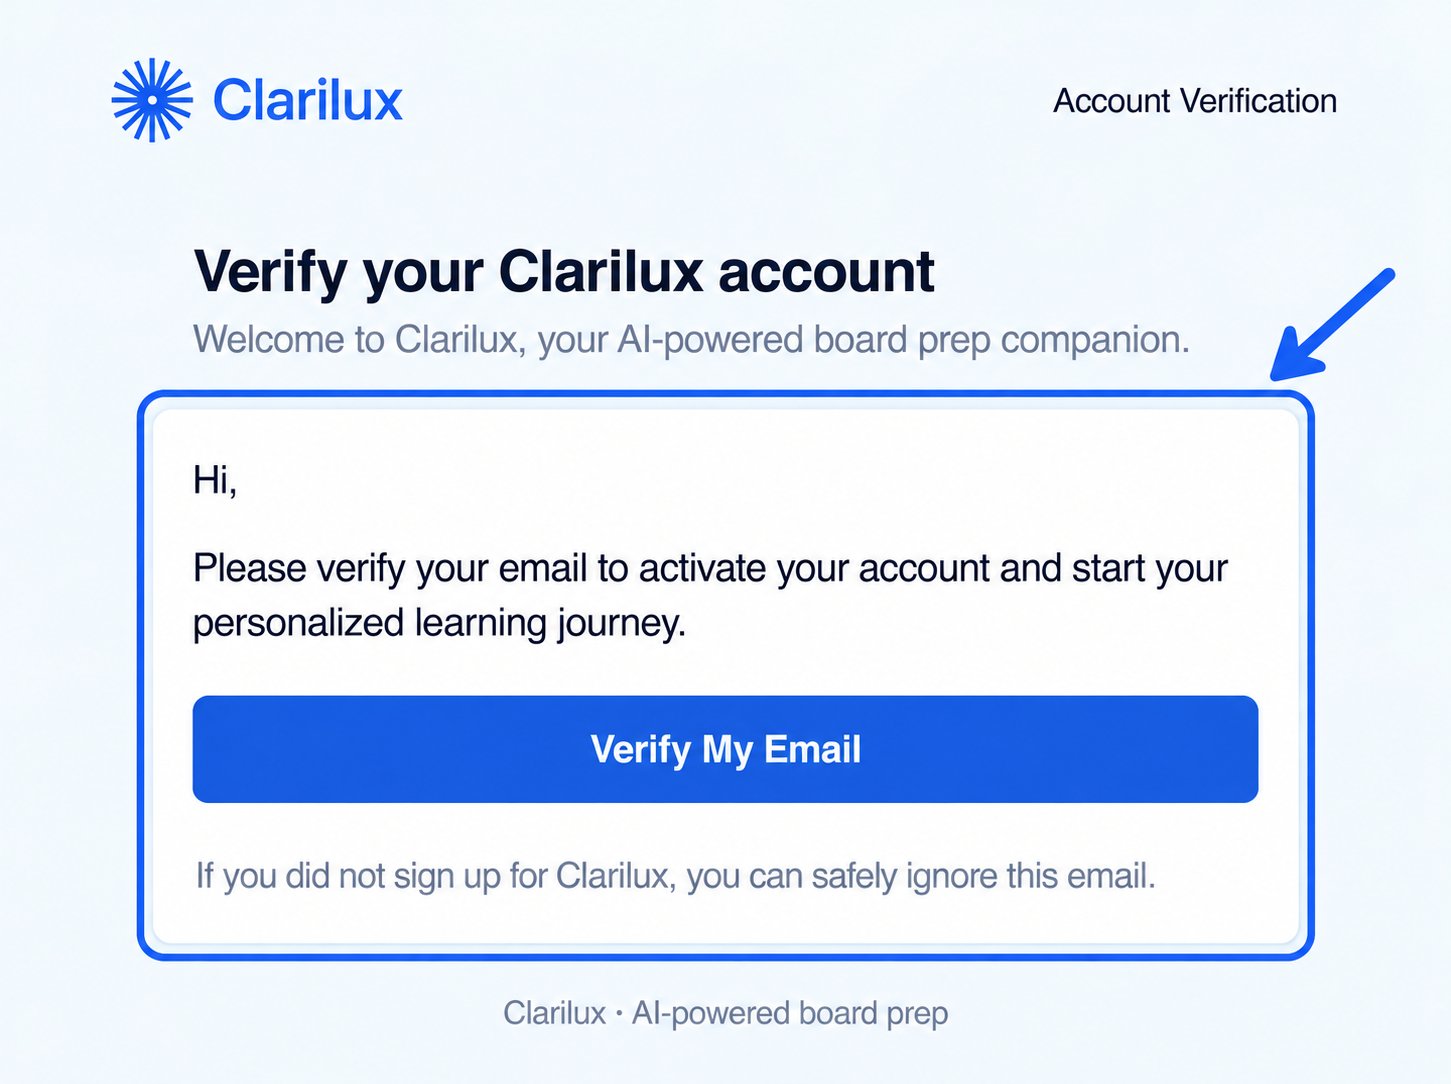
- Select your Specialty (e.g., Anesthesiology).
- Select your current Role (e.g., Resident, Fellow, Physician, or preparing independently).
- Click Continue.
- Indicate whether you have taken the exam before.
- Input your Target Certification Date using the provided calendar tool.
- Click Submit to finalize your profile.
Dashboard
Your Candidate Dashboard is the central command center for your exam preparation. From here, you can track your progress, resume ongoing sessions, and seamlessly access all platform features. First-time login: Guided tour When you land on the dashboard for the first time, a guided tour appears to walk you through the key areas of your dashboard. Click Next to move through each step, or click Skip at any time to exit the tour and explore on your own. Main Dashboard Features- Performance Overview: View your overall “Exam Readiness” to monitor your progression from building foundational knowledge to becoming board-ready.
- Weekly Study Goal: Track your progress against the weekly study hours you have set for yourself to ensure you stay on pace.
- Daily Streak: Keep your momentum going by monitoring how many consecutive days you have actively engaged with your preparation.
- Upcoming Sessions: Quickly view sessions that have been scheduled.
- Continuue Learning: Quickly resume courses that you have started but have not yet completed.
- Past Cases: Review a comprehensive list of your completed and graded cases to reflect on past performance.
- Next Recommendations: Access a curated list of suggested assessments and default courses (e.g., Orthopedics, Pharmacology) to guide your next study session.Top Navigation & Account Settings
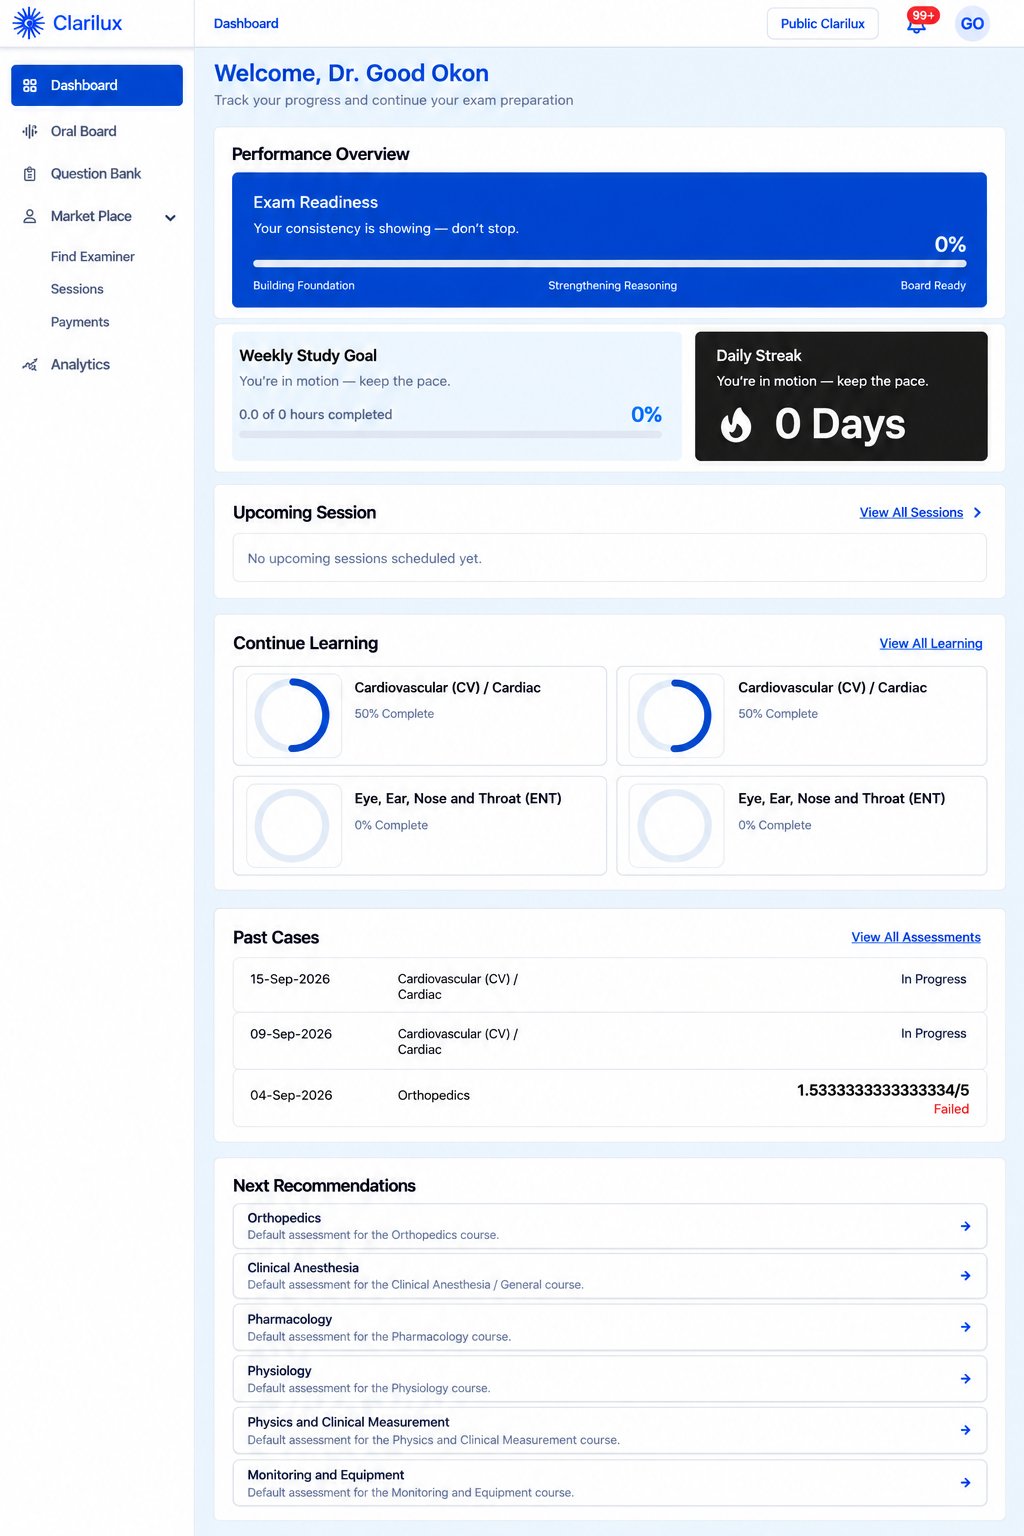
- Profile Menu: Click on your initials located in the top right corner of the application. This opens a dropdown menu where you can:
- Access and edit your Profile.
- Manage your Billing and Subscription.
- Access Help and Support.
- Sign Out of the application.
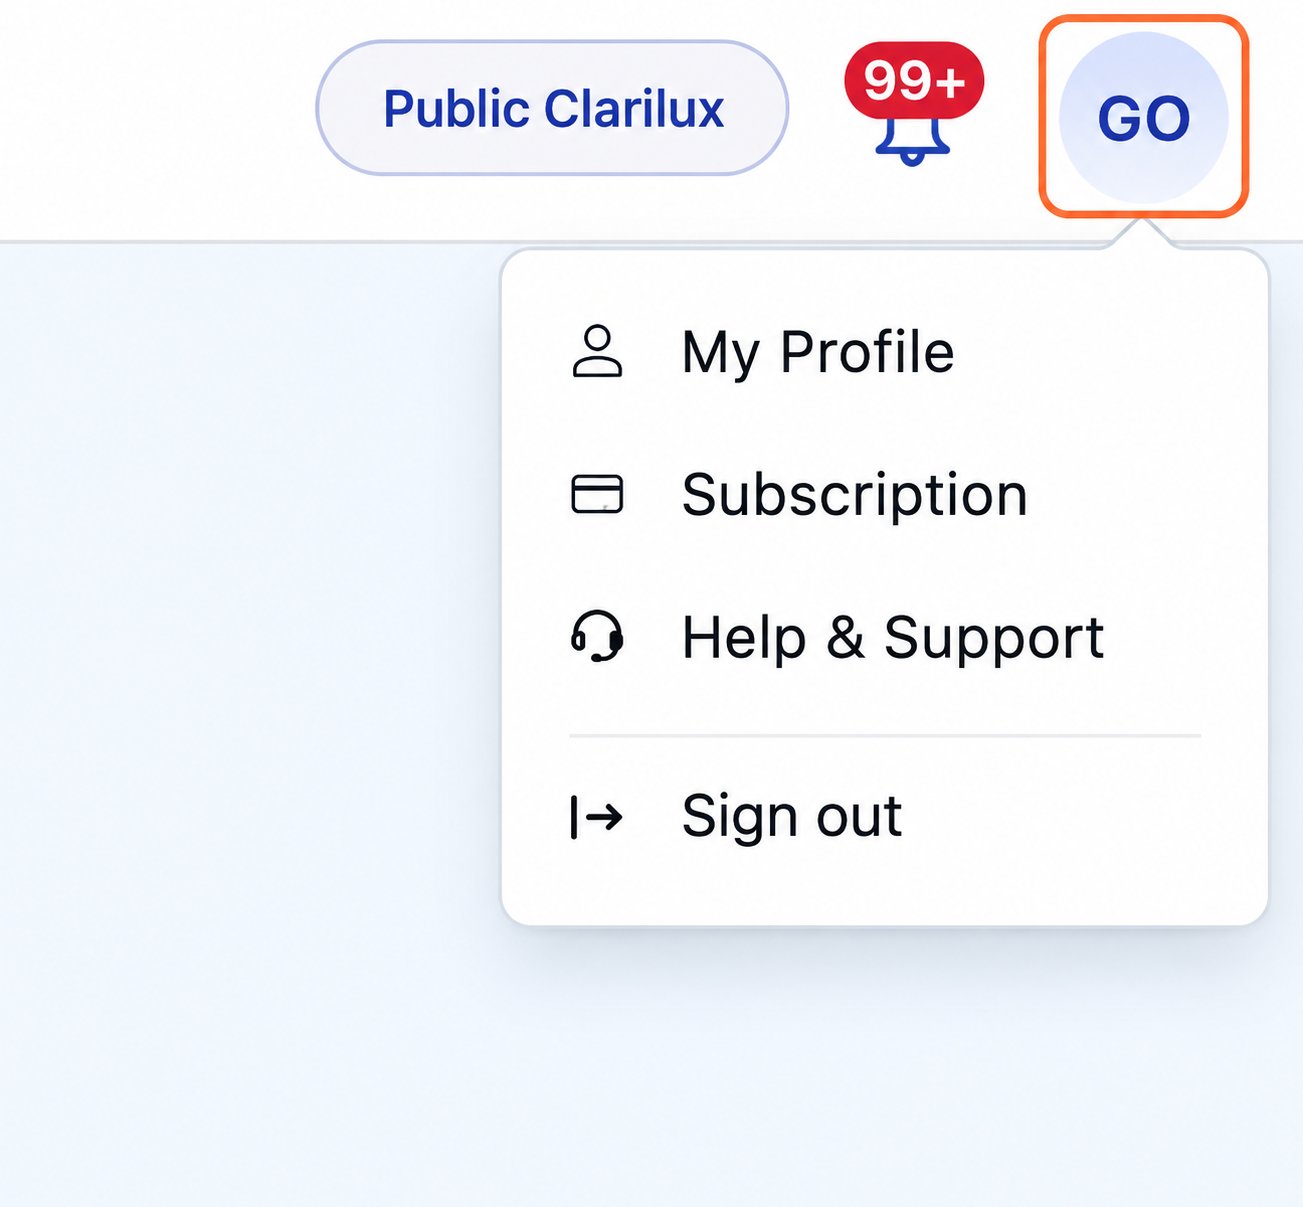
- Institution Switcher: Located at the top right, just beside the notification bell (displaying “Public Clarilux” by default). If you are affiliated with multiple institutions, use this dropdown to seamlessly switch between their respective workspaces without needing to log out.
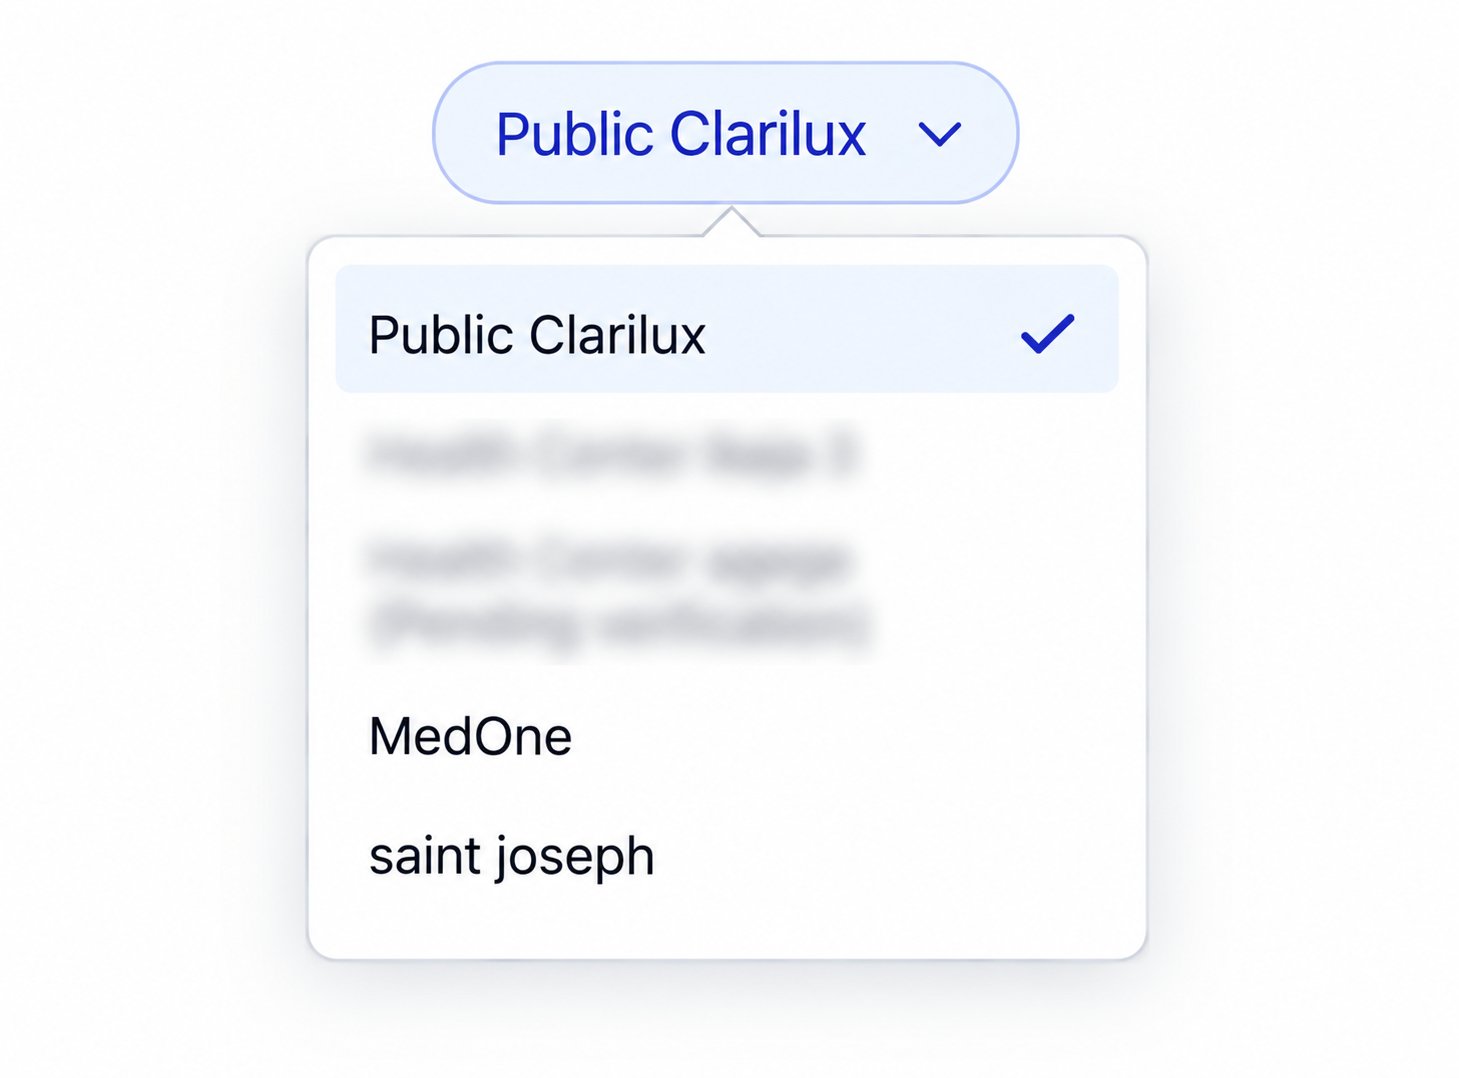
- Dashboard: Return to your main overview page at any time.
- Oral Board: Access your oral board simulation cases and testing environments.
- Question Bank: Navigate to the test bank to practice specific questions and topics.
- Marketplace: Find examiners, track and book sessions, and manage payments.
- Analytics: Dive deeper into your performance metrics, strengths, and areas for improvement.
My Programs
My Programs feature is exclusive to candidates affiliated with a specific institution. If you are using a standard “Public Clarilux” account, this tab will not be visible on your sidebar. For institutional users, this tab will display the specific programs your institution has added you to. If you are associated with an institution but have not yet been assigned to any program, the page will simply display a prompt stating, “no programs assigned yet.” 1. Navigate to My Programs: From the persistent sidebar menu on the left side of your screen, click on My Programs to access your institutionally enrolled programs. 2. Access Program Details: Once on the My Programs page, click the View Program button next to your selected program to see its full details. 3. Review the Program Overview: This section provides the foundational details of your selected program. Here you will find the specific Specialty, the program Training Level, and a comprehensive Description of the curriculum. 4. Track Your Program Summary: Monitor your overall progress through high-level metrics. This area displays your Average score, a count of your scheduled Upcoming sessions, and the total number of your Completed sessions. 5. Analyze Your Performance Summary: Dive into your personal analytics to better understand your clinical progression. This section specifically highlights your demonstrated Strengths and identifies key Areas for improvement to help guide your future study sessions.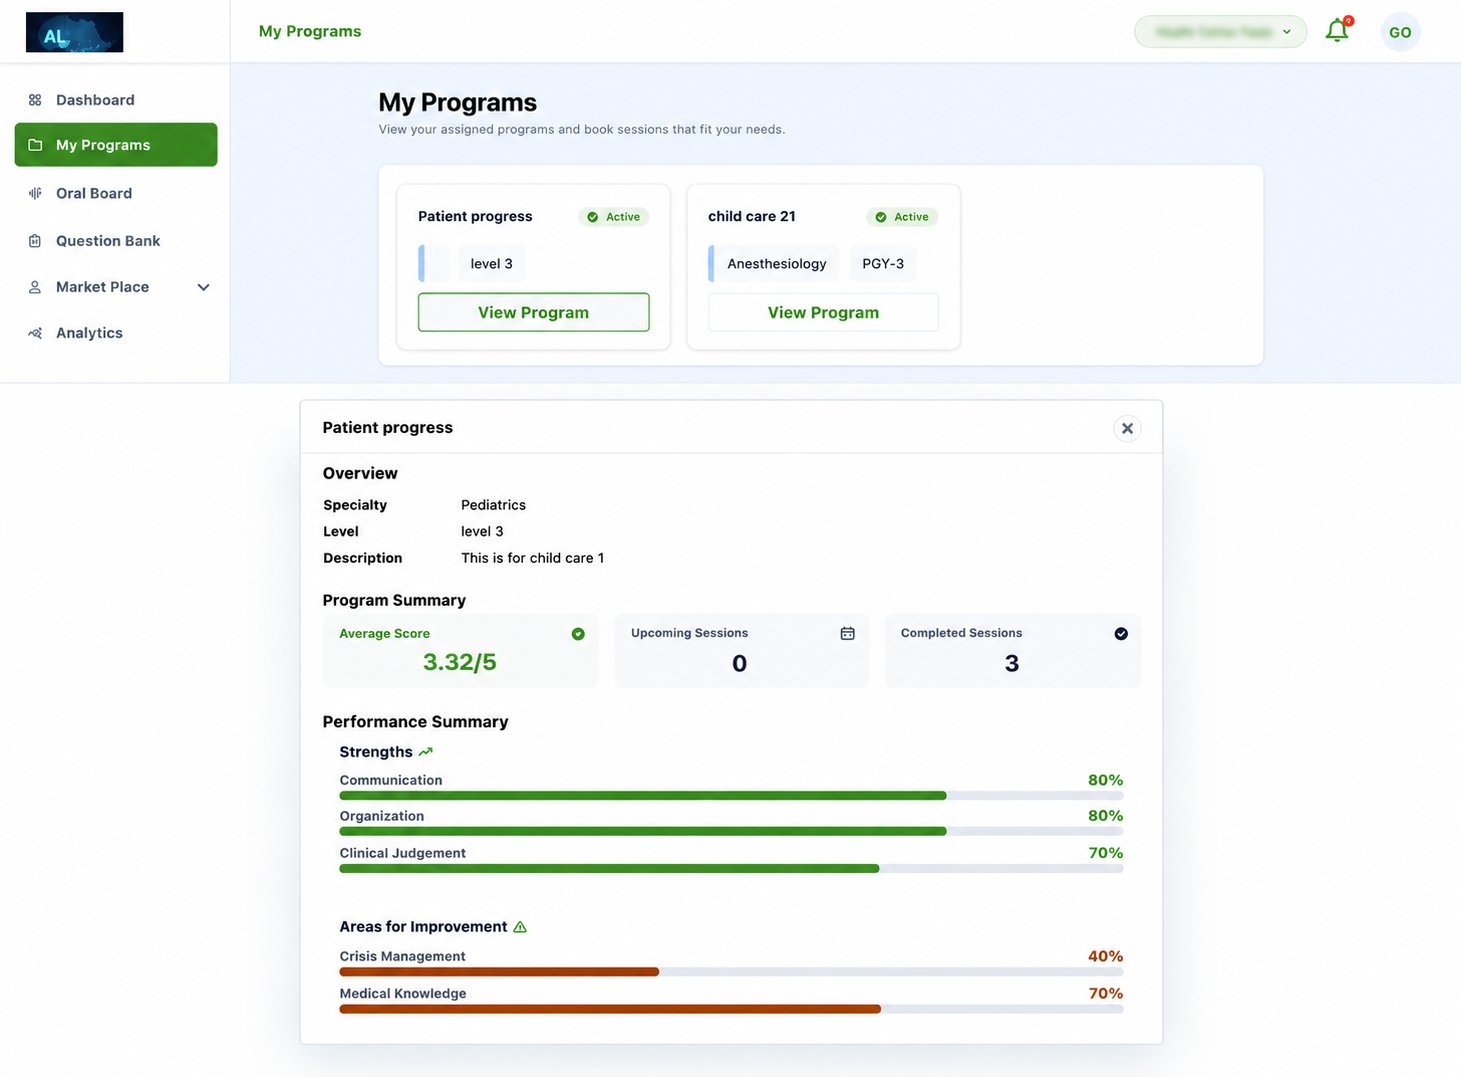
Oral Board
The Oral Board is a high-fidelity simulation environment designed to bridge the gap between textbook knowledge and the high-pressure environment of board examinations. By simulating the structure of a real examination, the Oral Board helps you refine your clinical reasoning, verbalize complex decision-making processes, and manage the rapid-fire nature of board-style questioning. Key Features and TopicsThe platform covers a comprehensive range of clinical domains to ensure you are prepared for any scenario. Some topics currently available include but not limited to:
- Cardiovascular & Neuro: High-stakes management and physiology.
- Obstetrics: Specialized care and maternal-fetal considerations.
- Pain Management & Pharmacology: Deep dives into drug interactions and therapeutic pathways.
Navigating to your simulation is straightforward. Follow these steps to begin:
- Log In: Access your account via the secure login page.
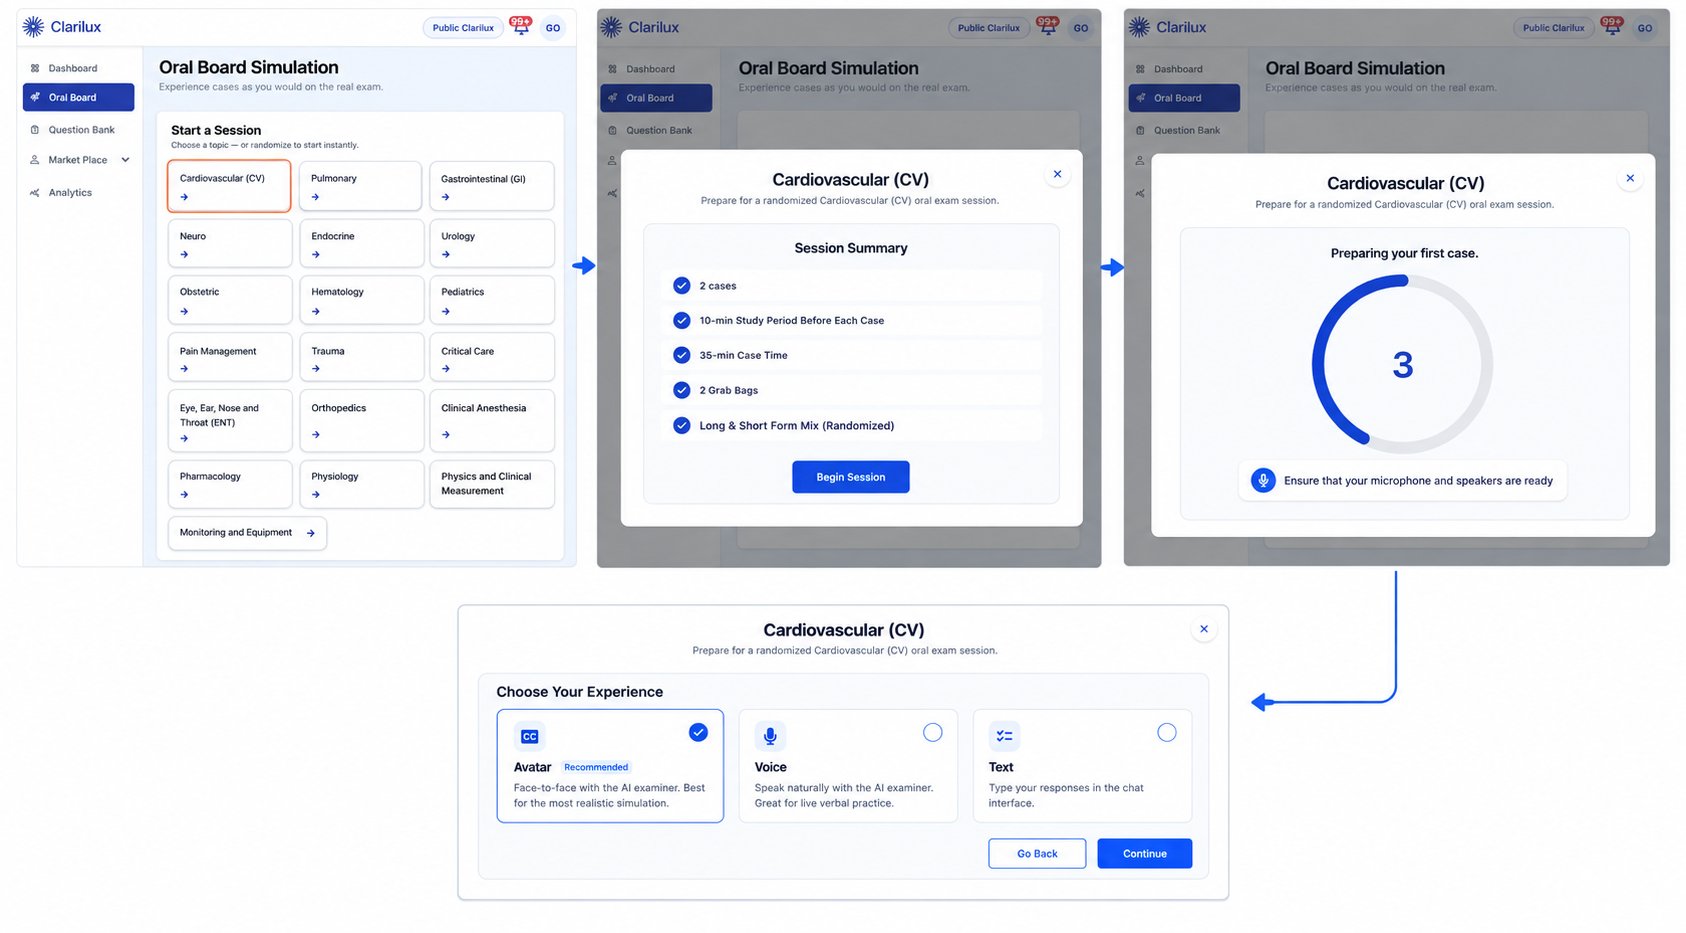
- Access Oral Board Sessions On the left-side menu (which includes Dashboard, Oral Board, Question Bank, Marketplace, and Analytics), click on Oral Board.
- Choose a subject from the available options. E.g, Endocrine.
- The screen will display a summary of the session, indicating it includes 2 cases, a 10-minute case study review period before each case, and 35 minutes of case time (comprising 30 minutes of focused questioning and a 5-minute grab-bag session at the end).
- Click Begin Session.
- While the first case is preparing, choose your preferred interaction method: Avatar, Voice, or Text.
- Select your preferred option and click Continue.
- The case scenario will be displayed. You have a 10-minute review time to read the question, draft your answers, and perform any necessary calculations.
- You can either wait for the 10 minutes to elapse (the session will start automatically), or you can click Begin Early to jump straight into the active session.
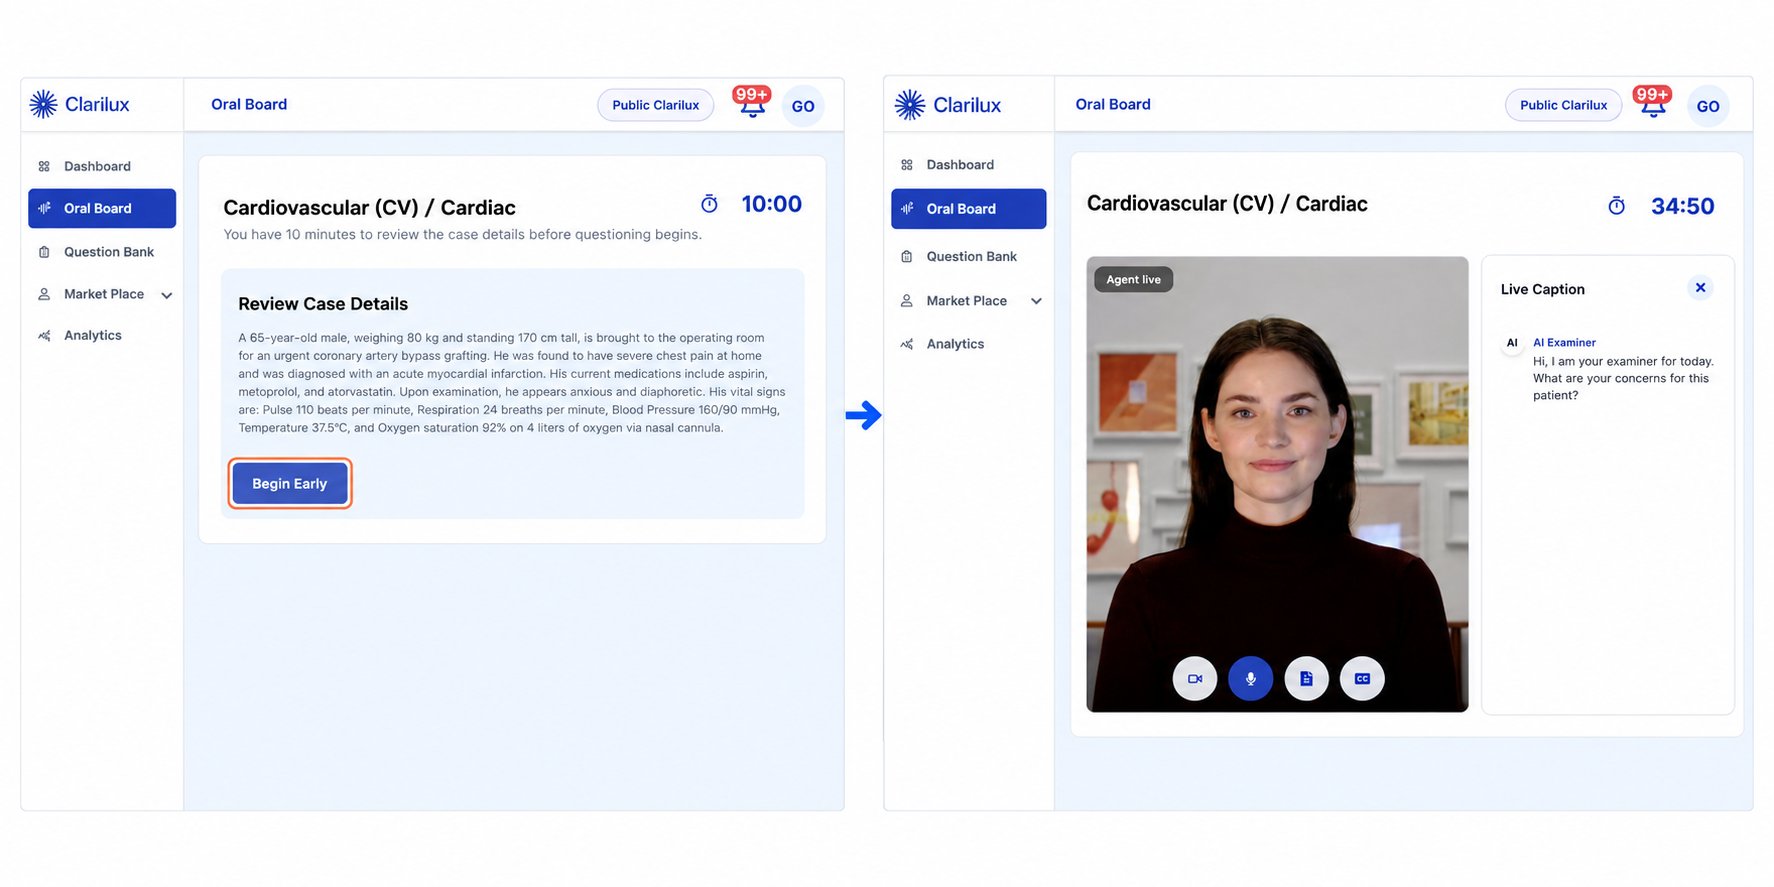
- The active oral board session begins and will last for exactly 35 minutes. This first case will either be a long-form or short-form scenario.
- Once the 35 minutes conclude, you will be presented with a choice:
- Click Continue Later to pause the exam and immediately view your score for this first case.
- Keep Going: Proceed directly to the second case without viewing your score yet.
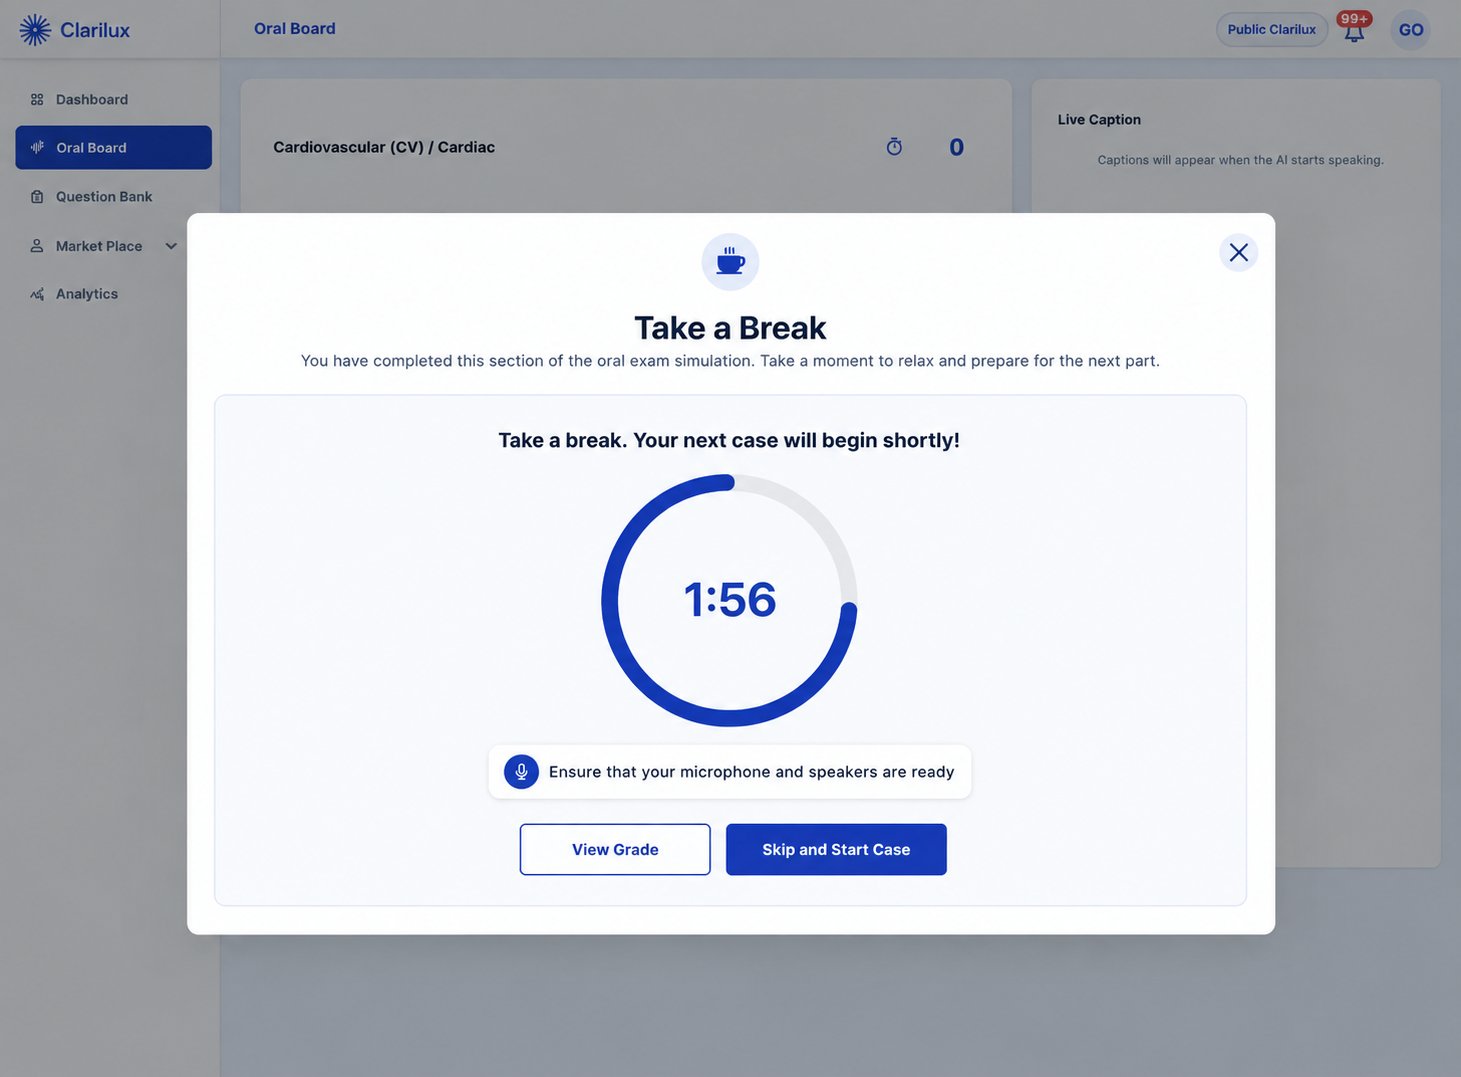
- If you choose to continue, you will begin the second 35-minute case.
- At the end of the full 70-minute exam time (35 minutes for the first case + 35 minutes for the second case), the session will conclude entirely.
- You will then be presented with your comprehensive score for both the long-form and short-form cases.
- Simulate the Environment: Try to find a quiet space and respond out loud to mimic the actual board experience.
- Focus on Diversity: While it is tempting to stick to comfortable topics, ensure you rotate through categories like Pharmacology and Pain Management e.tc. to find and address any knowledge gaps.
- Review Feedback: After each session, analyze the evaluation to understand how to better structure your clinical justifications.
Question Bank
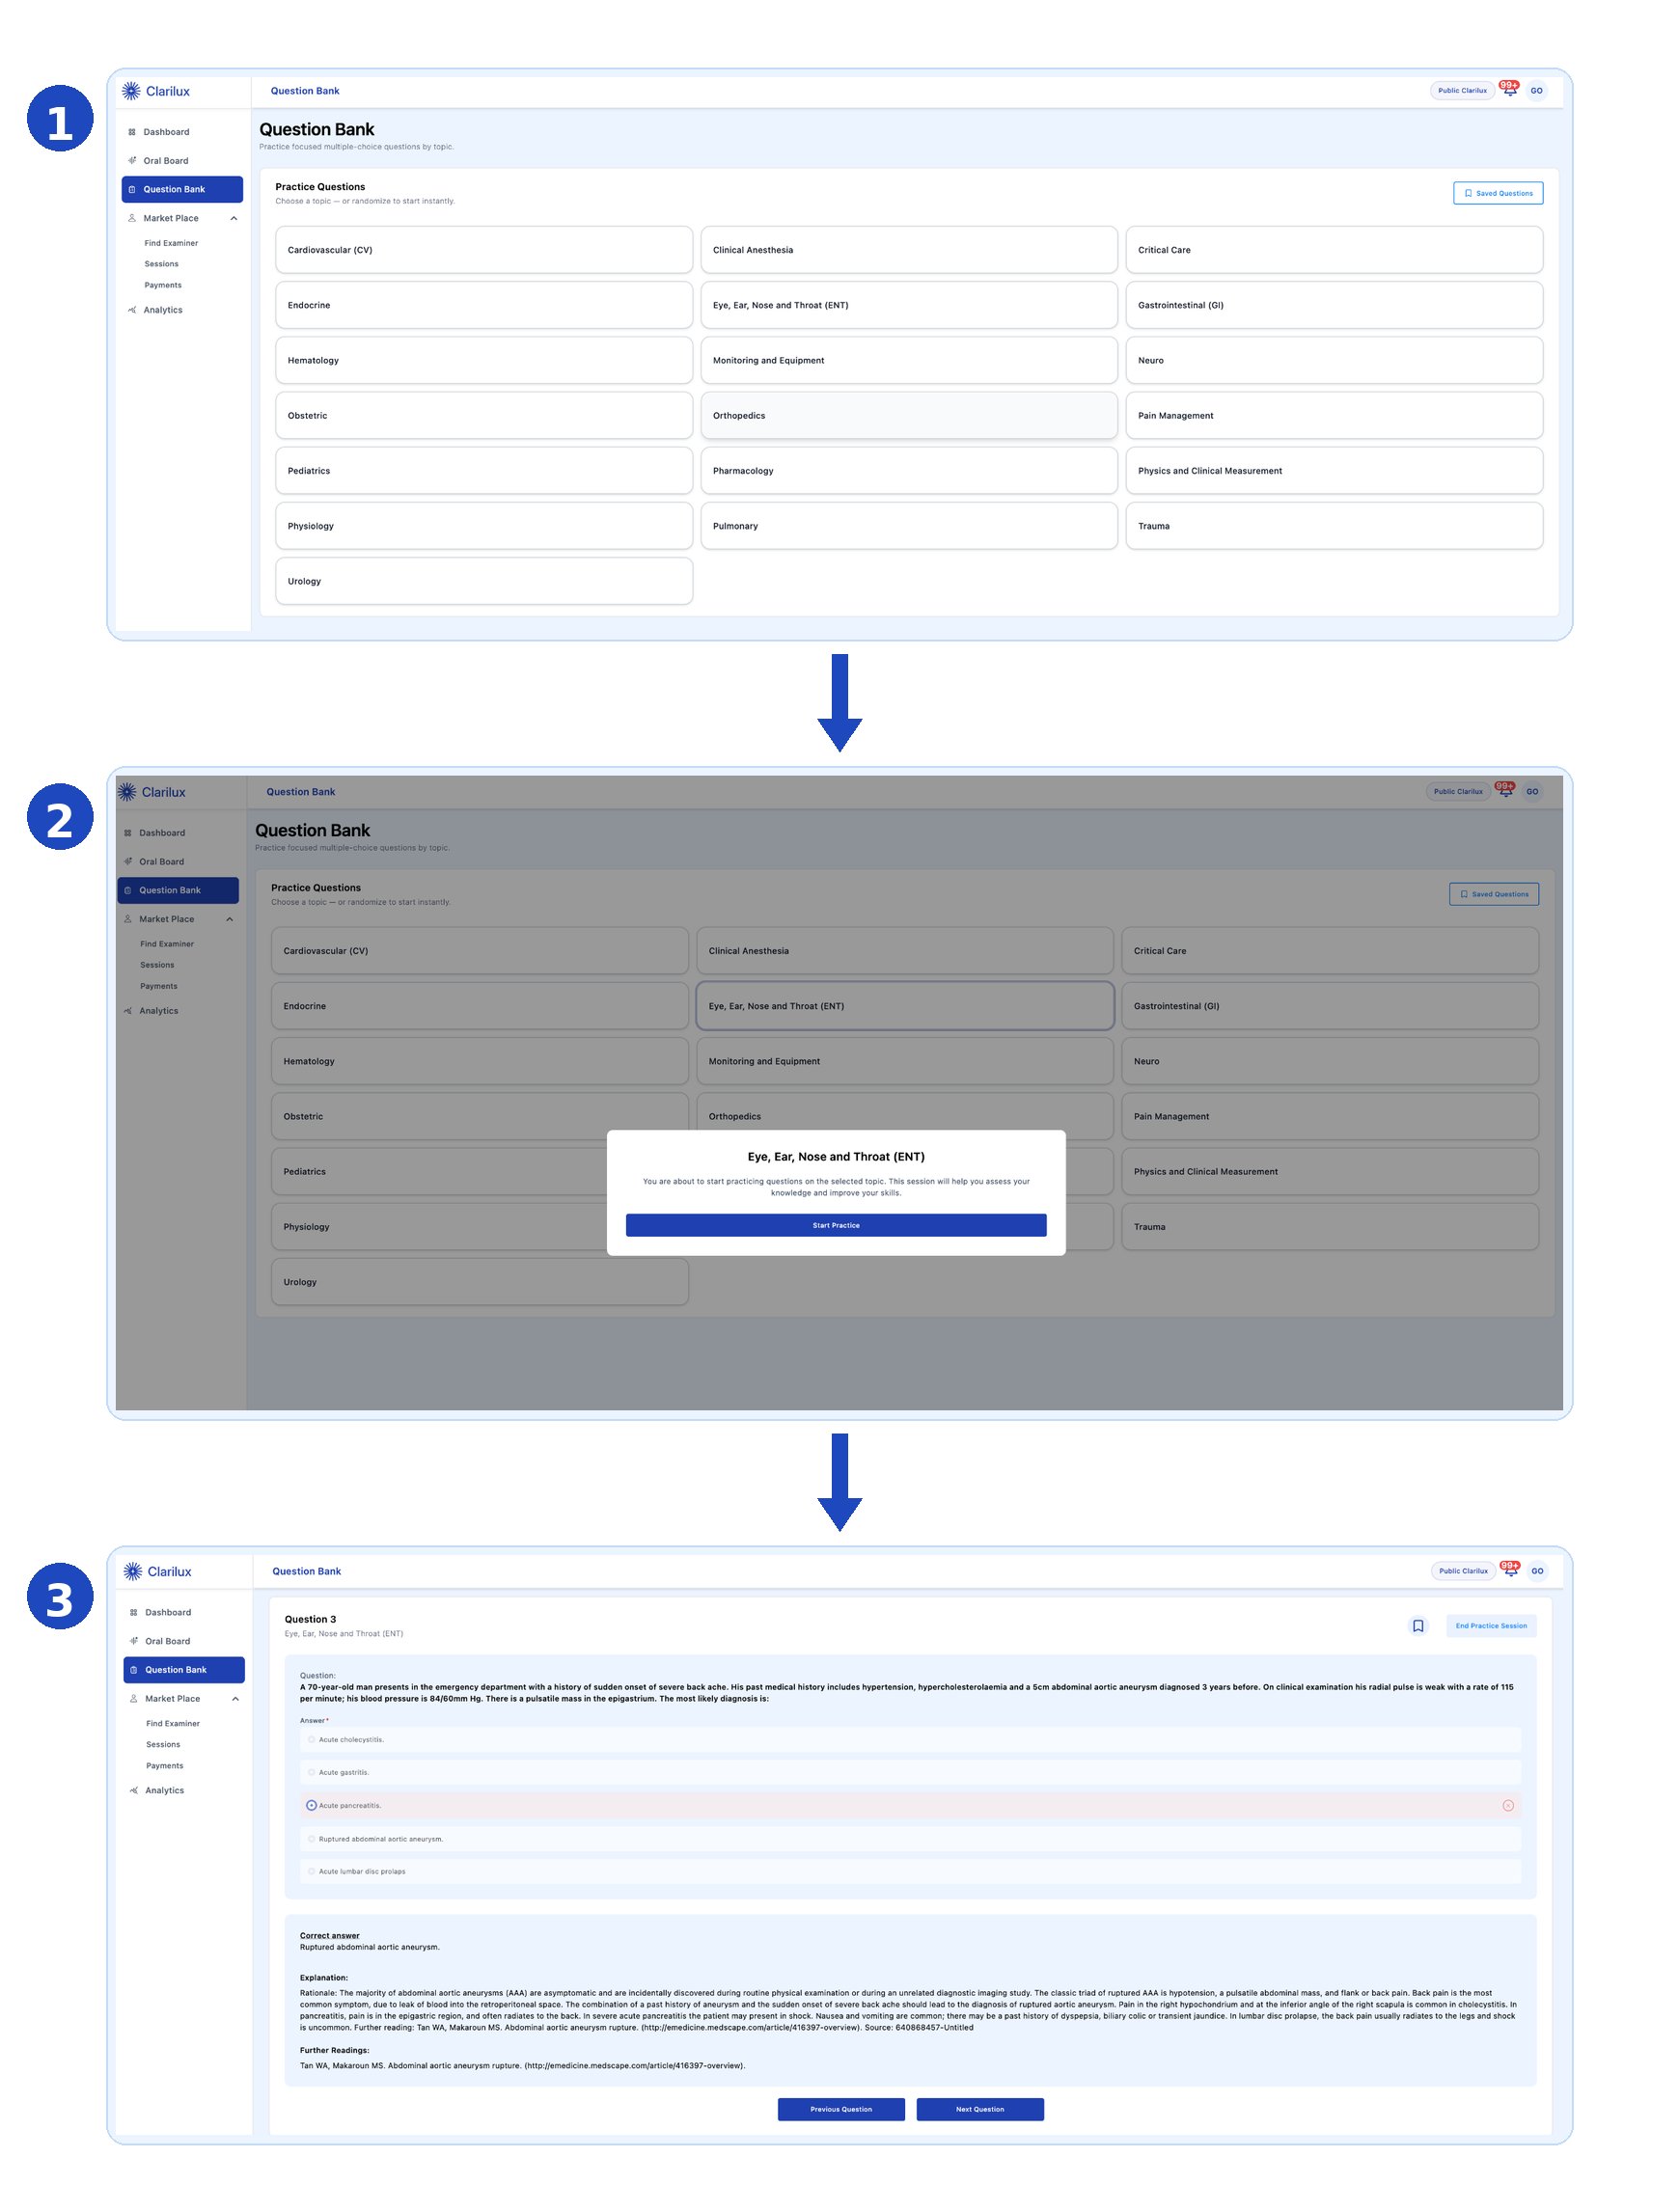
The Question Bank is a dedicated practice hub. It allows you to sharpen your knowledge through focused, multiple-choice questions organized by specialized medical and surgical topics. Topic Selection Candidates can choose from a wide range of available categories to target their study sessions. Available topics include, but are not limited to:- Cardiovascular
- Pulmonary
- Orthopedics
- Trauma
- Hematology
- Endocrine
- Urology
- ENT (Ear, Nose, and Throat)
- Pain Management
-
Answer & Instant Feedback: Select your answer for the question and click submit. The platform immediately validates your choice with clear visual indicators:
- If your answer is correct: The option is highlighted in a light green color and marked with a checkmark (✓).
- If your answer is incorrect: The option you selected is highlighted in a light red color and marked with an (X) sign
-
Comprehensive Review Material: Right below the visual feedback, the system instantly displays:
- The correct answer
- Detailed Explanation: A comprehensive breakdown explaining the underlying medical/surgical concept.
- Further Readings: A curated list of reference materials and recommended readings to help widen your knowledge and address any gaps.
- Bookmarking: If you encounter a challenging or interesting question that you wish to review later, you can click the Bookmark icon to save it to your personal study list.
- Continuous Learning: You can answer as many questions as you like in a single session, moving sequentially from one question to the next.
- Ending a Session: There is no fixed time limit or forced ending. You can click End Practice at any point to conclude your session.
Market Place
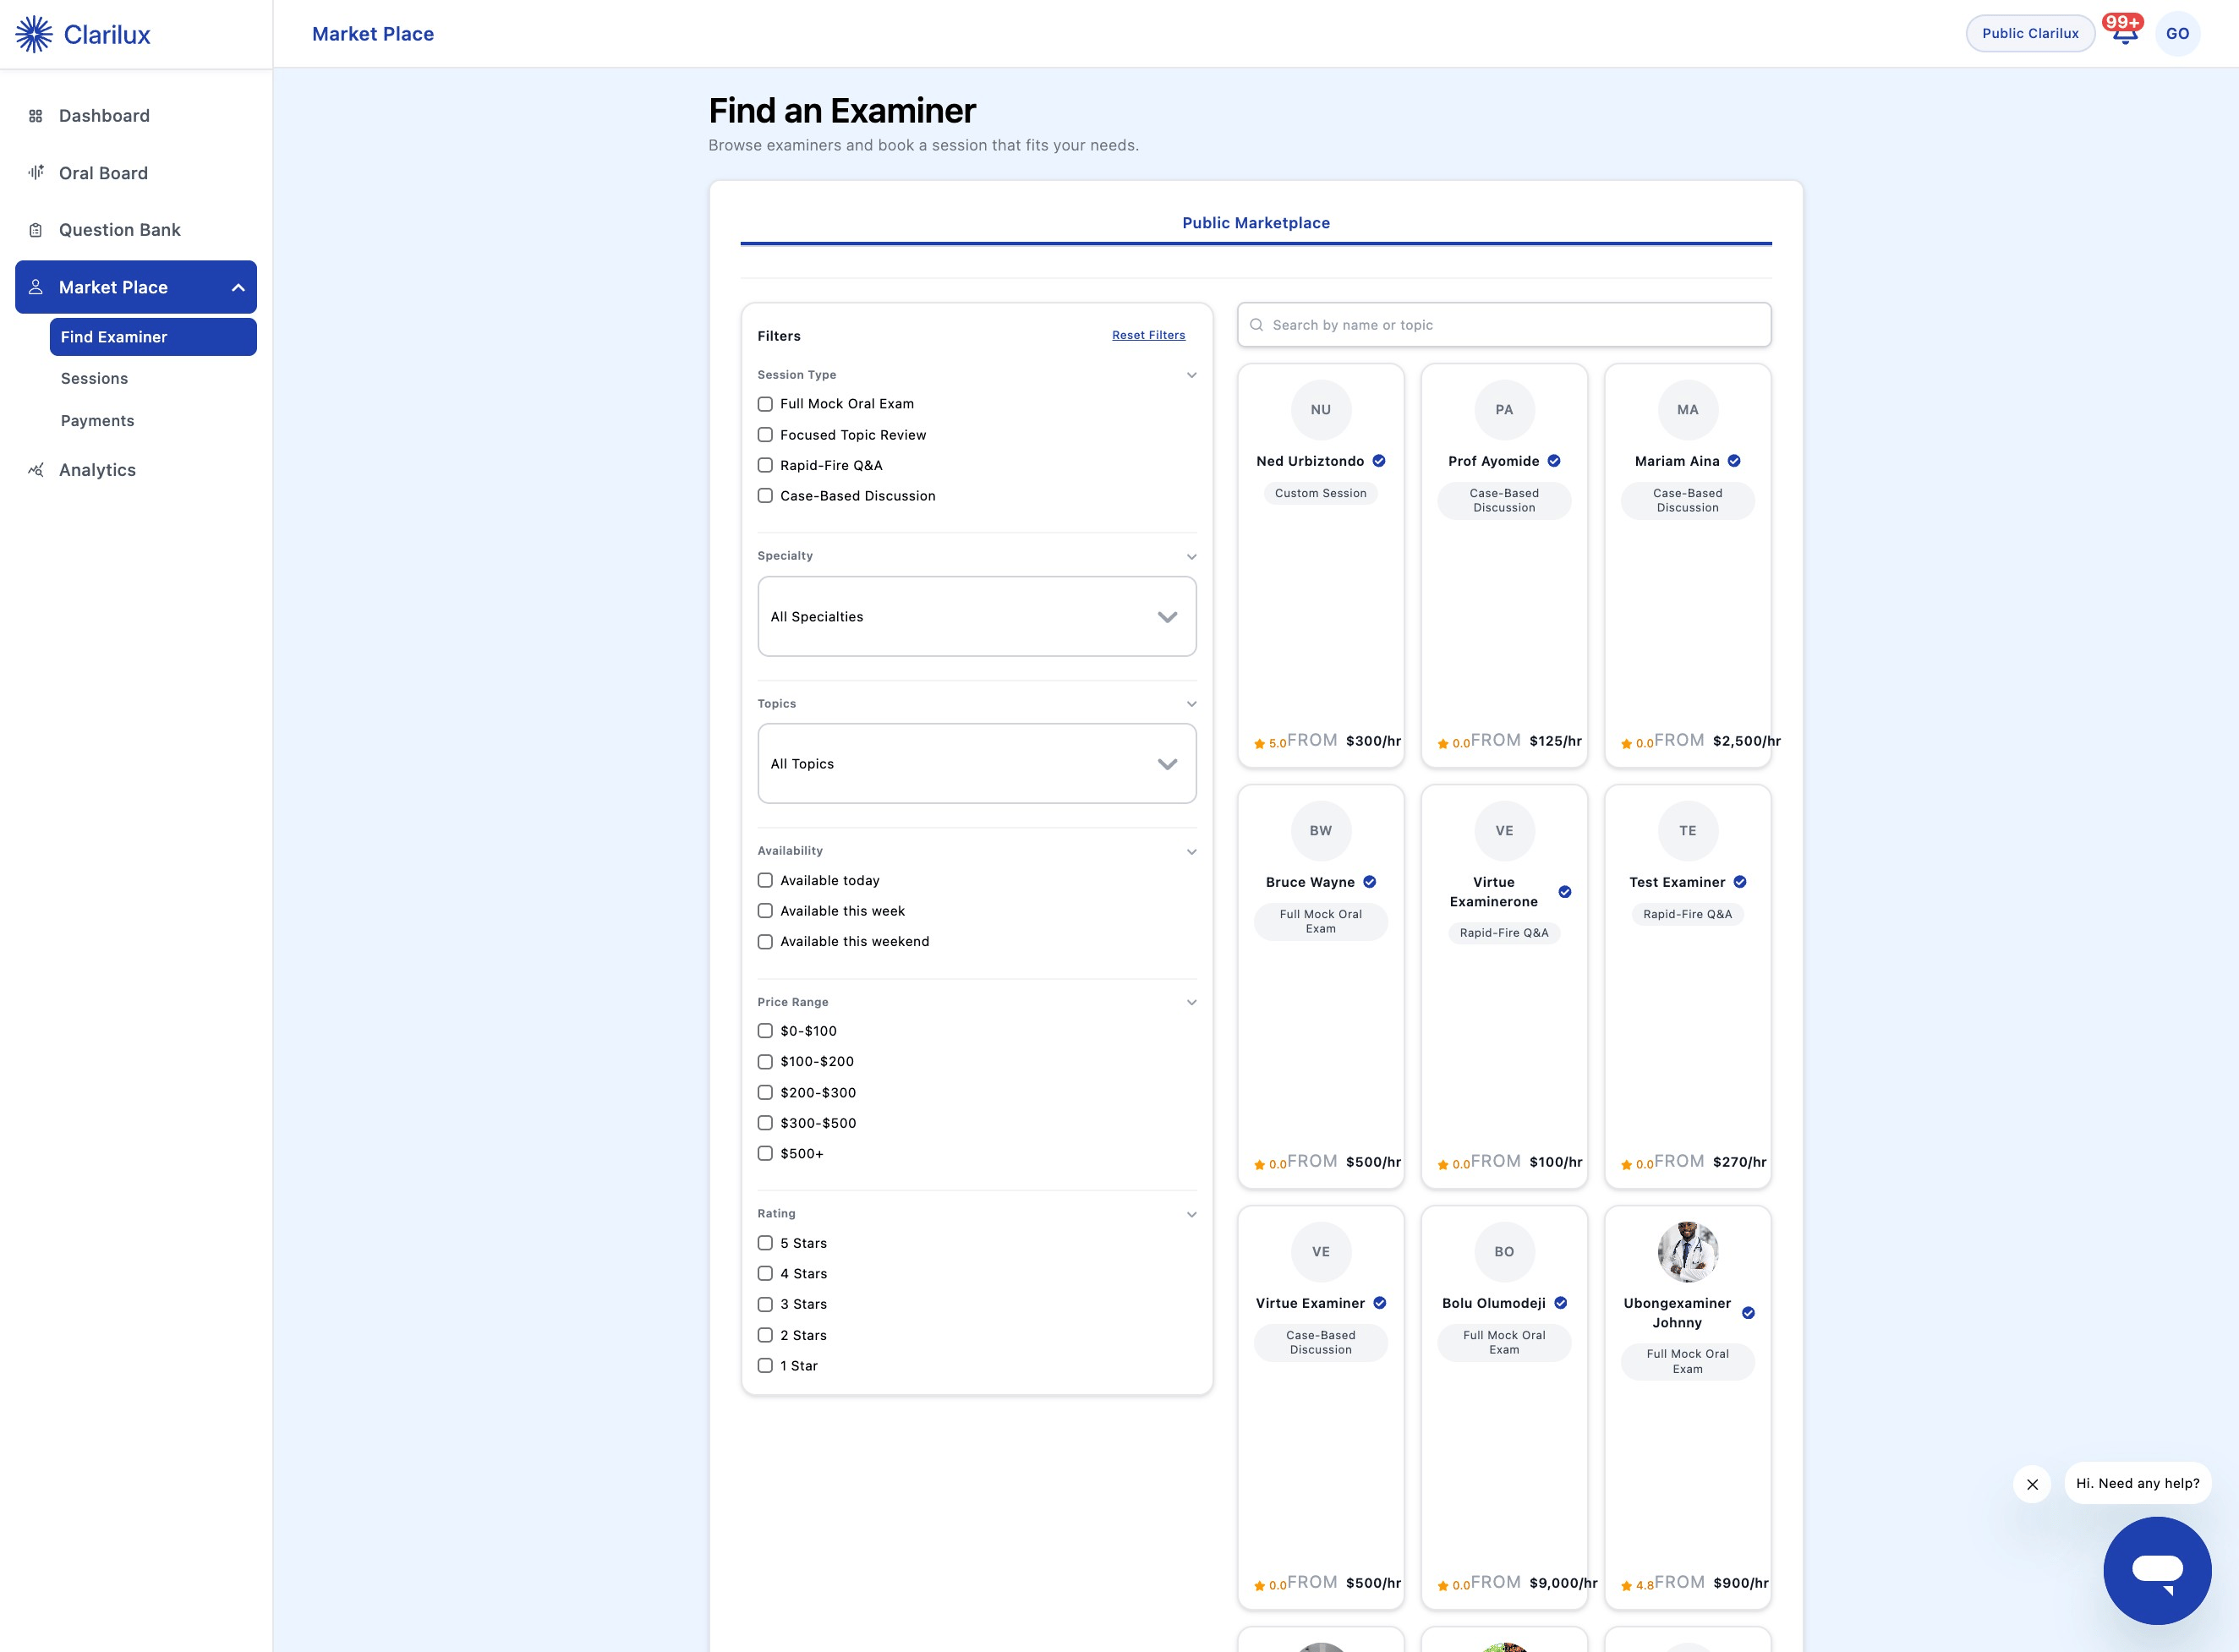
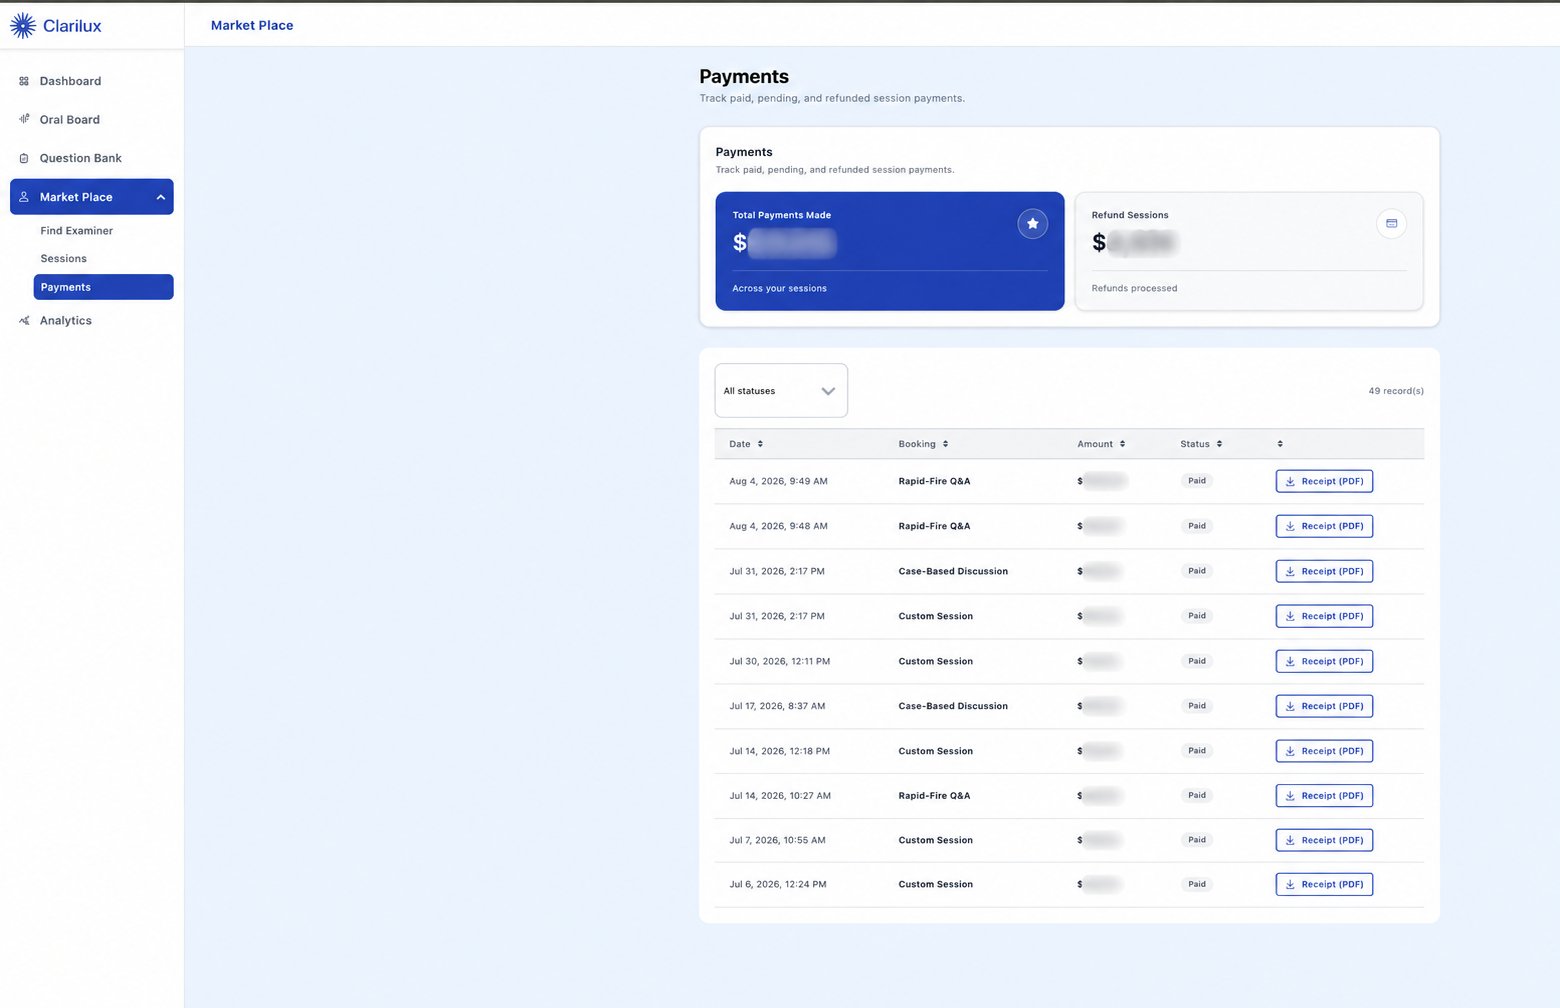
The Marketplace is a comprehensive feature, serving as the central hub for discovering examiners, booking sessions, managing schedules, and tracking financial transactions. The Marketplace is split into three main modules: Find Examiner, Sessions, and Payment. Find Examiner To streamline your search and find the best match for your study needs, you can narrow down the list of examiners using the following filters:- Session Type
- Program
- Speciality
- Topic
- Availability
- Price
- Ratings
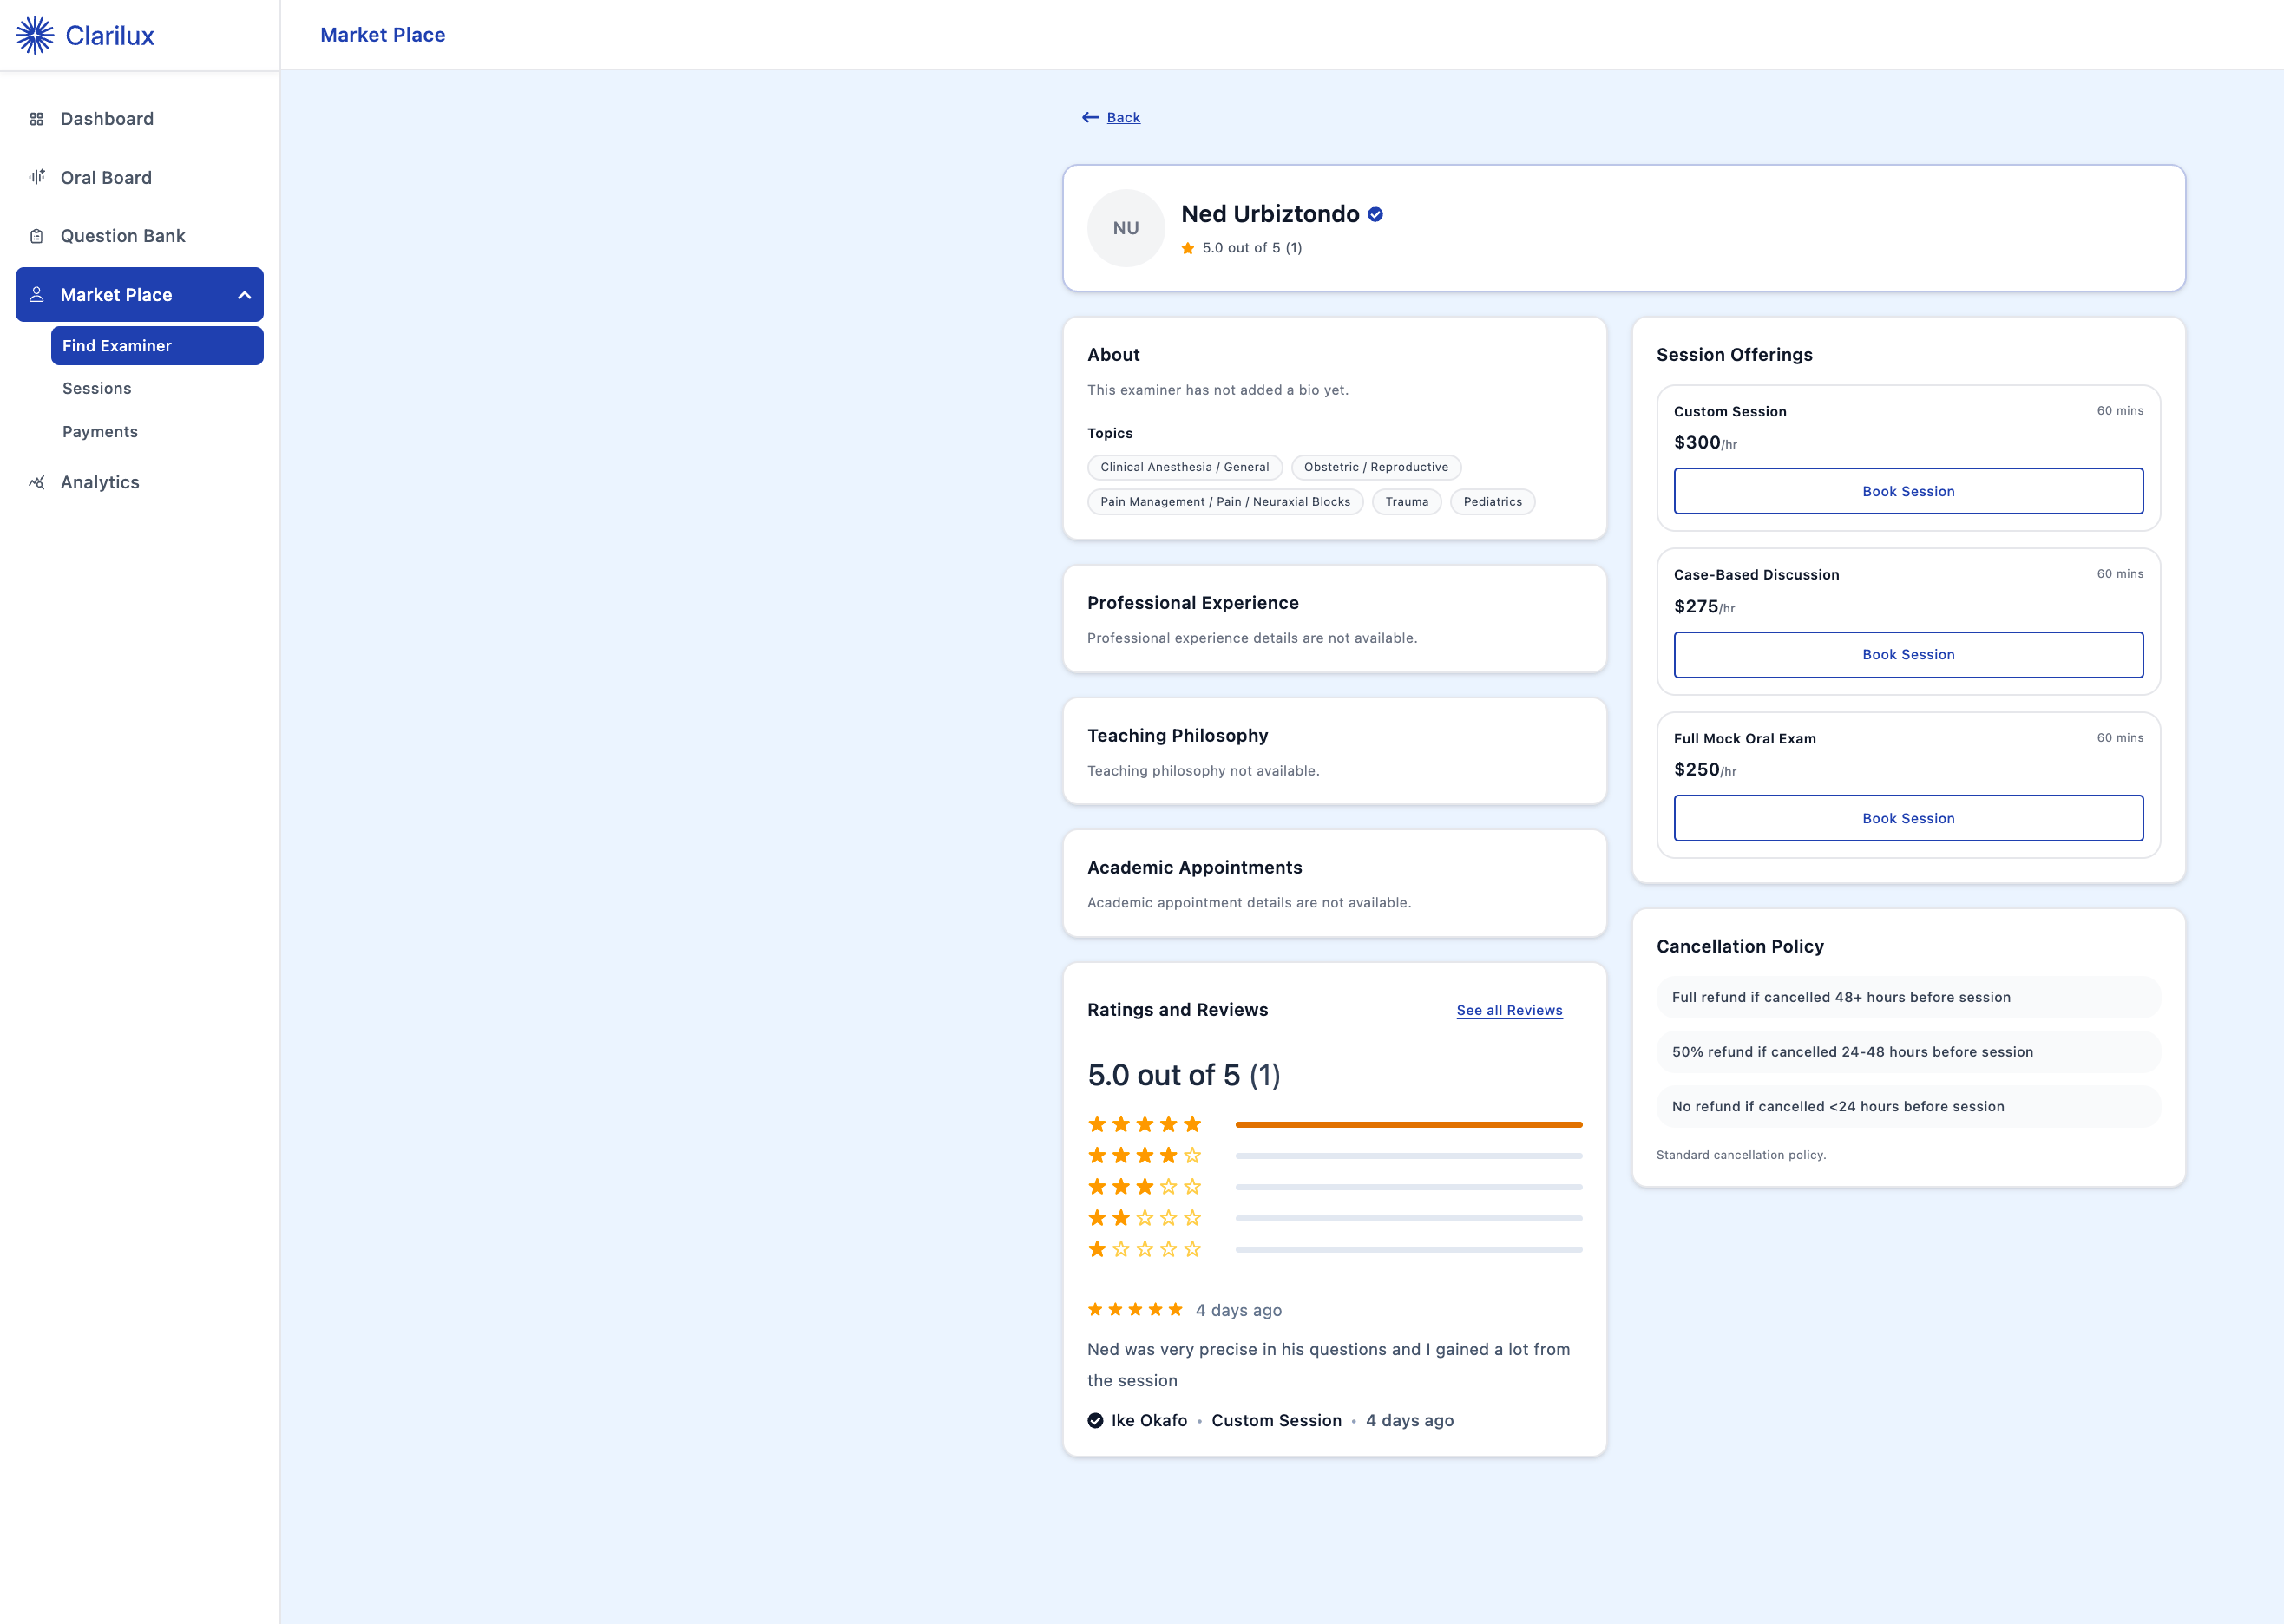
- About Section & Professional Experience: A summary of their background, credentials, and teaching history.
- Session Pricing: Explicit costs associated with booking their time.
- Cancellation Policy: The rules regarding rescheduling or canceling a booked session.
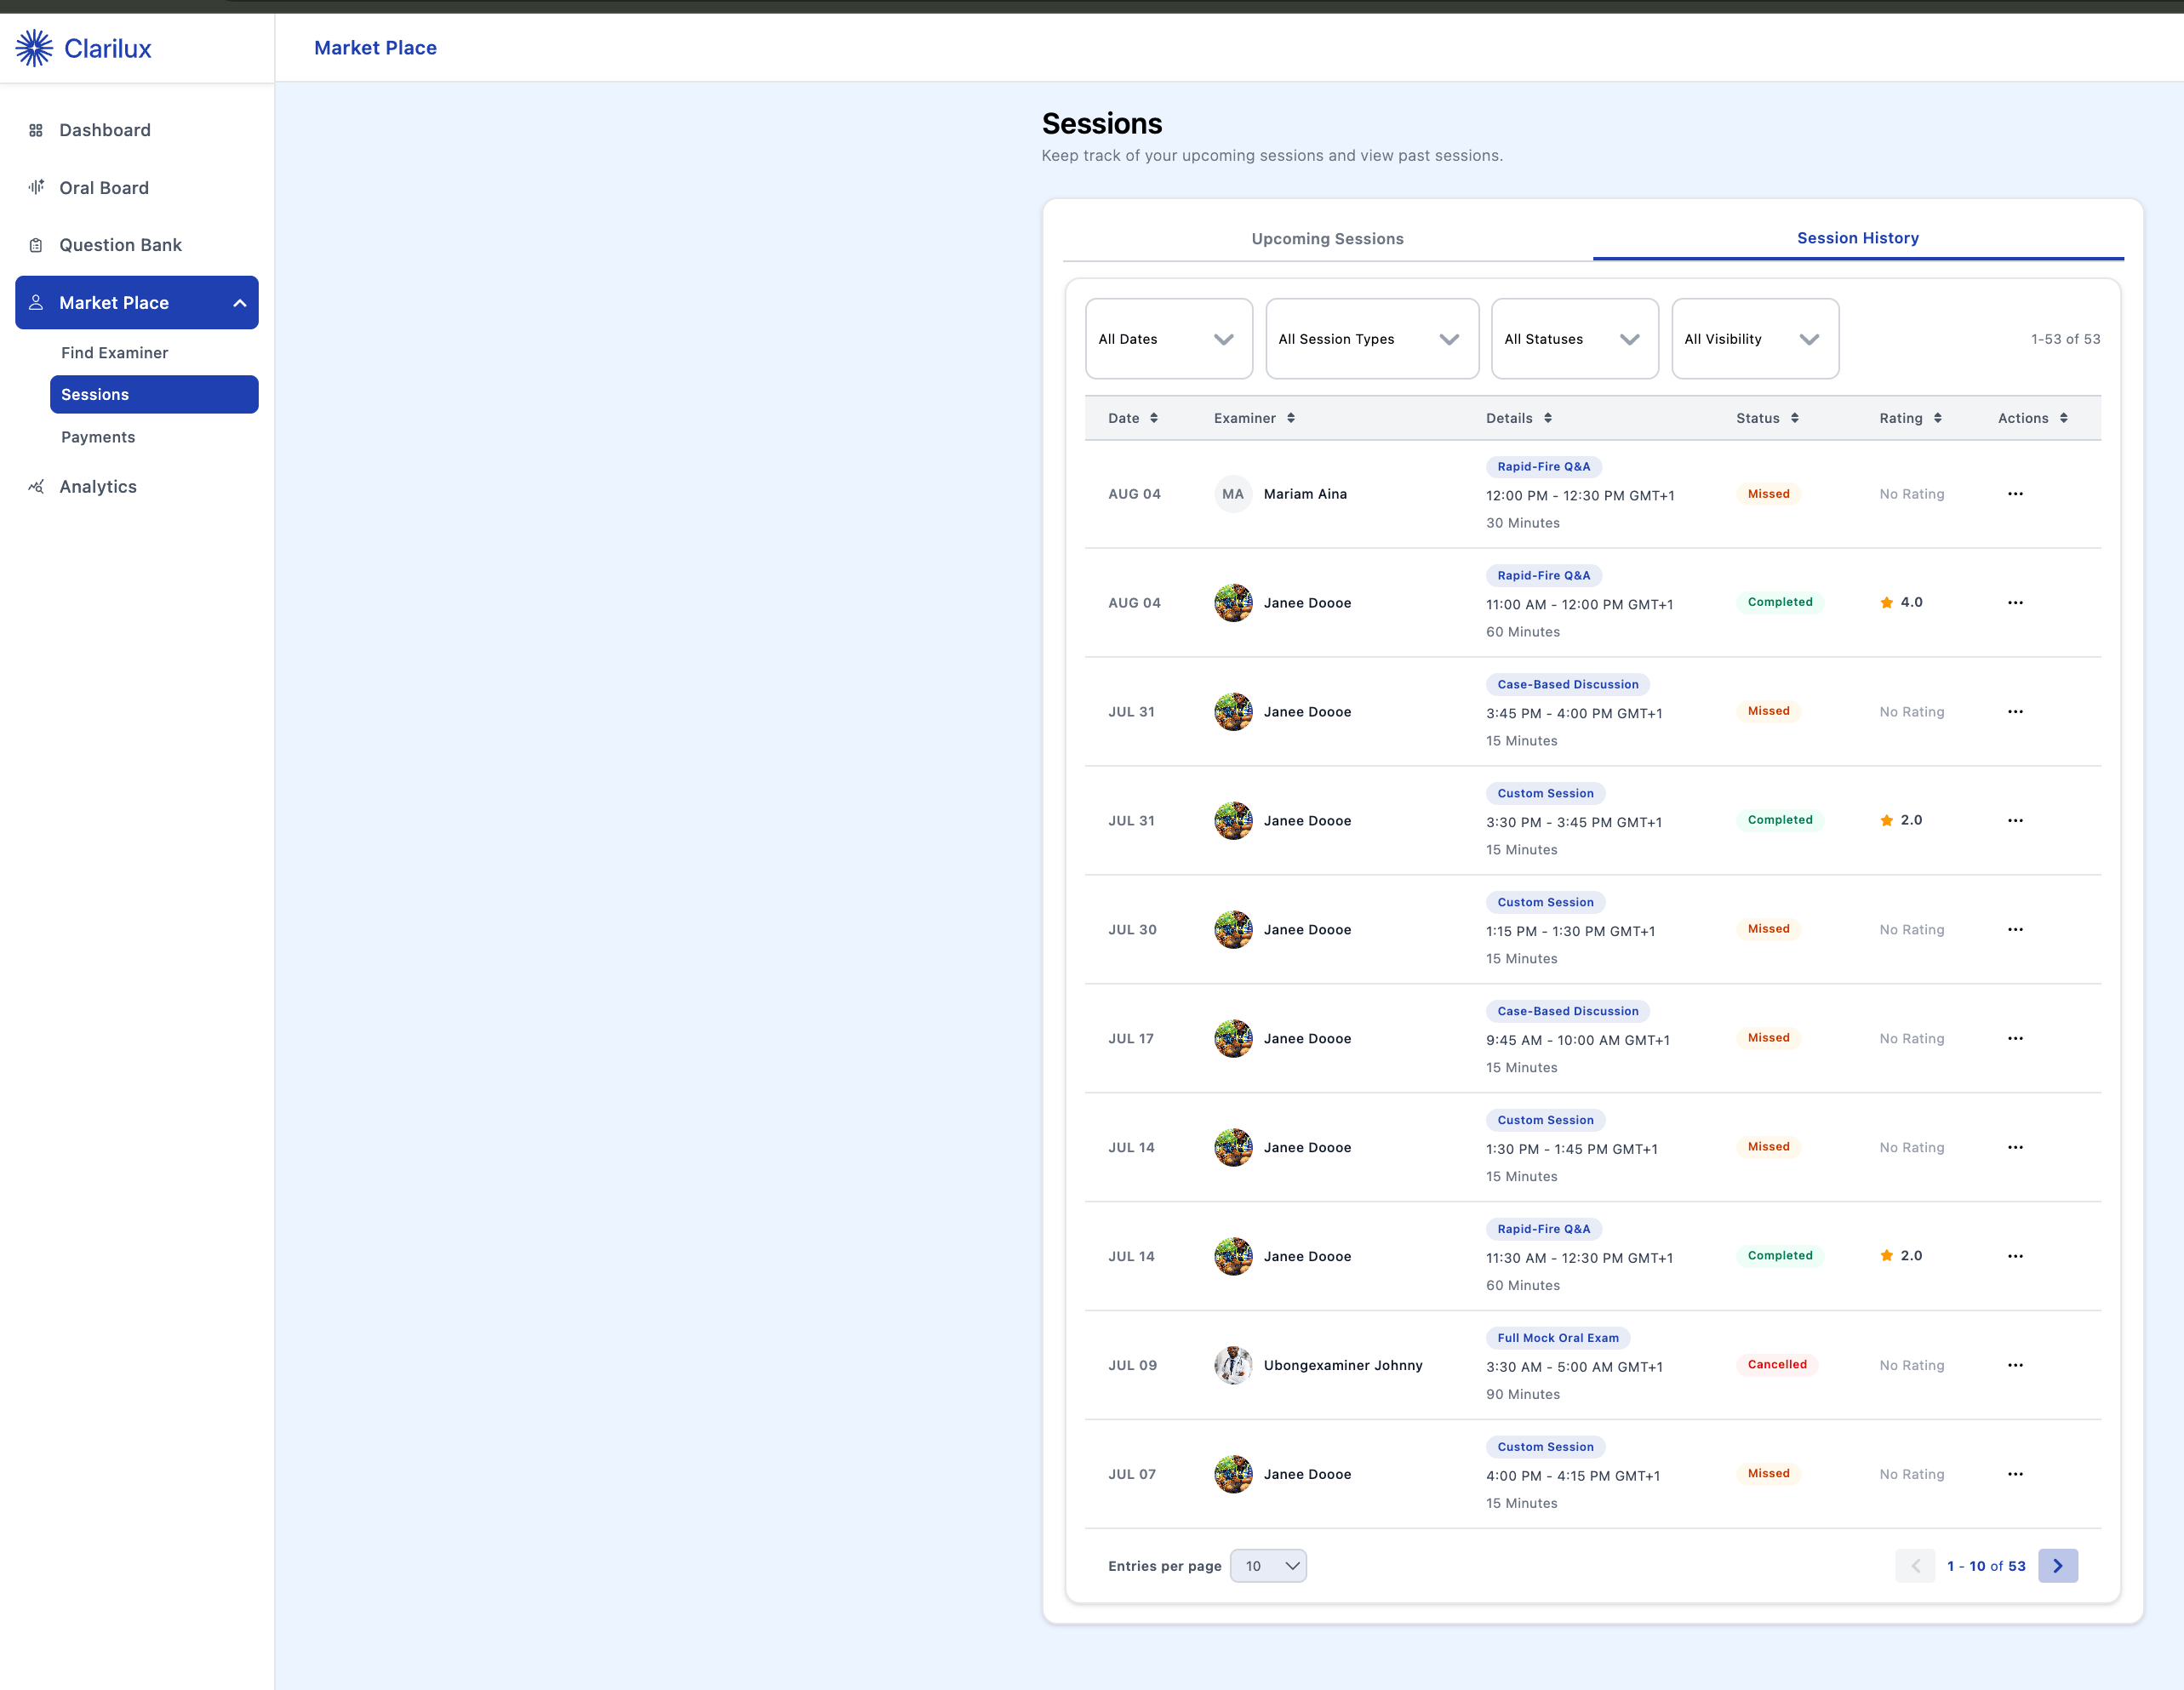
- Upcoming Sessions: A dynamic list displaying all your future, confirmed sessions. You can quickly navigate here to see dates, times, and examiner details.
- Session History: A complete archive of all past sessions you have attended or completed on the platform.
- Financial Summary: View your cumulative total expenditure on the platform, as well as an aggregated overview of any refunded amounts.
- Total Payment Made: Completed transactions for confirmed sessions.
- Refunds: Fees returned to you due to cancellations or updates adhering to the examiner’s policy.
- Financial History: View a quick overview of payments which can be filtered by paid, refunded, failed, disputed and pending and for any transaction listed in your logs, you can directly download an official payment receipt for your personal records
Analytics
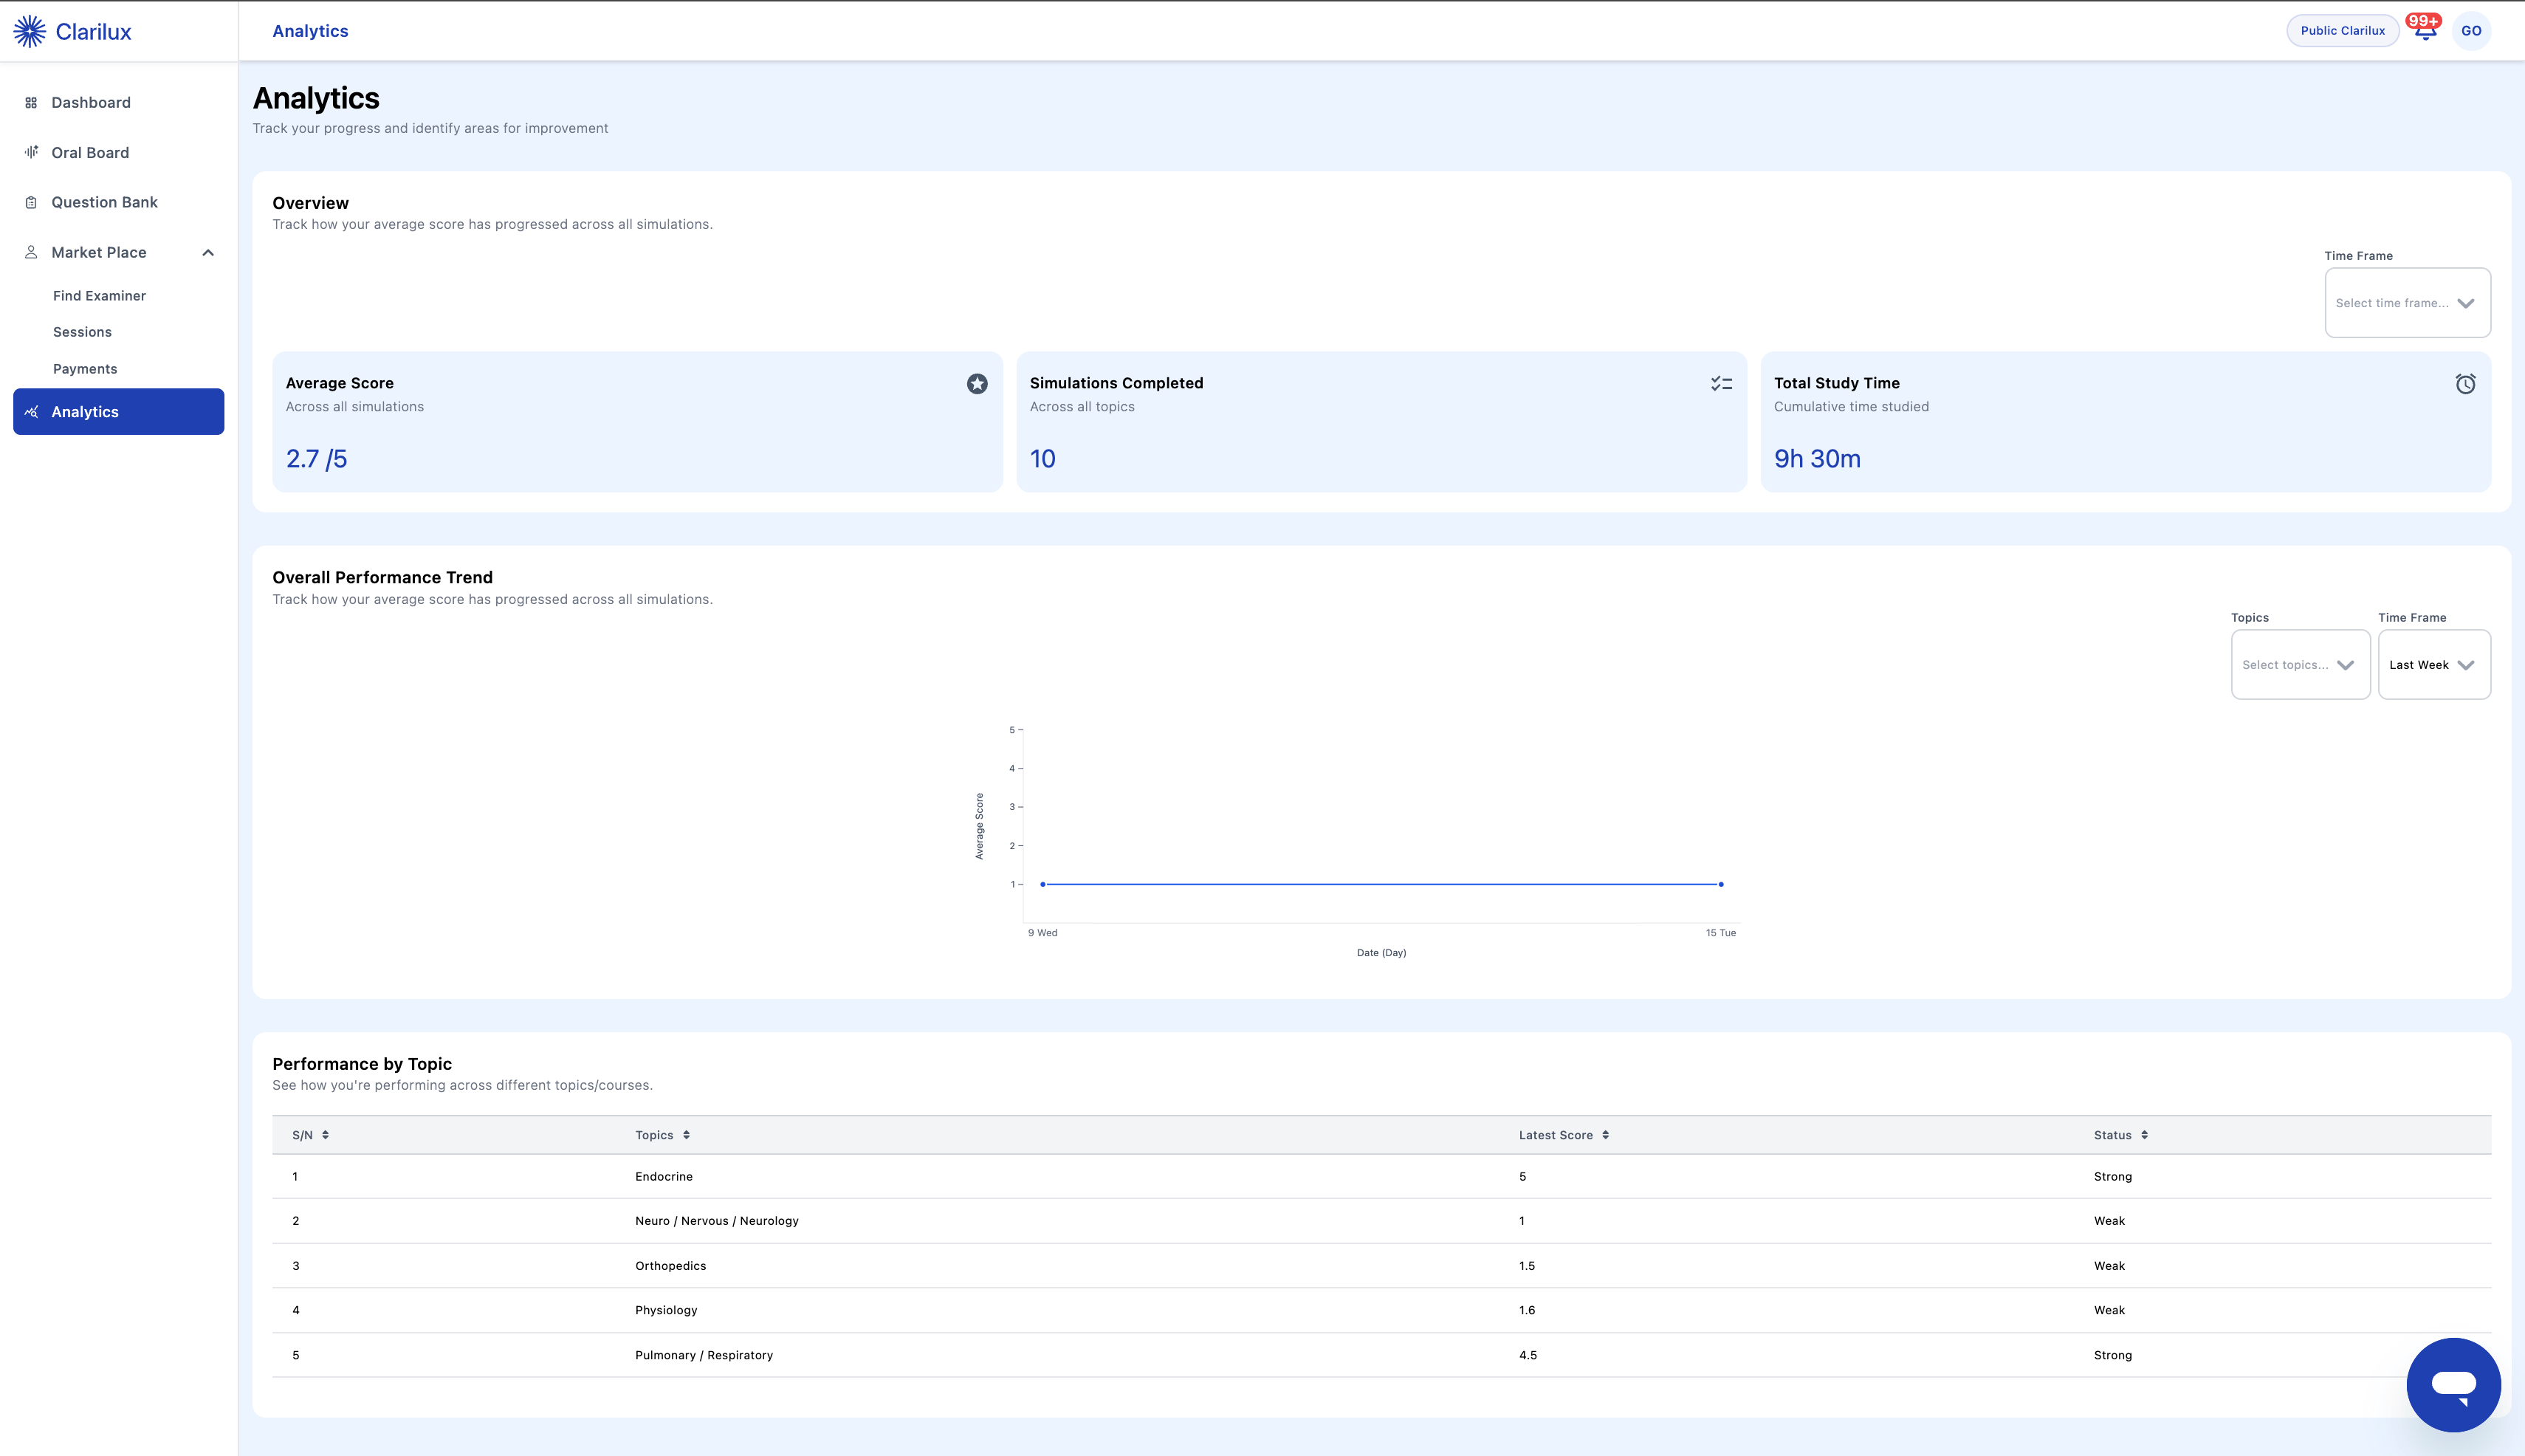
The Analytics feature is a powerful data dashboard. It tracks your overall learning journey, monitors your preparation consistency, and delivers targeted insights to help you identify specific medical or surgical topics that require improvement.- Analytics Overview
- Average Score: Your mean score calculated across all completed practice exam simulations.
- Simulations Completed: A total count of the full-length practice exam simulations you have successfully finished across all topics.
- Total Study Time: A cumulative tracker showing the total hours and minutes you have spent actively studying and practicing on the platform.
- Overall Performance Trend:
Profile
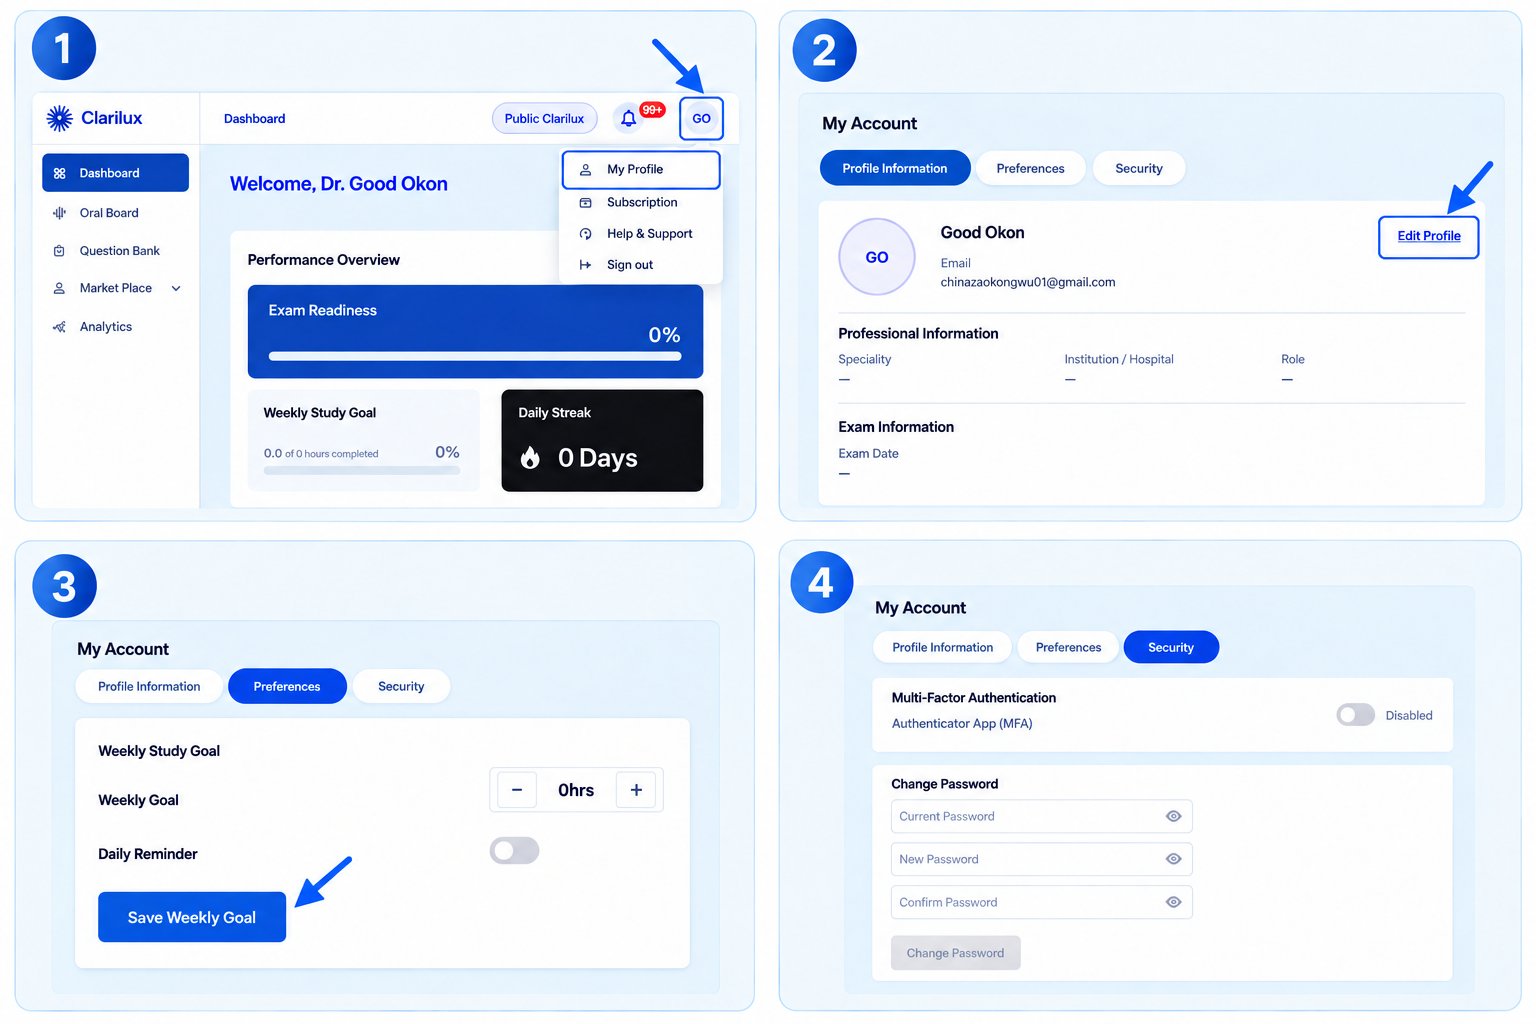
1. Access Your Profile Locate and click your initials in the top right corner of the applicaton. From the dropdown menu that appears, select My profile. 2. Update Profile Information Within the main profile section, you can easily view and edit your profile information to keep them up to date. 3. Set Your Study Preferences Customize the platform to fit your learning schedule:- Weekly Study Goals: Enter the specific number of hours you want to commit to studying each week.
- Daily Reminders: Choose a preferred time to receive automated study nudges.
- Once you have configured your preferences, click Save Weekly Goals to apply the changes.
Billing & Subscription
From the application, click your initials in the top right corner of the screen. Select Billing and Subscription from the dropdown menu. If you are a new user, click Select plan to view the available options.- Browse the available tiers: Basic Plan, Pro Plan, and Premium Plan.
- Review the features and pricing, then select the plan that best suits your preparation needs.
- Input your credit or debit card details.
- You have the option to securely save your payment information for future transactions.
- Click Subscribe. Your new subscription will become active immediately upon successful payment.
- Change Plan: Upgrade or downgrade your current subscription tier.
- Cancel Subscription: Terminate your active subscription if you no longer need it.
- Click the Update payment method button on the Billing and Subscription page.
- You will be securely redirected to the Stripe billing portal, where you can manage all your payment preferences.
- Add a New Payment Method: To use a different card, click Add payment method. You will be prompted to input the Card Number, Expiry Date, Security Code, Country, Phone Number, and Full Name. After filling in the necessary information, click Add to save the new card to your profile.
- Update Billing Information: If you need to change your personal details, select the option to update your information. Fill out the provided form with your Name, Email Address, Billing Address, Country, and Phone Number. Once complete, click Save to lock in your new billing information.
- View Invoice History: You can also easily access and review the history of your past invoices directly from this portal.
Help & Support
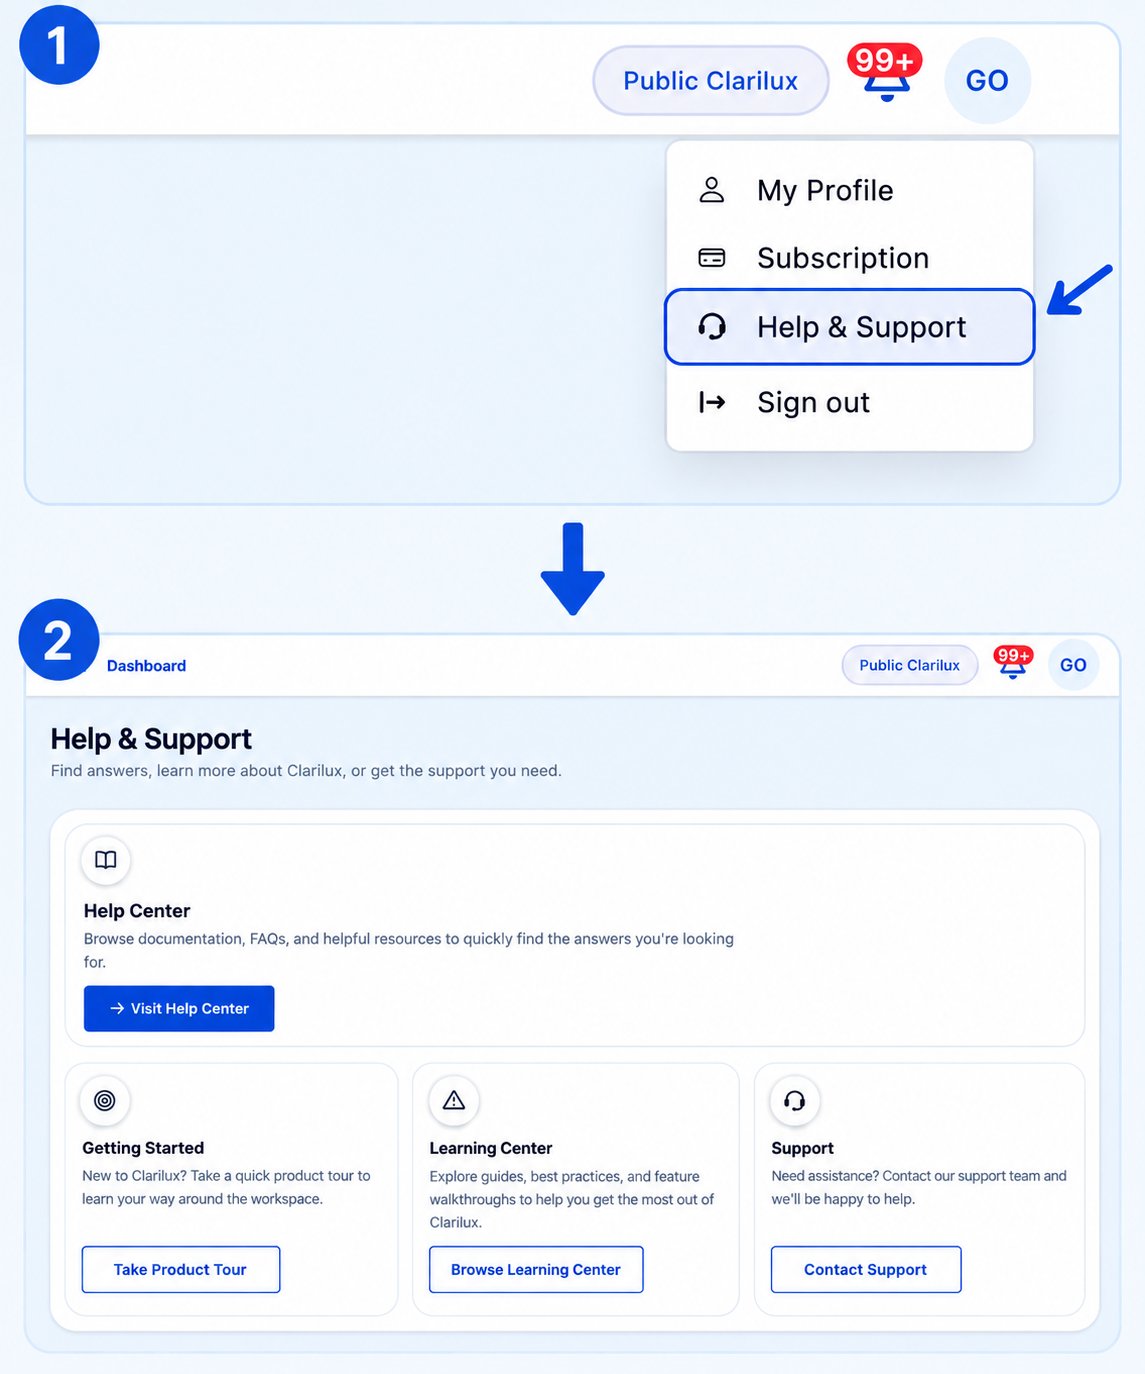
The Help and Support page is your dedicated channel for submitting feedback, reporting technical issues, or requesting assistance with the platform. Whenever you need assistance or want to explore Clarilux more deeply, everything is a click away from the Help & Support page.Accessing Help & Support
- Click your Initials in the top right corner of the dashboard
- Select Help & Support from the dropdown menu
What you’ll find on the Help & Support page
- Help Center: Browse documentation, FAQs, and helpful resources to quickly find the answers you’re looking for. Click Visit Help Center to open the full library.
- Getting Started: Click Take Product Tour to retake the guided walkthrough of your workspace. Useful whether you’re new to Clarilux or want a refresher on where things are.
- Learning Center: Click Browse Learning Center to explore guides, best practices, and feature walkthroughs to help you get the most out of Clarilux.
- Support: Click Contact Support to open a Contact Us form with your Name and Email pre-filled. Enter a Subject and Message describing your issue, and optionally attach a screenshot (JPEG or PNG, up to 2MB). Click Send Message to submit your request to the Clarilux support team.