Complete verification
Submit and monitor your professional credentials.
Manage sessions
Prepare for, conduct, and complete assessments.
Track earnings
Review payments and configure payouts.
- Account Setup & Verification: Completing your professional profile and securely verifying your medical credentials to maintain a trusted community.
- Dashboard Navigation: Understanding your key metrics, monitoring your performance, and managing your upcoming schedule.
- Session Management: Organizing, filtering, and tracking both public marketplace and private institutional sessions.
- Resource Library: Accessing the global Case Bank, generating AI-assisted scenarios, and manually creating custom examination materials.
- Settings & Payouts: Configuring your specific availability windows, managing account security, and connecting your payout accounts.
Getting Started: Account Registration
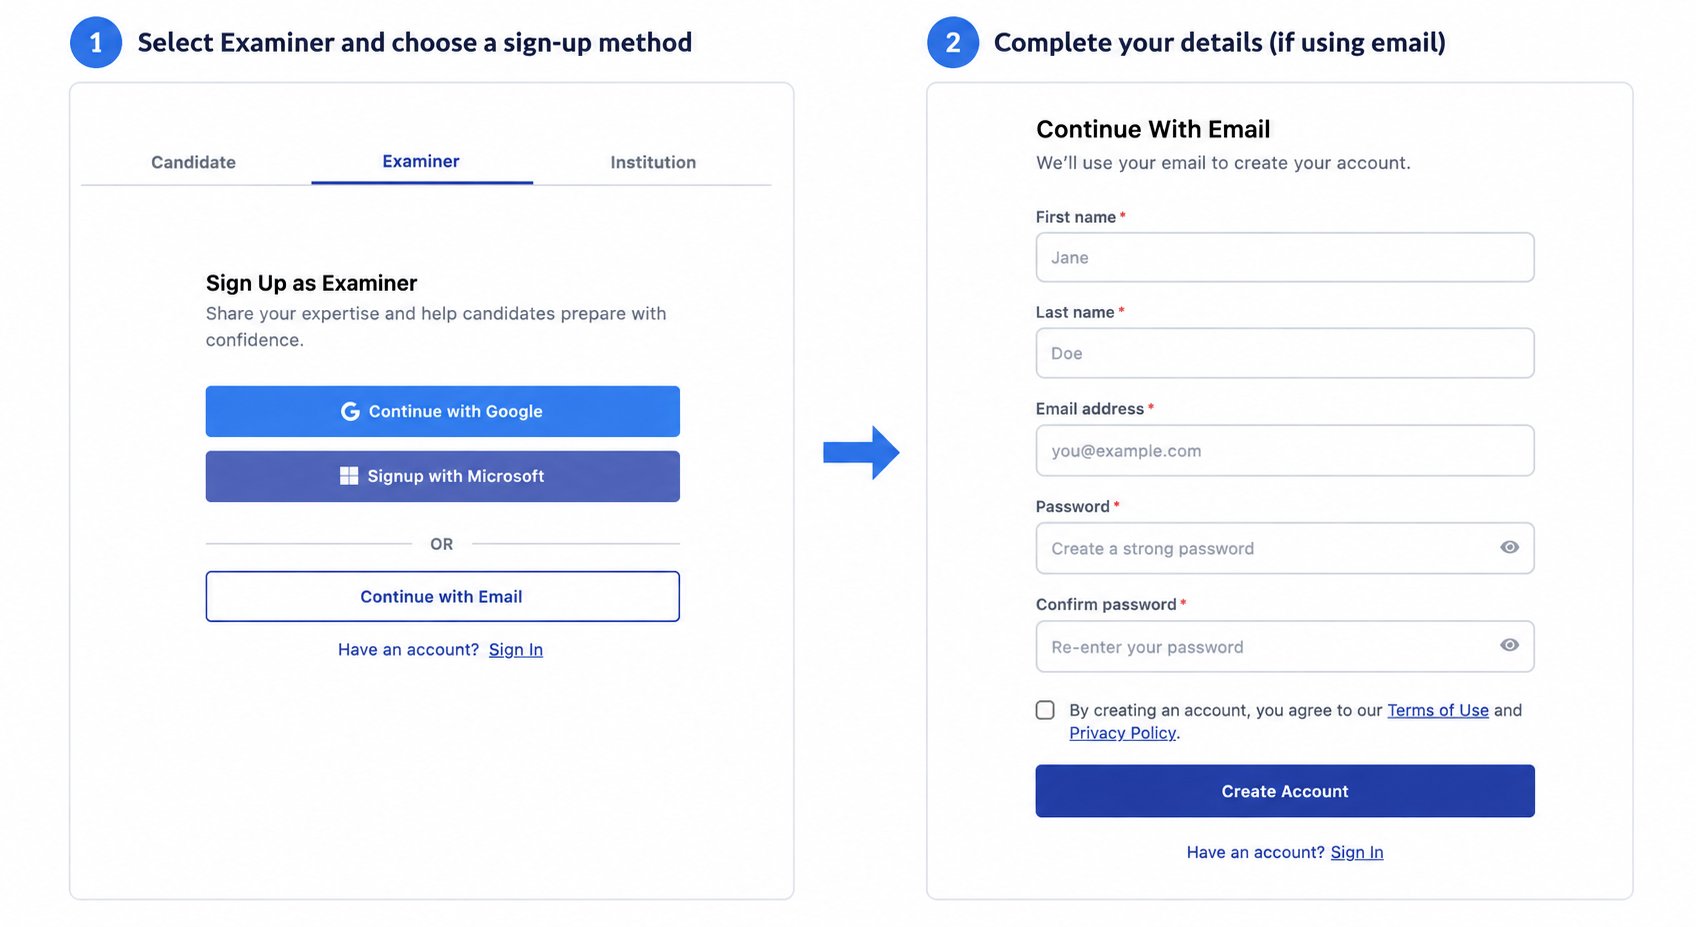
1. Navigate to the Platform Open your preferred web browser and enter the application URL: clarilux.ai. This will take you directly to the platform’s landing page. 2. Initiate Sign-Up Locate and click the Sign-Up button in the top right corner of the landing page. Click on Examiner to be redirected to the Examiner Sign-Up page.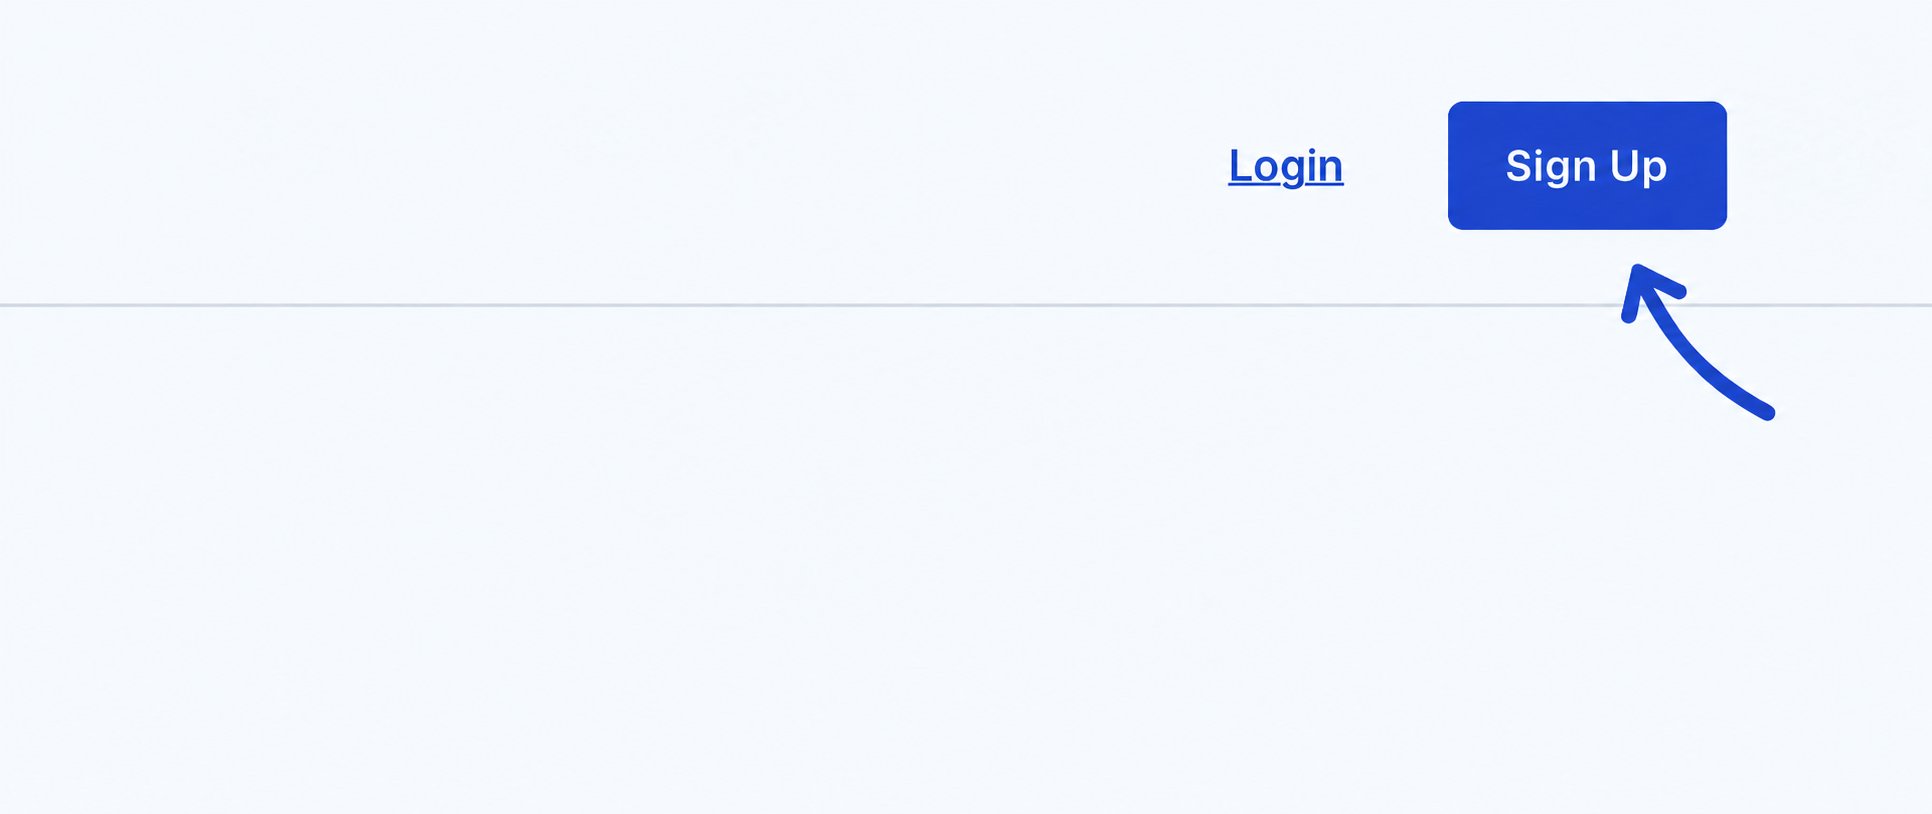
- Sign up with Google
- Sign up with Microsoft
- Continue with Email
- Fill in your First Name, Last Name, Email Address, Password, and Confirm Password.
- Agree to Terms of Use and Privacy Policy then proceed to Create Account
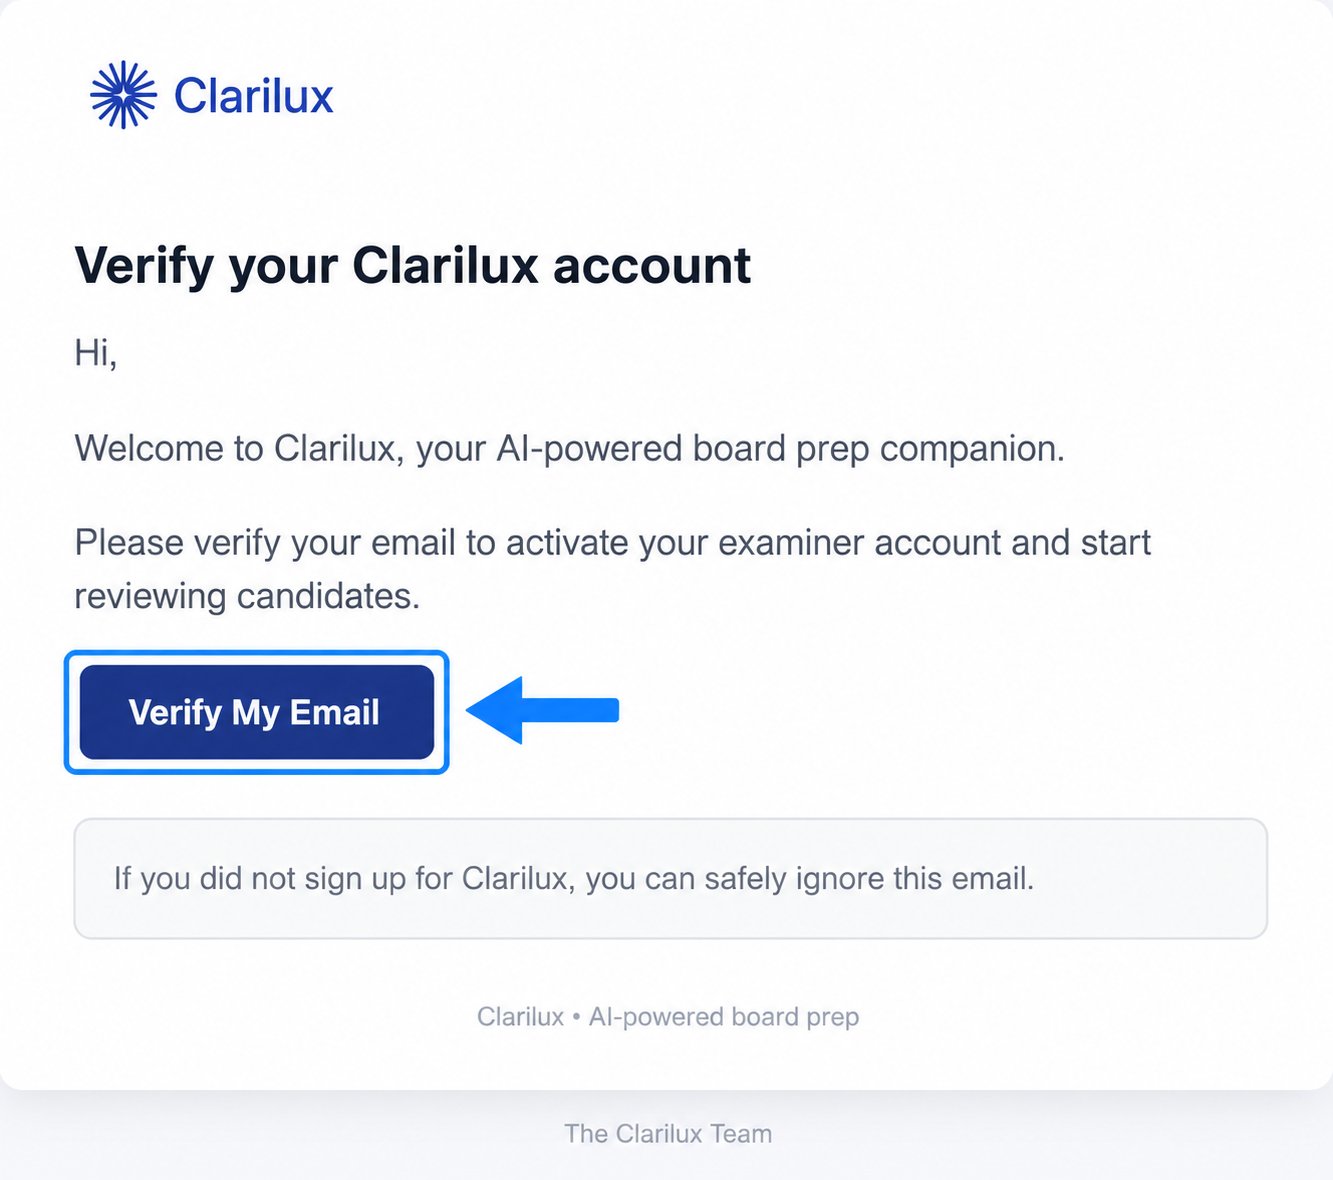
Verification Workflow Breakdown
- Step 1: Initiation The “Verify your credentials” page outlines that the process is designed to confirm the examiner’s medical license, specialty, and board certifications to maintain a trusted community. It details that the user will submit ABA credential details, have them confirmed, and then upload a supporting board certification document. The user begins by clicking the “Start Verification” button.
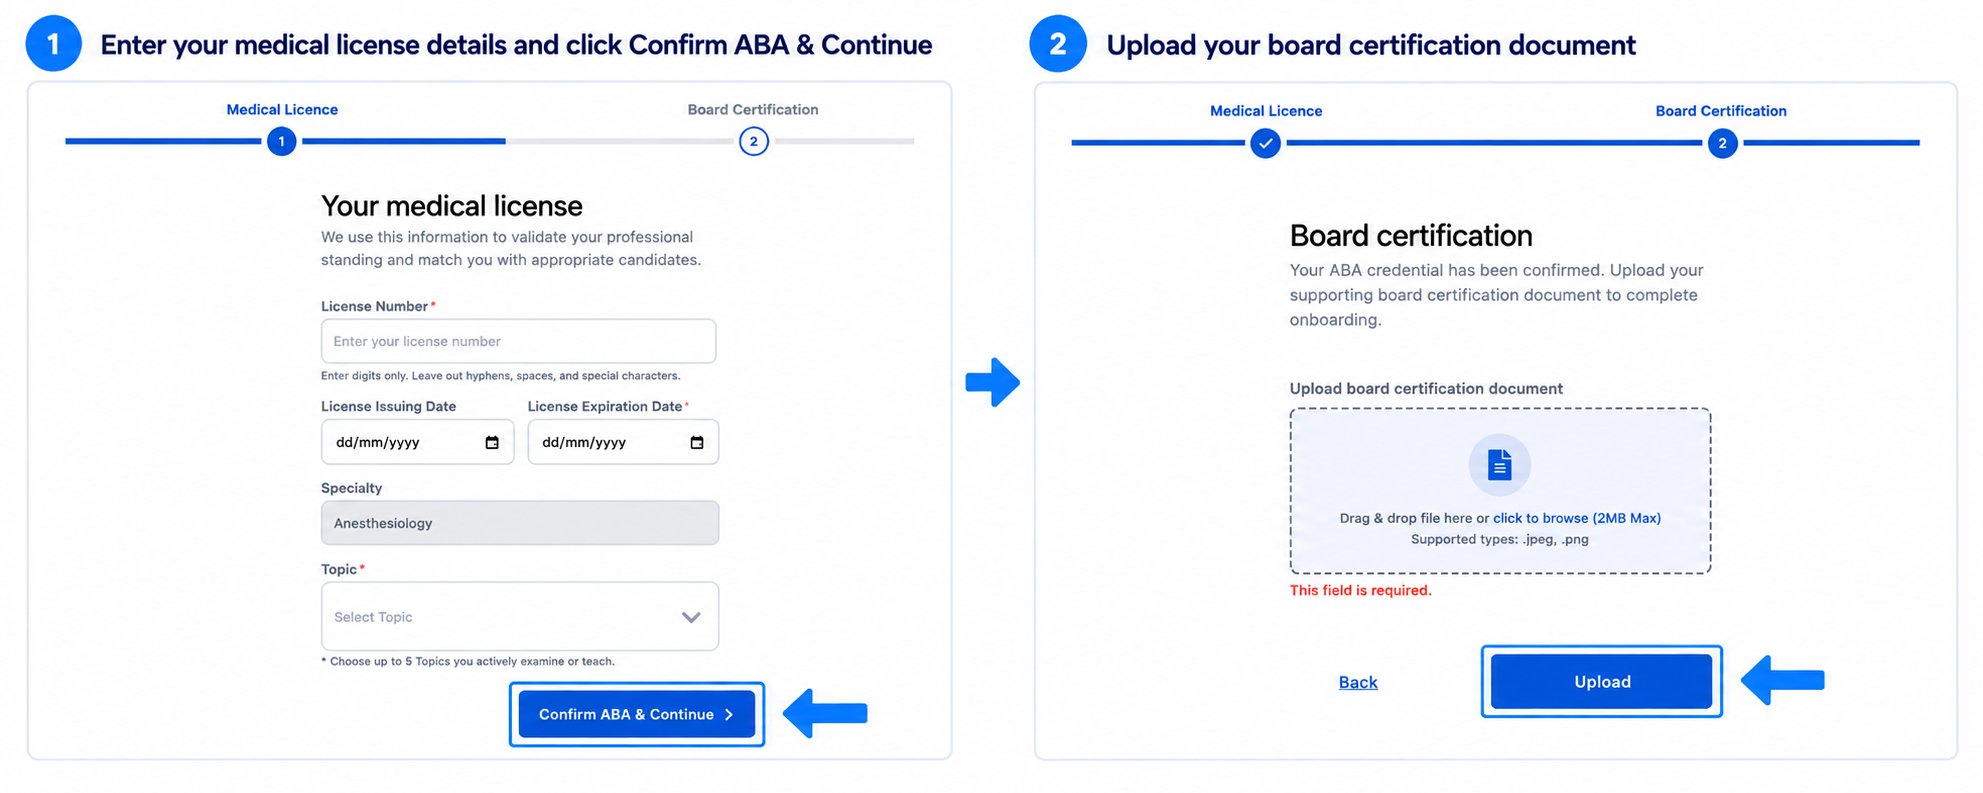
- Step 2: Medical License Submission The user is directed to the “Your medical license” form, where they must input their “License Number” using digits only, alongside the “License Issuing Date” and “License Expiration Date”.
- Step 3: Specialty and Topics Selection The system pre-fills the specialty field with “Anesthesiology”. The examiner then uses a dropdown menu to choose up to 5 topics they actively teach.
- Step 4: Confirmation and Progression To move to the “Board Certification” document upload stage, the examiner clicks the “Confirm ABA & Continue” button.
- Step 5: Document Upload Following the ABA credential confirmation, the examiner reaches the upload page for their board certification documents. The system accepts specific image formats (.JPEG and .PNG). The examiner attaches their files and clicks “Upload and Finish.”
- Step 6: Success and Orientation A “Verification Successful” page appears, providing next steps to keep the user engaged. It suggests they set up MFA or choose to do it later from the account settings, complete their profile details, establish their availability, and begin exploring the platform.
- Step 7: MFA Configuration Connect an authenticator app for enhanced security. To postpone this, click Finish Later. Confirm your choice by clicking Continue when prompted. When the secondary notification detailing the benefits of MFA appears, select Set up later to proceed
- Step 8: Dashboard Access The user is then redirected to the main examiner dashboard where they will manage their active sessions and candidate interactions.
Dashboard
Upon logging into your account, you are automatically directed to this centralized hub. The dashboard is designed to give you a complete, at-a-glance view of your account activity, upcoming schedule, and platform settings. First-time login: Guided tour When you land on the dashboard for the first time, a guided tour appears to walk you through the key areas of your dashboard. Click Next to move through each step, or click Skip at any time to exit the tour and explore on your own.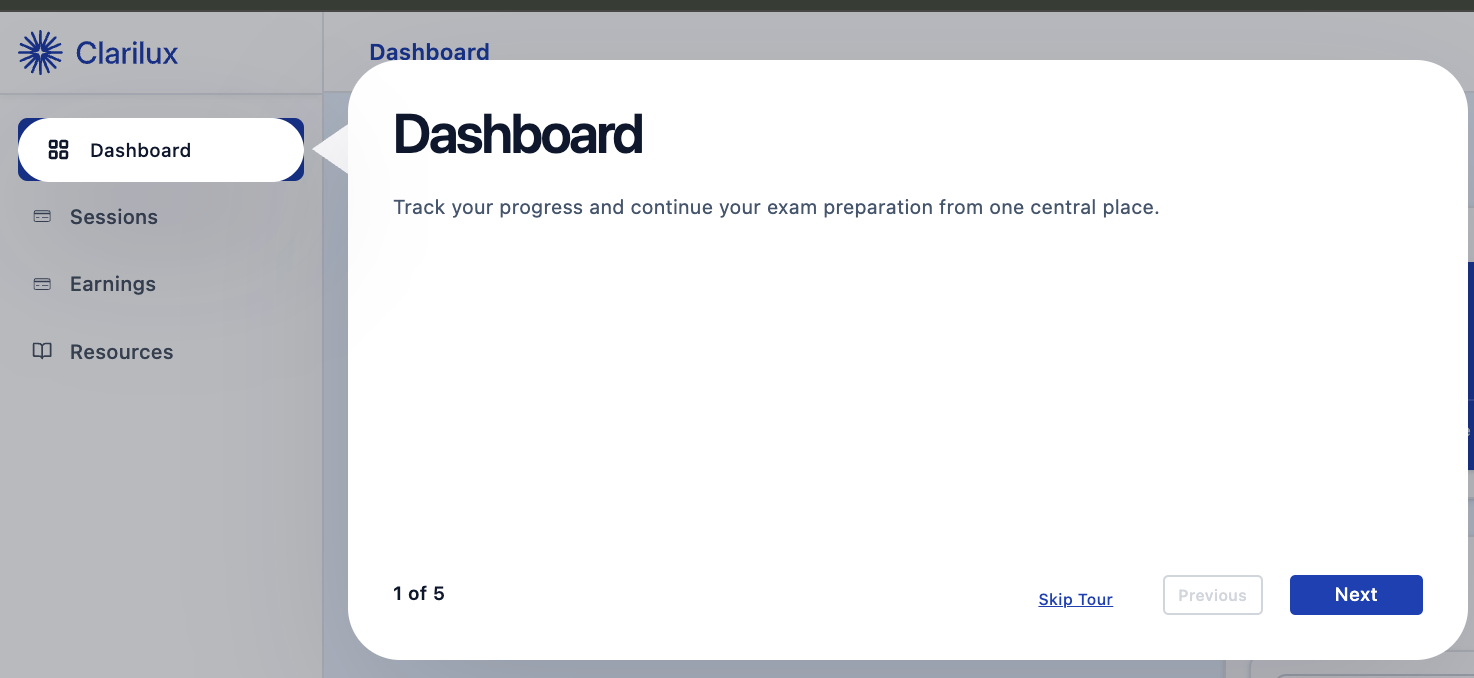
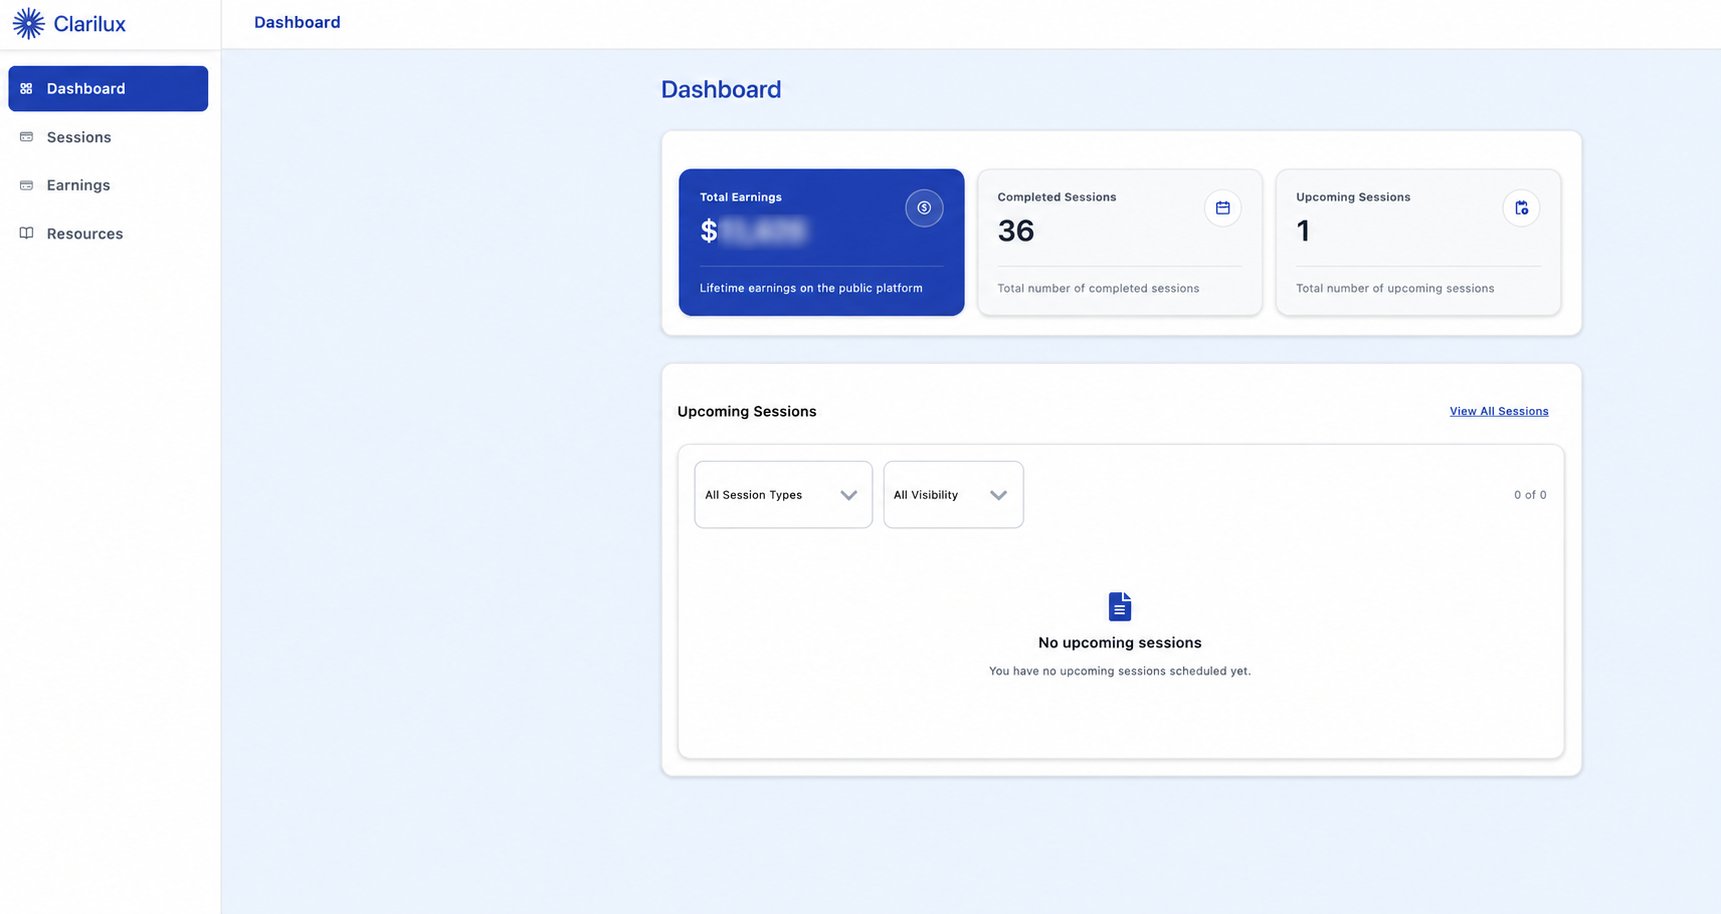
- Total Earnings: The total amount you have earned from your participation.
- Completed Sessions: The overall number of examination sessions you have successfully finished.
- Upcoming Sessions: The total count of your scheduled, pending sessions.
- Sort by Session Type: Filter your upcoming schedule based on the specific format or category of the examination.
- Sort by Visibility: Filter sessions based on their platform environment. This allows you to view sessions located in the public Clarilux marketplace separately from sessions that belong to private, institutional environments.
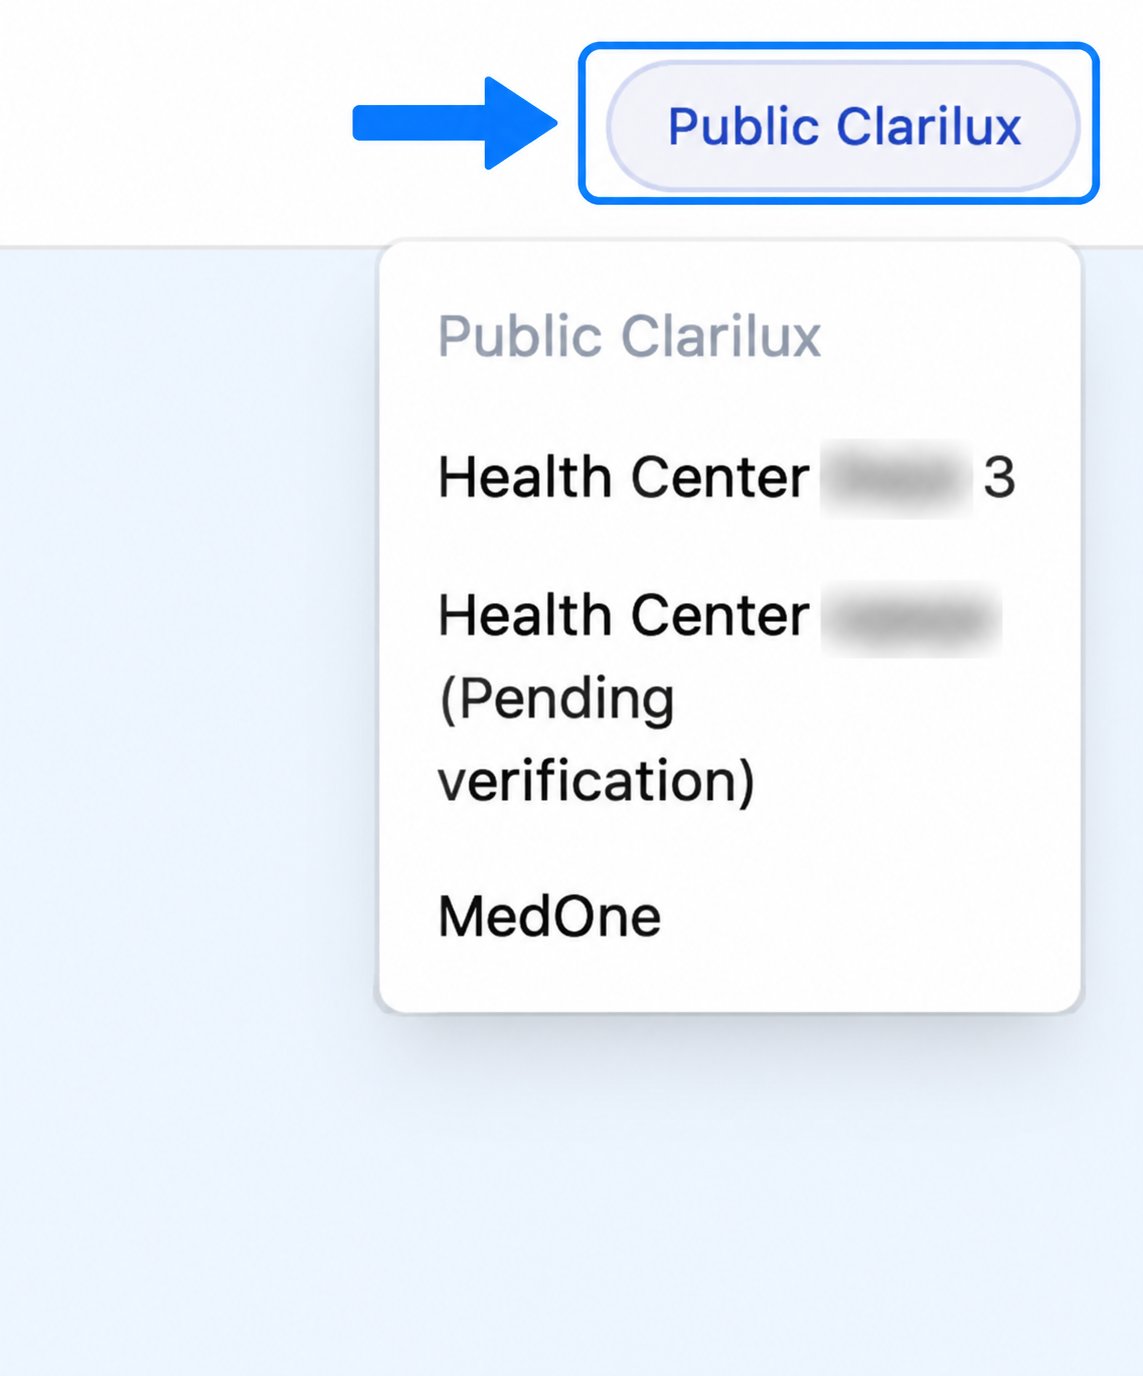
- Environment Toggle: Located directly beside the notification bell, this switch allows you to seamlessly transition your dashboard view between the public Clarilux platform and any specific private institutions you are a member of.
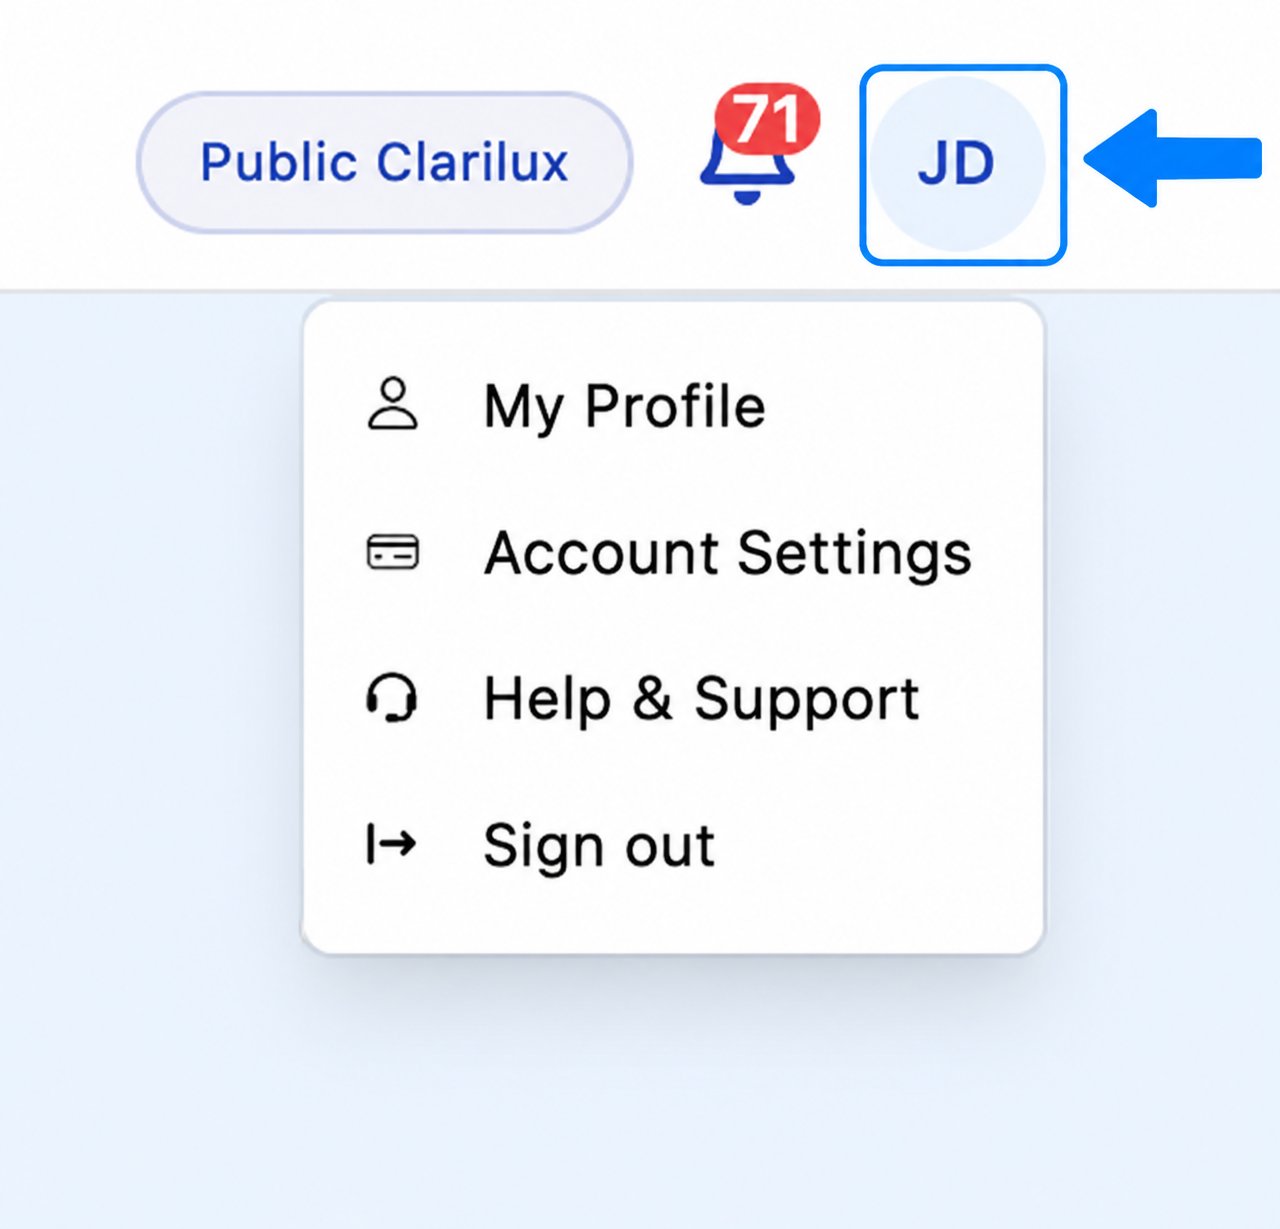
- Profile Access: Click on your initials in the corner to access your account settings, update your personal information, and manage your availability.
My Programs
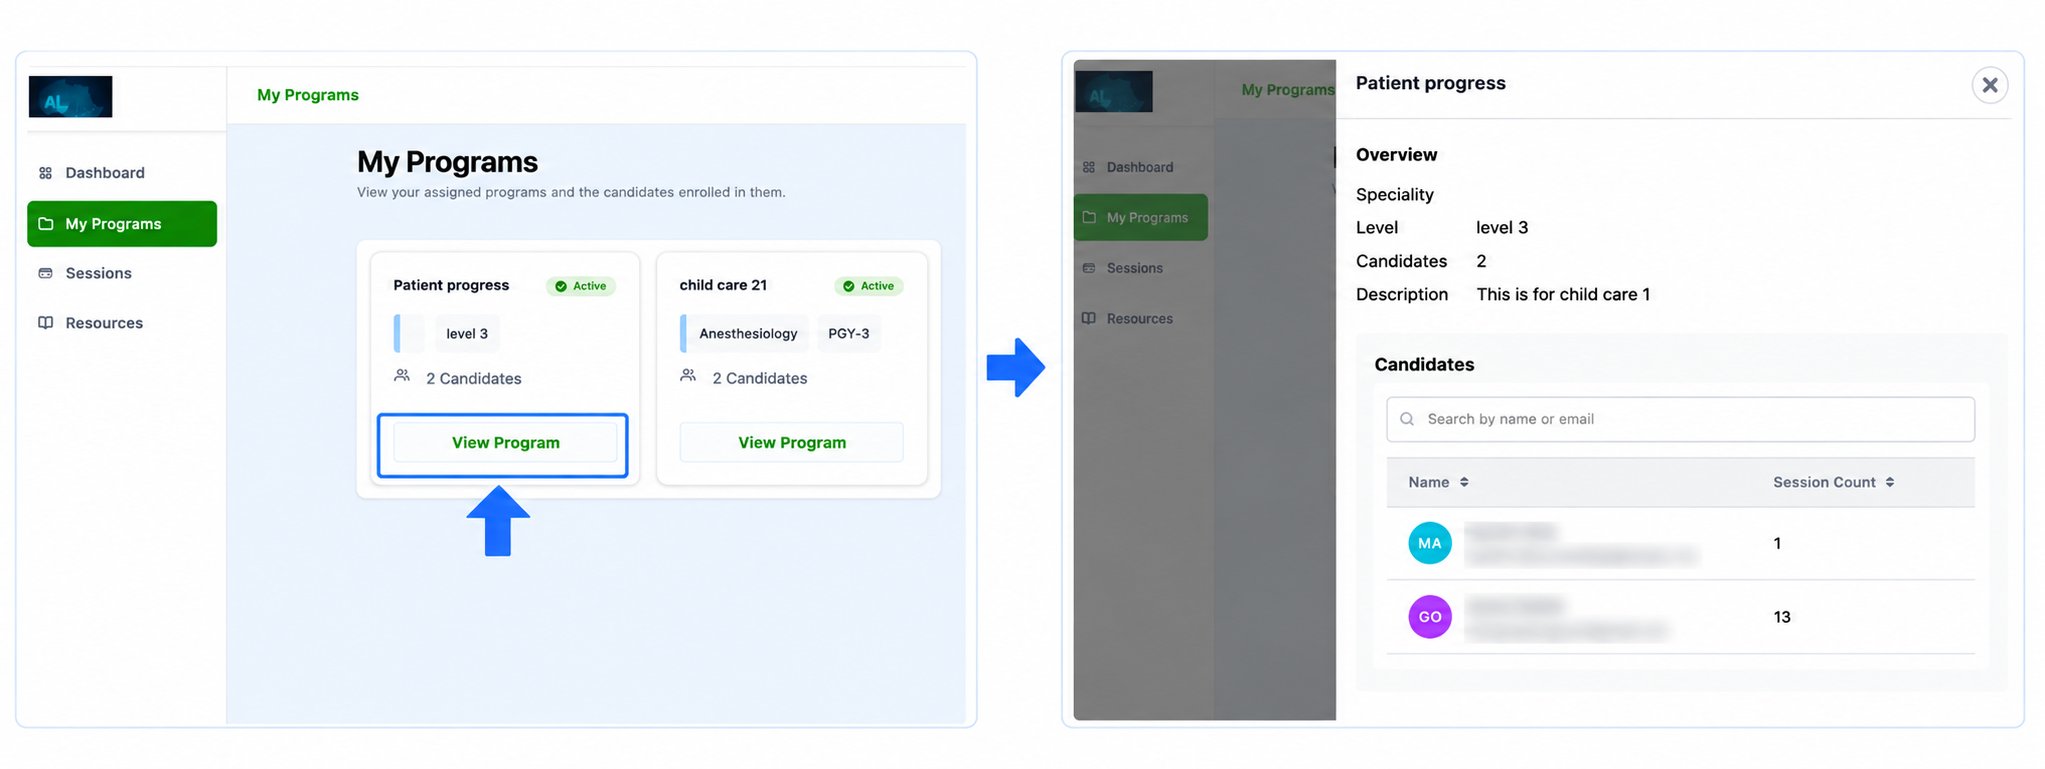
The My Programs feature is tailored exclusively for examiners who are members of private institutions. This section is not available on the public Clarilux marketplace and is used to monitor your specific institutional training cohorts. Navigating to My Programs- Click on My Programs on the left-hand sidebar.
- You will be redirected to the main My Programs page, which displays a comprehensive list of all institutional programs you are currently a part of.
- Program Name: The title of the specific training track.
- Status: Your current standing within the program (e.g., Active).
- Training Level: The residency or educational stage targeted by the program.
- Specialty: The medical specialty area of the program.
- Number of Candidates: Total count of candidates enrolled in that cohort.
- Program Metadata: A comprehensive breakdown including the program name, description, specialty, training level, and total candidate count.
- Candidates: A complete list of all individual candidates currently enrolled within that specific program.
- Search: A dedicated search utility that allows you to instantly locate specific candidates within the program by entering their name or email address.
Sessions
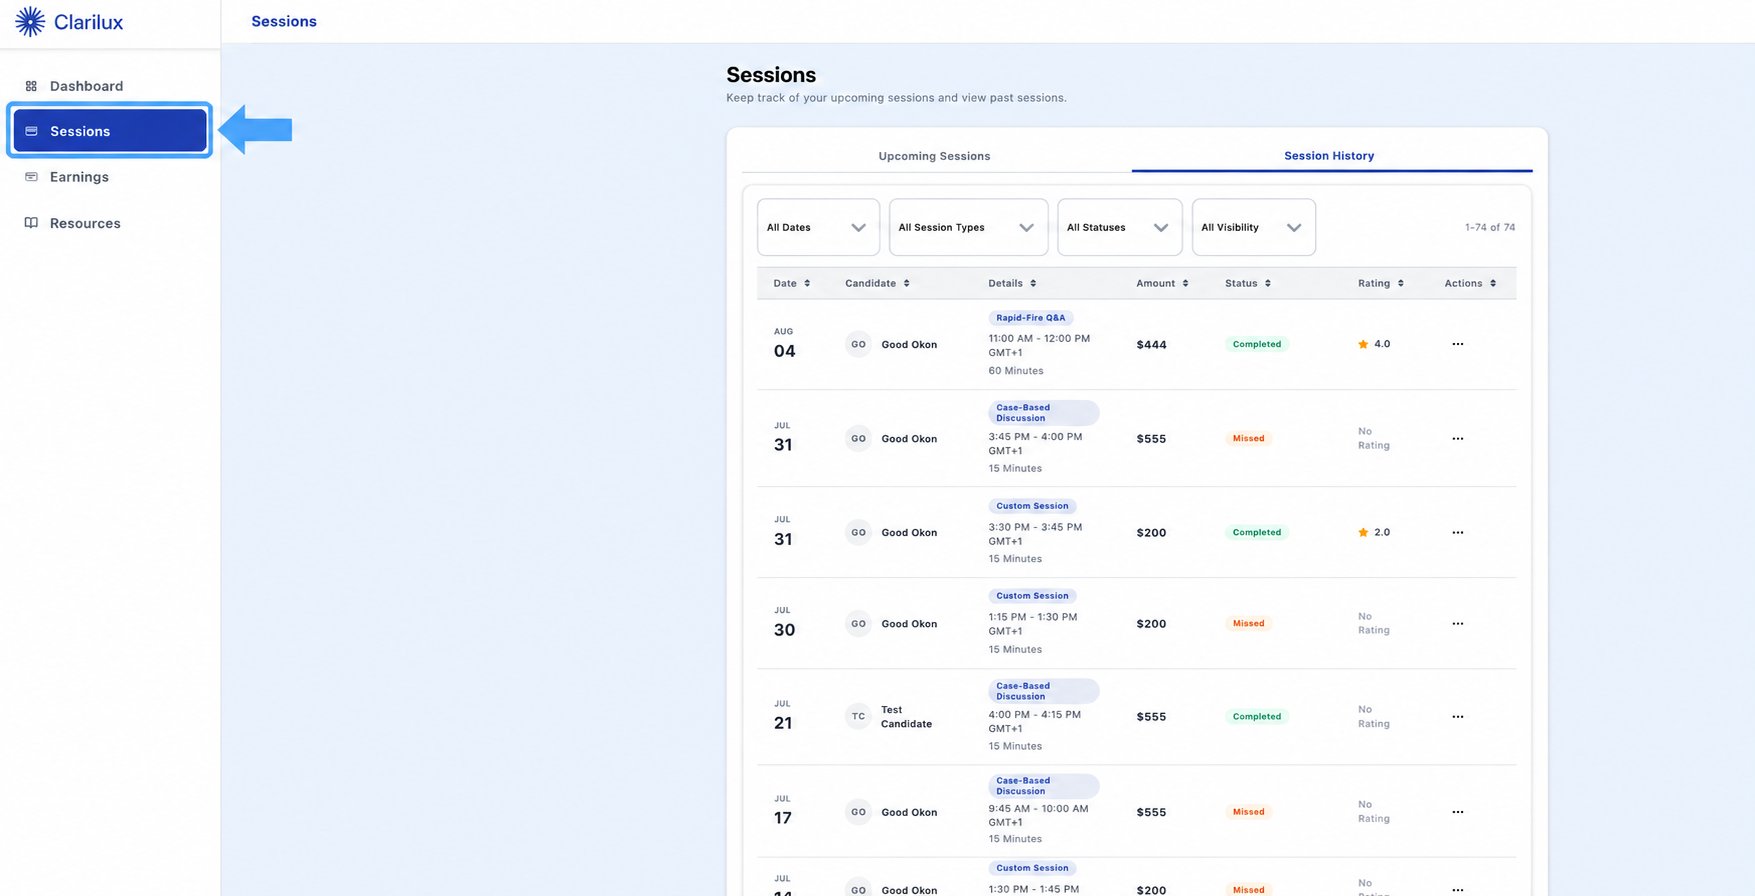
To manage your schedule and review past engagements, click on Sessions from the main left-hand sidebar. This page is divided into two main sections: your current schedule and your past records. Upcoming Sessions This section provides a clear view of all your scheduled, future sessions. To help you organize your upcoming workload, you can apply the following filters:- Session Type: Narrow down your view based on the specific format of the examination (e.g., Rapid Fire Question and Answer, Focus Topic Review, Full Mock Exam).
- Visibility: Filter your schedule to show only sessions located in the public Clarilux marketplace or those belonging to private Clarilux institutions.
- Date: Filter your history by selecting a specific date or timeframe.
- Session Type: Filter past sessions by their examination format.
- Status: Sort your records based on the final outcome of the session (e.g., Completed, Cancelled, or Missed).
- Visibility: Filter past records to see sessions conducted within the public Clarilux marketplace versus private Clarilux institutions.
Earnings
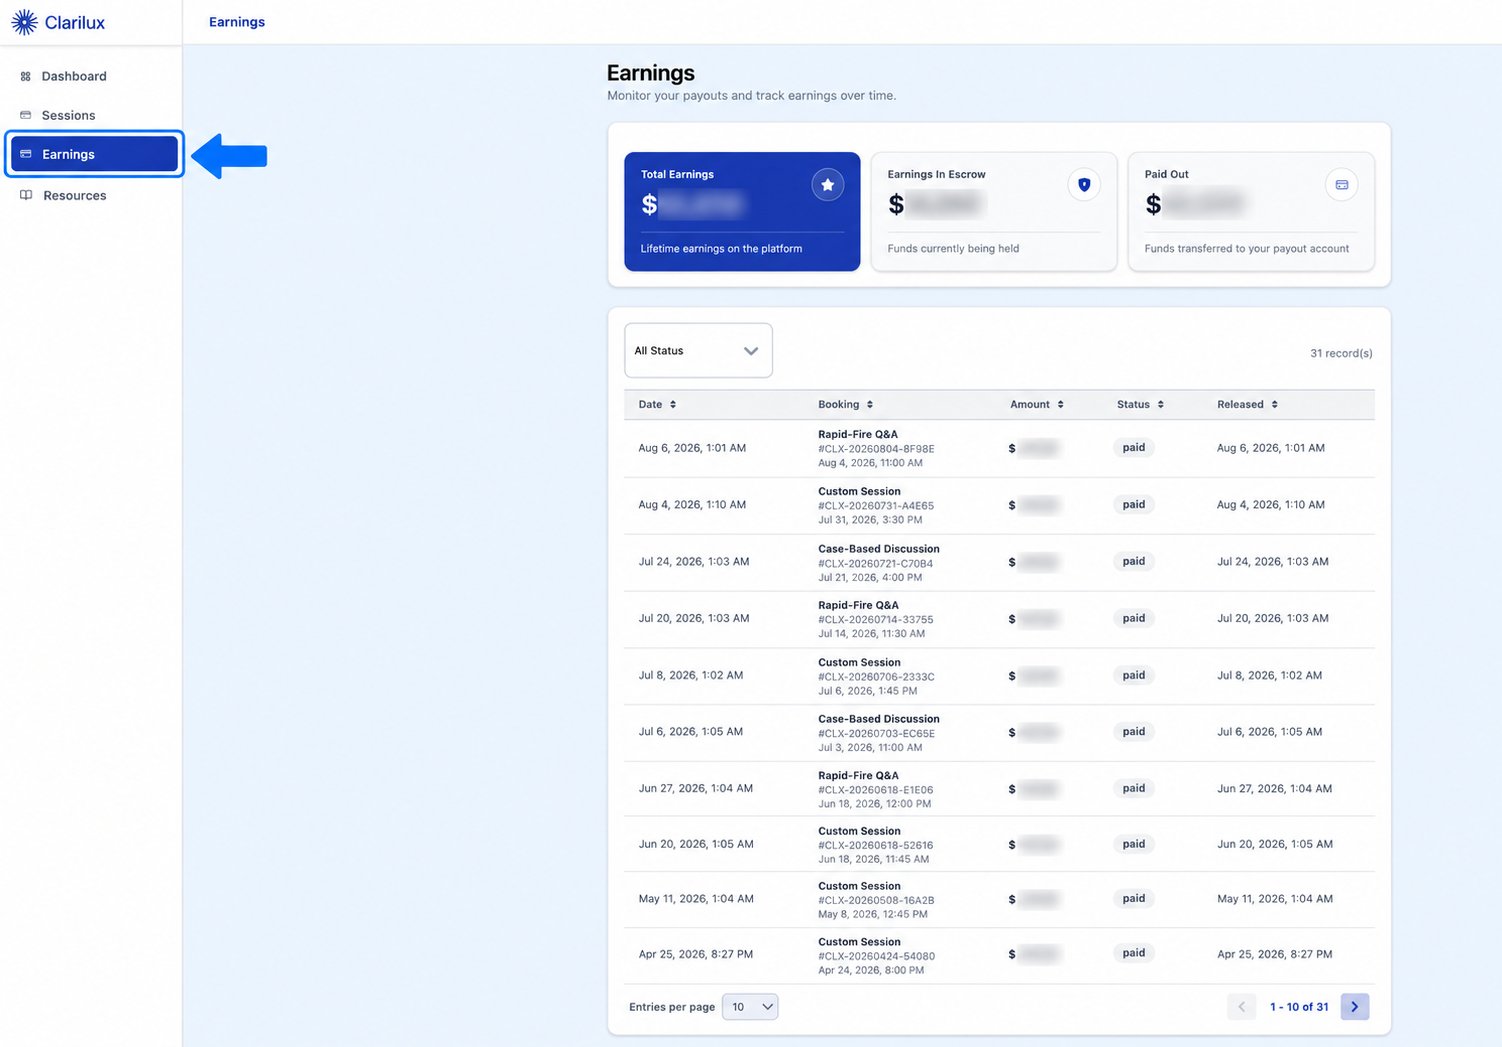
The Earnings feature provides a complete view of your financial activity and is exclusively available for sessions conducted within the public Clarilux. This section allows you to seamlessly monitor your payouts and track your earnings over time. At the top of the Earnings page, you can review a clear snapshot of your account’s financial status through three primary metrics:- Total Earnings: A summary of your lifetime accumulated earnings on the platform.
- Earnings in Escrow: Funds that are currently being held securely prior to processing.
- Paid Out: The total amount of funds that have been successfully transferred to your designated payout account.
- Below your top-level metrics, you will find a comprehensive list of all the earnings you have generated on public Clarilux. To easily navigate this history and locate specific transactions, you can filter all of your past earnings by their current status:
- Paid: Earnings that have been successfully transferred to your account.
- Pending: Earnings that are currently in the queue for processing.
- Failed: Transactions that encountered an error and were unsuccessful.
- Reversed: Earnings that have been returned or undone.
Resources
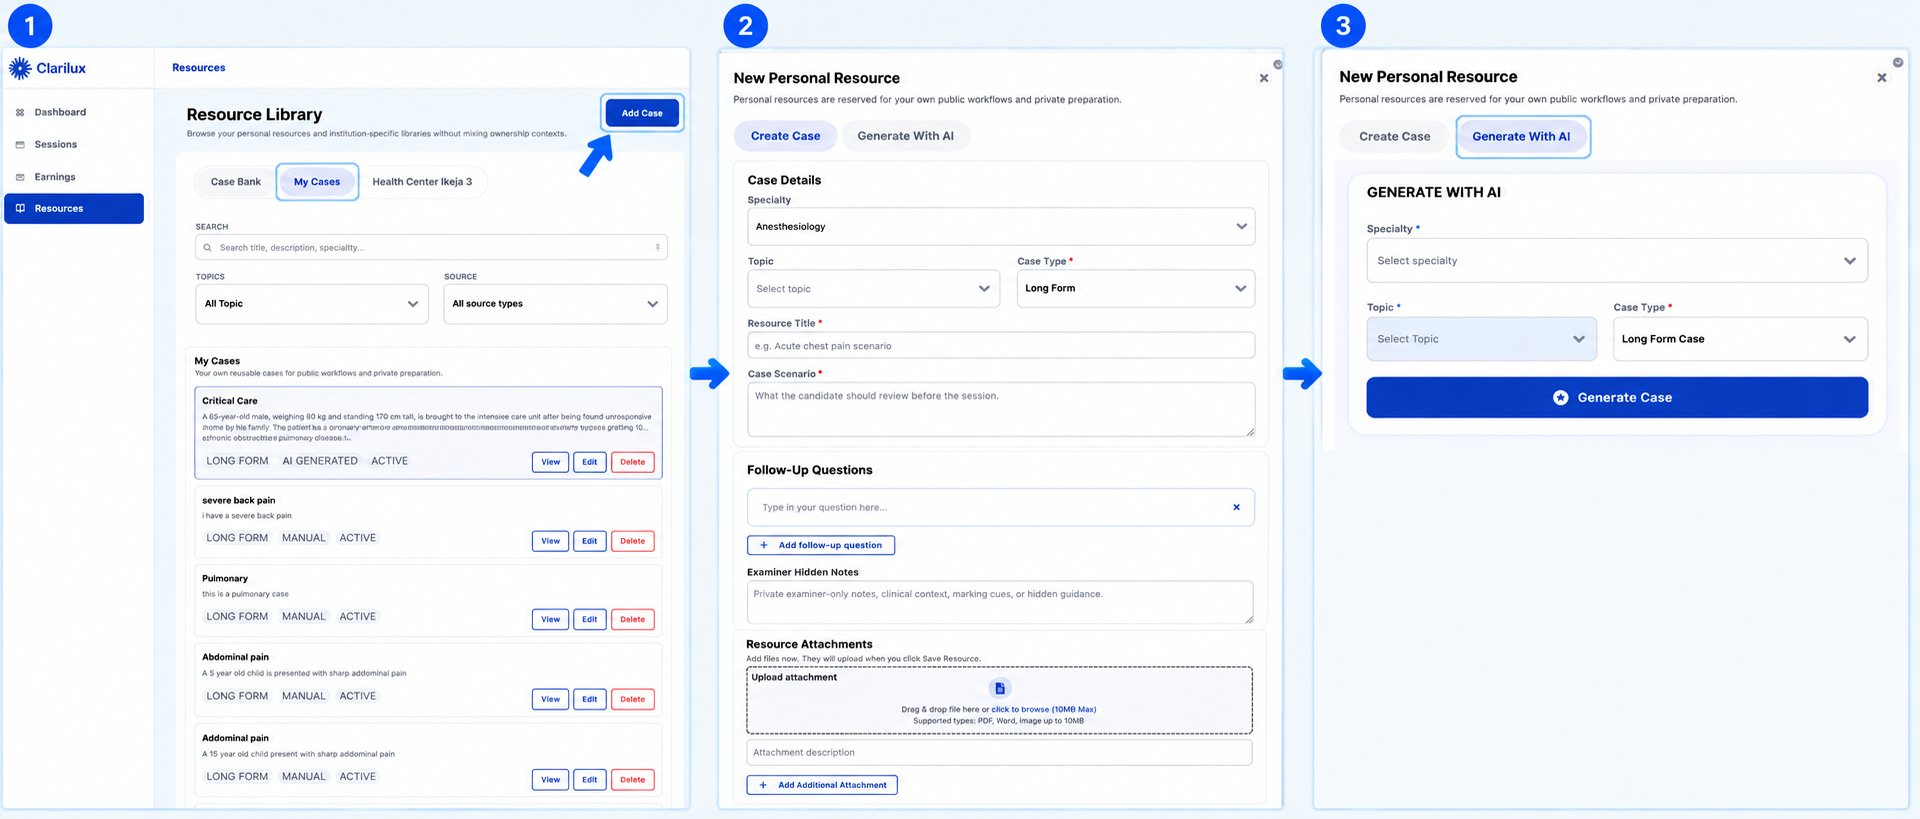
To access your study materials and case files, click on Resources from the main left-hand sidebar. The Resource Library page allows you to seamlessly browse your personal materials, platform-provided cases, and institution-specific libraries all in one centralized location. The library is organized into three distinct sections to help you find exactly what you need for your upcoming sessions:- Case Bank: This is a globally managed repository of platform-created cases provided directly by Clarilux. You can easily navigate this robust library using several search and filter options:
- Search: Find specific materials by entering a title, description, or specialty.
- Filter by Topic: Narrow down cases by categories such as Practical Care, ENT, Endocrine, Orthopedics, and Pediatrics.
- Filter by Source: Choose to view cases that were manually created by experts or cases that were generated by AI.
- My Cases: This section serves as your personal storage area. It houses all the individual cases you have created or uploaded yourself to save for future sessions.
- Institution Cases: This area contains specific, customized cases that belong to the private institutions you are affiliated with.
- Basic Details: Your Specialty is automatically set to Anesthesiology. You will then select the specific Topic and your preferred Case Type (Long Form or Short Form).
- Scenario Details: Input the custom Title for your case and write out the full Case Scenario.
- Follow-Up Questions: Add any specific questions you want to ask the candidate during the session.
- Hidden Notes: You can add private notes or grading rubrics here. These notes are completely hidden from the candidates and are only visible to you when making use of the case during a session.
- Resource Attachments: Upload any necessary supporting files, such as PDFs, Word documents, or images that correspond with the case.
- Simply enter the required Specialty and Topic.
- Select your preferred Case Type (either Long Form or Short Form).
- Click Generate Case to automatically create the scenario.
Profile
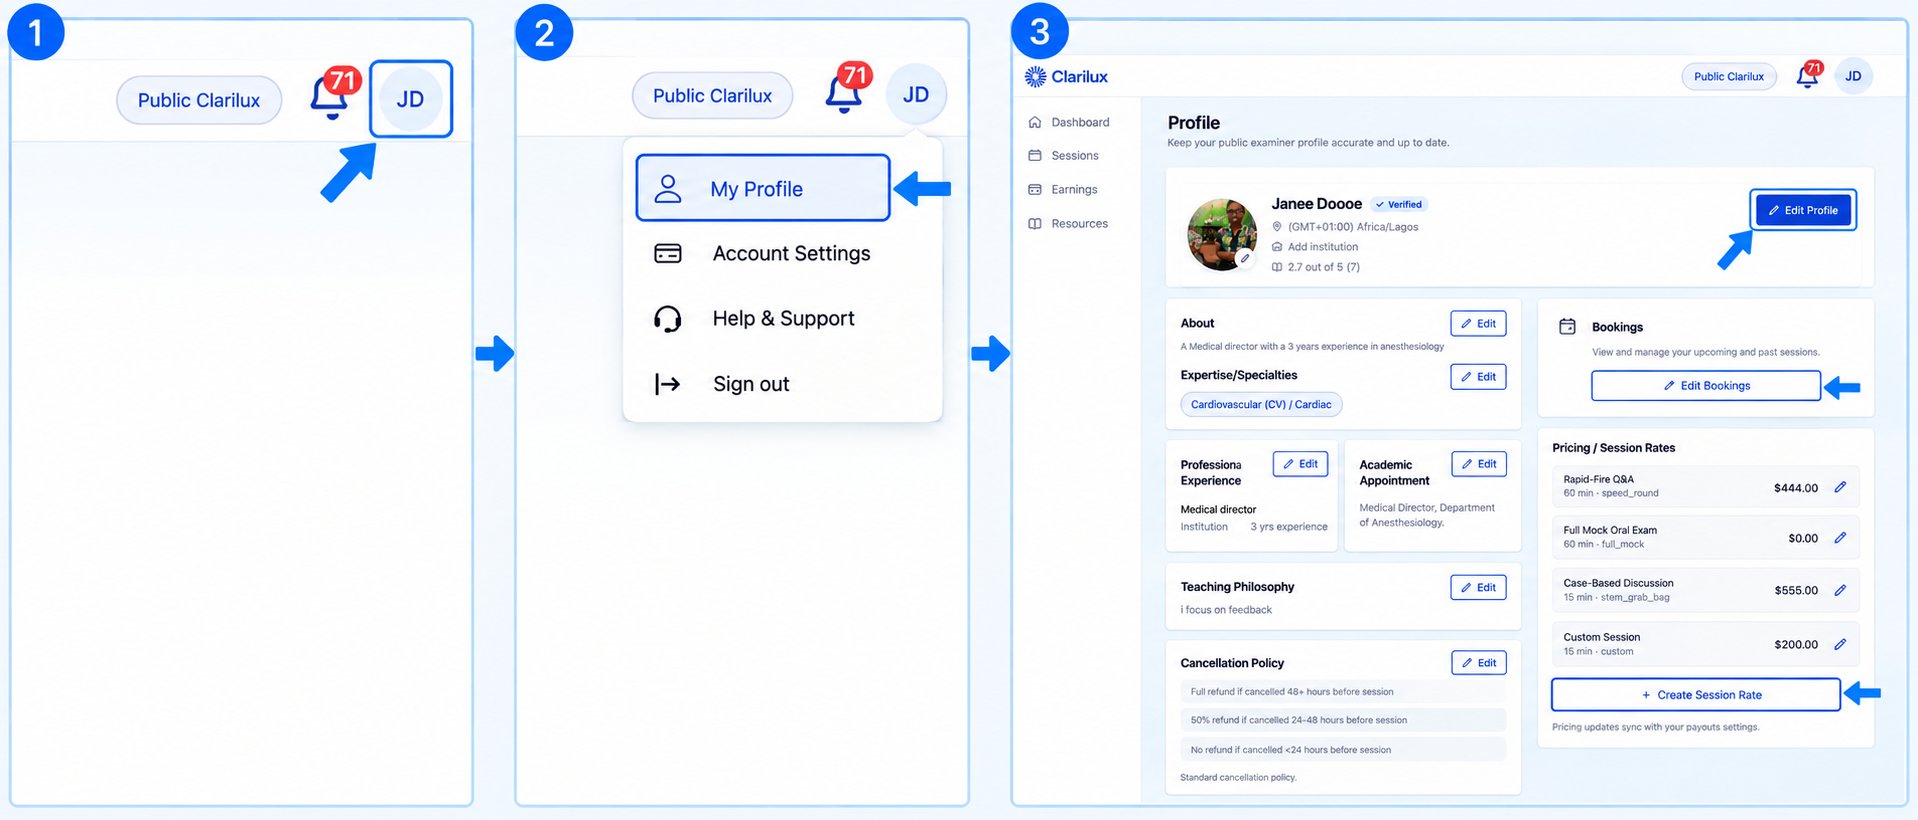
To manage your personal information, professional details, and session pricing, you can access your profile directly from the platform interface. Navigating to Your Profile- Click on your initials located at the top right corner of the application.
- Select My Profile from the dropdown menu to open your profile page.
- On your profile page, you can easily update your core details. You have the ability to edit your Credentials, Title, and your specific Time Zone.
- Once you have made your updates, simply click Save Changes to apply them to your account.
- About Information: Provide a general summary or biography.
- Expertise/Specialties: Highlight your specific areas of medical focus.
- Professional Experience: Add and manage your past and current work history.
- Academic Appointments: List any relevant academic or university roles.
- Teaching Philosophy: Share your personal approach to examining and educating candidates.
- The platform provides a standard cancellation policy by default for your convenience.
- However, you have full control to edit and customize this policy to suit your own taste and scheduling requirements.
- Click the Create Session Rates button.
- Select the specific session formats you want to set a price for. You can choose individual formats such as:
- Full Mock Oral Exam
- Focused Topic Review
- Rapid Fire Q&A
- Case-Based Discussion
- Custom Sessions
- Alternatively, you can choose all of the formats at once.
- For each selected format, input the specific duration the session will take and the corresponding price for that exact duration.
- Once all your durations and prices are accurately inputted, click Save Changes.
Account Settings
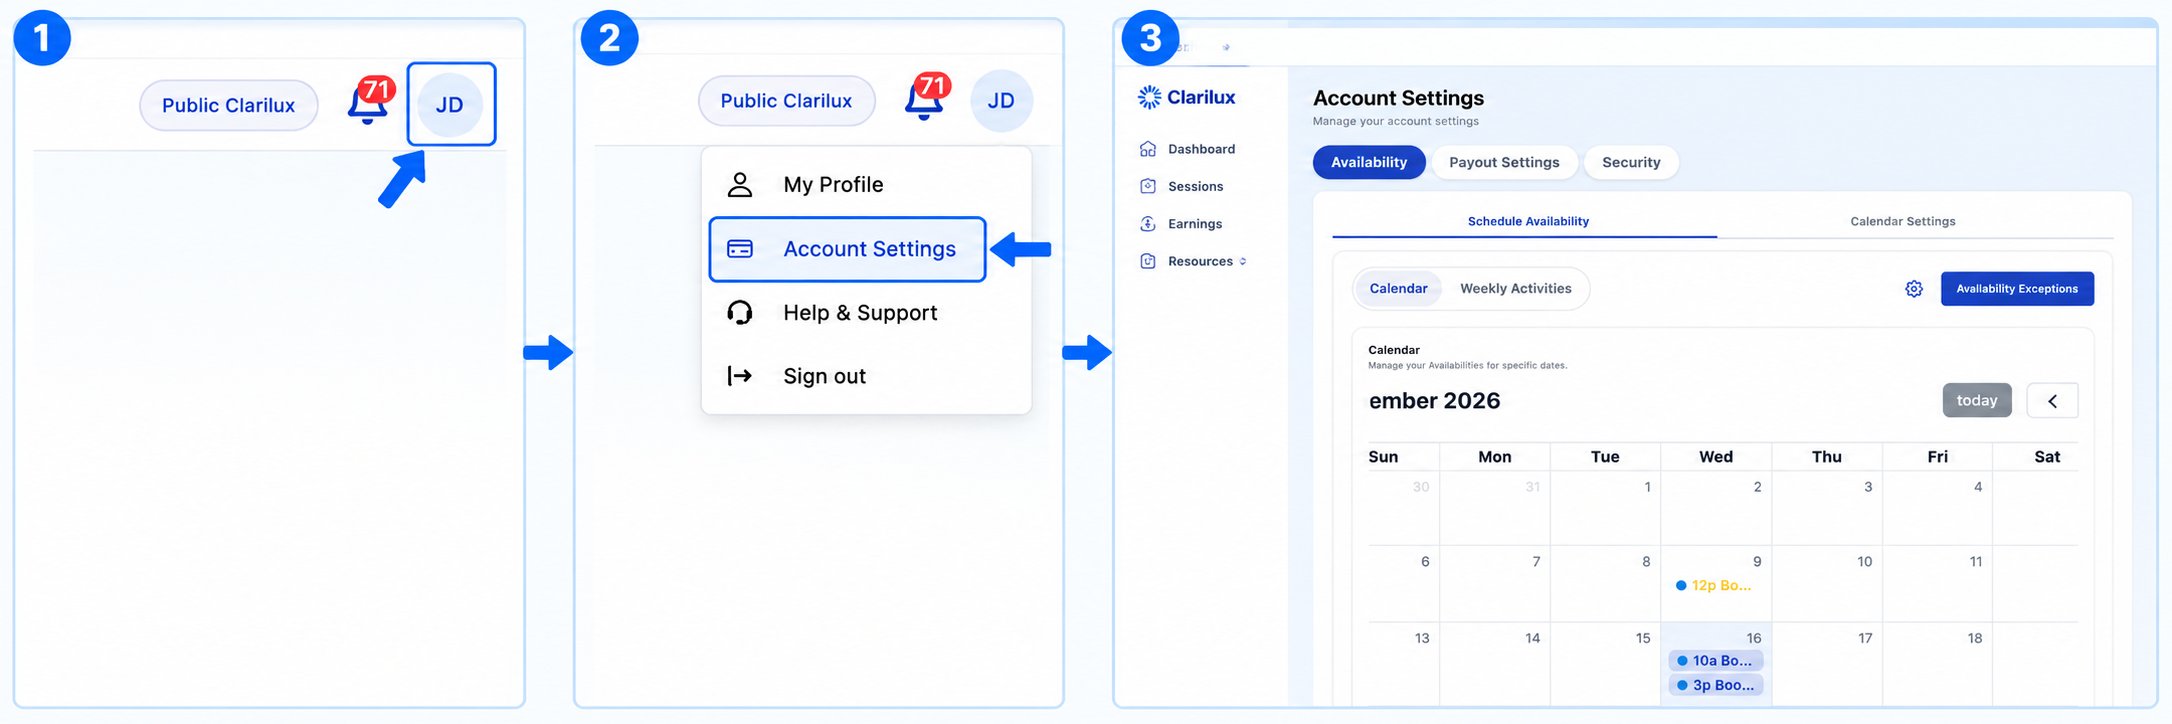
To manage your core preferences, availability, and security, click on your initials at the top right corner of the application and select Account Settings from the dropdown menu. This section is divided into three main areas: Availability, Payout Settings, and Security. The Availability section gives you complete control over when and how candidates can book sessions with you. Scheduling Your Time- Set Availability: You can establish a one-time availability slot or set up a recurring weekly schedule. Define your preferred start and end times for these periods.
- Accept Bookings: Once your weekly availability is configured, toggle on “Accept Bookings” to open your schedule.
- Modify Schedule: You can easily delete or adjust any previously set availabilities if your schedule changes.
- All Marketplace: Selecting this ensures your availability is visible to everyone across both the public Clarilux marketplace and any private institutional environments.
- Private Marketplace: Selecting this restricts your visibility so that only members within the specific institutions you are part of can see your available times.
- Public Marketplace: Selecting this restricts your visibility so that only members within the public clarilux can see your availability
- Availability Exceptions: If you need to take time off, you can set exceptions for vacations, conferences, sick leave, or other events. Input a start date and finish date so candidates know you cannot be booked during this window. You can also add optional notes to your exceptions before clicking Save Exceptions.
- Time Zone: Ensure your schedule aligns perfectly by setting your current local time zone.
- Buffer Time: Prevent back-to-back sessions by establishing a mandatory break between bookings. You can set your buffer time to 15, 30, 45, or 60 minutes. Click Save Changes to apply.
- Minimum Booking Notice: Control exactly how far in advance a candidate must book a session with you. Choose from standard options (24, 48, or 72 hours) or select “Custom” to input your own specific number of hours. Click Save Changes to apply.
- Calendar Settings: Automatically connect your personal or professional calendar directly to your Clarilux account. This integration helps you stay organized and keeps your schedule up to date across all your devices.
- Setup and Update: Configure your primary payout account details.
- Stripe Integration: Connect your Stripe account seamlessly to ensure you receive automated, secure payouts for all of your completed sessions.
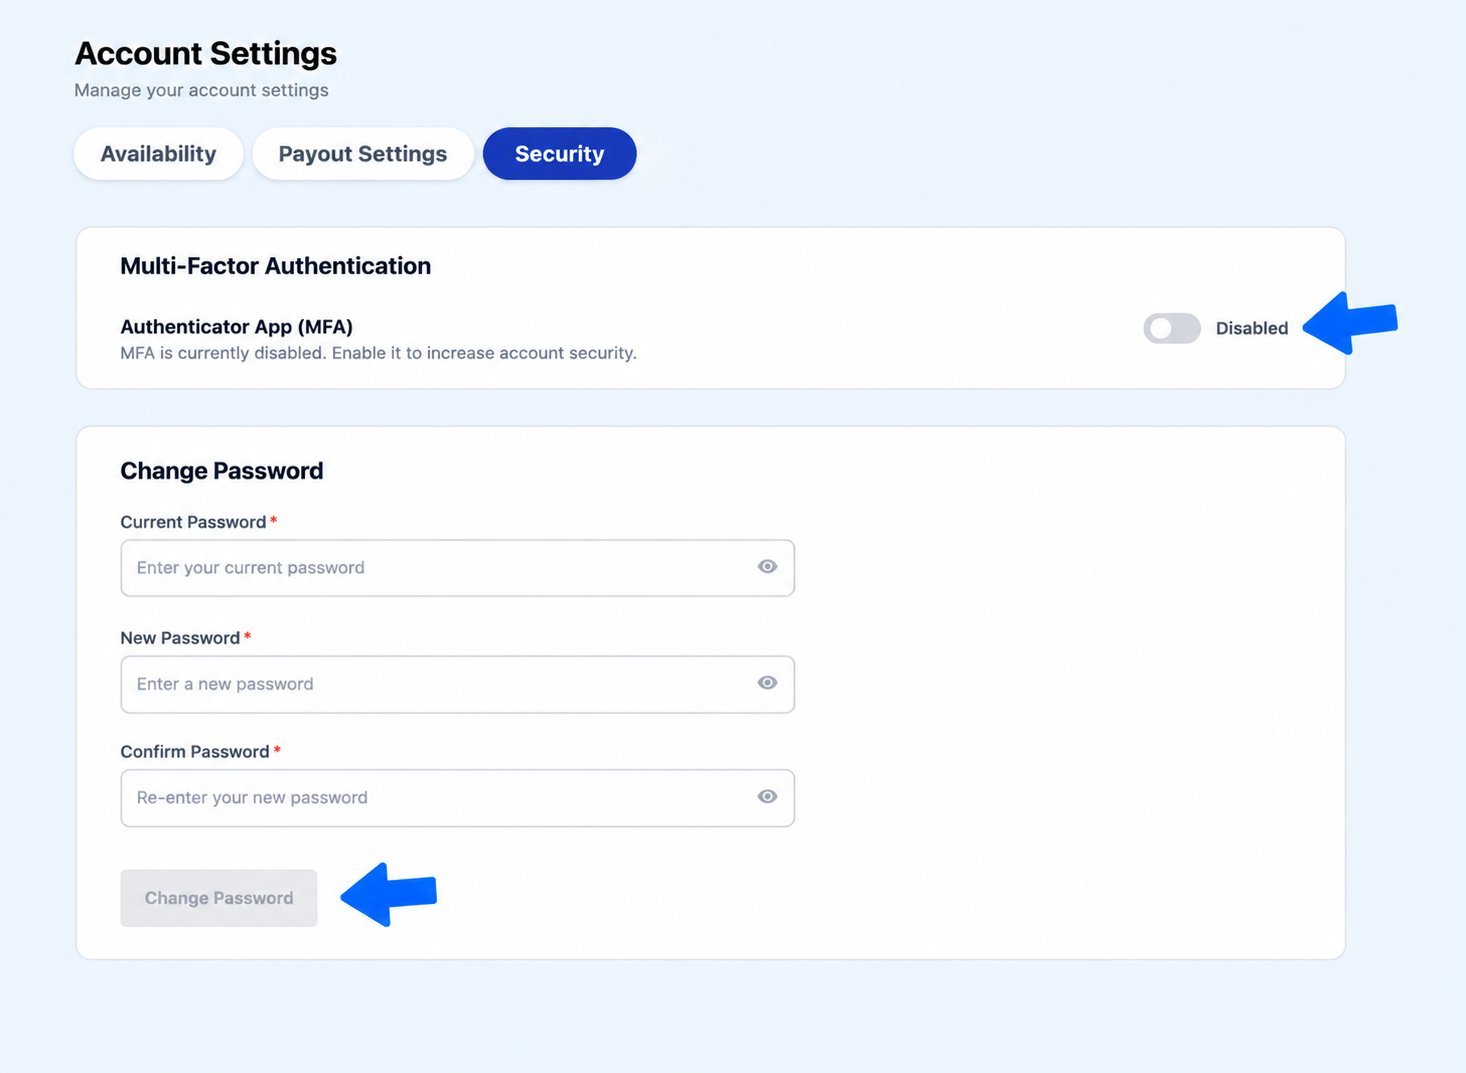
- Multi-Factor Authentication (MFA): Add an extra layer of protection to your account by enabling or disabling MFA.
- Password Management: Update or change your account password securely at any time.